Create or delete a list
With SharePoint 2010 you can create lists while editing pages, as well as from the Site Actions menu. You can create lists by using list templates, such as calendar and tasks, by importing spreadsheets, and by creating custom lists. Lists can include many kinds of data, ranging from text and dates, to calculations based on other columns.
Lists can take advantage of e-mail features. For example, you can add content to discussion boards, announcements, and calendar lists by sending e-mail, if incoming e-mail is enabled on your site. Furthermore, tasks, project tasks, and issue-tracking lists can send e-mail alerts to people when items are assigned to them, if outgoing mail is enabled for the site.
To create or delete a list, you must have at least the permissions obtained by being added to the default Designer SharePoint group for the site.
For other versions of SharePoint, see:
-
Delete a list in SharePoint Online Create a list in SharePoint Online
-
Add, change, or delete a list or library on a page in SharePoint 2013/2016
Updated November 2, 2016 thanks to customer feedback.
What do you want to do?
Create a list by using a list template
SharePoint includes many kinds of list templates, such as calendar, survey, and tasks. Templates make it easier for you to create the lists that you need.
Create a list from the Site Actions menu by using a list template
-
Click Site Actions
 , click View All Site Content, and then click Create
  .
.Note: A SharePoint site can be significantly modified. If you cannot locate an option, such as a command, button, or link, contact your administrator.
-
Under Communications or Tracking click the type of list that you want to create, such as Contacts or Calendar. Find more information about lists and related features in the See Also section.
-
Type the Name for the list. Name is required.
The name appears at the top of the list in most views, becomes part of the Web address for the list page, and appears in site navigation to help users find the list. You can change the name of a list, but the Web address will remain the same.
-
Type the Description for the list. Description is optional.
The description appears underneath the name in most views. Some kinds of lists can receive content by e-mail. If you plan to enable the list to receive content by e-mail, you can add the e-mail address of the list to its description so that people can easily find the e-mail address. You can change the description for a list.
-
To add a link to the Quick Launch, verify that Yes is selected in the Navigation section.
-
If there is an E-mail section, your administrator has enabled lists on your site to receive content by e-mail. To enable people to add content to this list by sending e-mail, click Yes under Enable this list to receive e-mail. Then, in the Email address box, type the first part of the address that you want people to use for the list. This option is not available for all kinds of list.
-
Click Create.
Create a list from a page by using a list template
With SharePoint 2010 you can create lists from the pages that you are editing. This helps you more efficiently and effectively create the pages and the lists that you need.
-
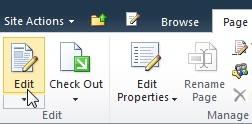
From a page, click the Edit tab, and then click the Edit command.

Note: If the edit command is disabled, you may not have the permissions to edit the page, contact your administrator.
-
Click on the page where you want to add a new list, click the Insert tab, and then click New List.

Note: If you don't see the Edit tab or New List is disabled, you may not have the permissions that are needed to create a list; contact your administrator.
-
In the Create List dialog, type the List Tile, select the type of list that you want to create, and then click OK. Find more information about lists and related features in the See Also section.
Create a custom list
Creating a custom list resembles creating lists from a template, except that the custom list is created with only three columns: Title, Created By, and Modified By. After you create a custom list, you can add columns and make other changes to the list to meet your needs. Find more information about lists and related features in the See Also section.
-
Click Site Actions
 , click View All Site Content, and then click Create
  .
.Note: A SharePoint site can be significantly modified. If you cannot locate an option, such as a command, button, or link, contact your administrator.
-
Under Custom Lists, click Custom List or Custom List in Datasheet View.
Notes:
-
Use custom list when you primarily want to use a form to enter and view data in the list.
-
Use custom list in datasheet view when you primarily want to use a grid, similar to a spreadsheet, to enter and view data in the list. This is helpful when you have several items to update at the same time. Datasheet view requires a control that is compatible with SharePoint 2010, such as Microsoft Office 2010, and ActiveX control support.
-
You can change how you enter and display data in a list after a list is created.
-
-
Type the Name for the list. Name is required.
The name appears at the top of the list in most views, becomes part of the Web address for the list page, and appears in site navigation to help users find the list. You can change the name of a list, but the Web address will remain the same.
-
Type the Description for the list. Description is optional.
The description appears underneath the name in most views. Some kinds of lists can receive content by e-mail. If you plan to enable the list to receive content by e-mail, you can add the e-mail address of the list to its description so that people can easily find the e-mail address. You can change the description for a list.
-
To add a link to the Quick Launch, verify that Yes is selected in the Navigation section.
-
If there is an E-mail section, your administrator has enabled lists on your site to receive content by e-mail. To enable people to add content to this list by sending e-mail, click Yes under Enable this list to receive e-mail. Then, in the Email address box, type the first part of the address that you want people to use for the list. This option is not available for all kinds of list.
-
Click Create.
Create a list by importing a spreadsheet
You can save time creating a list by importing a spreadsheet that has the columns and data that you want for the list. Importing a spreadsheet is also a way to create a list without the default Title column.
You must use a spreadsheet program that is compatible with SharePoint 2010. The following procedure was performed with Microsoft Excel 2010. Your experience may vary if you are using a different spreadsheet program.
-
Click Site Actions
 , click View All Site Content, and then click Create
  .
.Note: A SharePoint site can be significantly modified. If you cannot locate an option, such as a command, button, or link, contact your administrator.
-
Under Custom Lists, click Import Spreadsheet.
-
Type the Name for the list. Name is required.
The name appears at the top of the list in most views, becomes part of the Web address for the list page, and appears in site navigation to help users find the list. You can change the name of a list, but the Web address will remain the same.
-
Type the Description for the list. Description is optional.
The description appears underneath the name in most views. Some kinds of lists can receive content by e-mail. If you plan to enable the list to receive content by e-mail, you can add the e-mail address of the list to its description so that people can easily find the e-mail address. You can change the description for a list.
-
Browse or type the File Location of the spreadsheet that you want to import and then click Import.
-
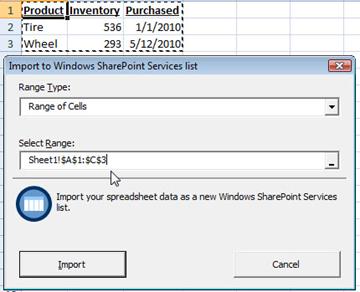
In the Import to Windows SharePoint Services list dialog, select the Range Type, in Select Range specify the range in the spreadsheet that you want to use to create your list.

Note: Depending on your spreadsheet program, you may be able to select the range of cells that you want directly in the spreadsheet. A table range and a named range must already be defined in the spreadsheet to be able to select it in the Import to Windows SharePoint Services list dialog.
-
Click Import.
The types of columns that are created for a list are based on the kinds of data that are in the columns of the spreadsheet. For example, a column in the spreadsheet that contains dates will typically be a date column in the SharePoint list. The following image is the SharePoint list that was created by importing the spreadsheet in the previous image.

After you import a spreadsheet, check the columns of the list to make sure that the data was imported as you expected. For example, you may want to specify that a column contains currency instead of a number. To view or change list settings, open the list, click the List tab, and then click List Settings.
Delete a list
Use the following procedure to delete a list.
Go to the list that you want to delete.
-
Click the List tab and then click List Settings.
-
On the list settings page, click Delete this list, and then click OK.
Note: If List Settings is disabled or Delete this list isn't on the list settings page, you may not have the necessary permissions to modify the settings or delete the list, contact your administrator.
Next steps
Columns You can configure what type of data a list contains by adding and deleting columns.
Views You can configure how the data in a list is displayed by creating views.
Permissions You can configure who can access a list and what they can do with list data by configuring permissions.
Recycle Bin You may be able to recover a deleted list from the recycle bin.
Find more information about lists and related features in the See Also section.
Leave us a comment
Was this article helpful? If so, please let us know at the bottom of this page. If it wasn't helpful, let us know what was confusing or missing. We'll use your feedback to double-check the facts, add info, and update this article.
No comments:
Post a Comment