Add a built-in form action to a Data View
After you add form functionality to a Data View, you can quickly add a few simple built-in form actions to enable your customers to do things like save changes made in the form, cancel changes, and even return back to the Data View from which the customer opened the form.
For more information on adding form functionality to a Data View, see the articles Insert a Data View as a form and Edit, delete, or insert records in a Data View.
In this article
What is a form action?
Form actions are the behaviors that are executed when a form is posted back to the server for processing. Data Views that have been inserted as a form support a variety of form actions.
When you click Save, the Save action — the form action that commits the changes to the data — is triggered. When you click Cancel, the Cancel action — the form action that cancels the changes to the data — is triggered.
What can I do with built-in form actions?
Built-in form actions are added to a form from the Actions List in the Form Actions dialog box. The following are the built-in form actions that are provided with Microsoft Office SharePoint Designer 2007:
-
Commit saves to the original data source any changes that have been made.
-
Refresh refreshes the view of the data form on the page.
-
Cancel cancels any changes that have been made to the data.
-
Navigate to source redirects the user to a page specified by a variable in the Source query string.
-
Navigate to page redirects the user to another page in the browser.
Add the Navigate to source form action to an existing button
Navigation between a view and a form
You can use the Navigate to source form action to return a customer back to the source Data View from a target Data View that was reached via a hyperlink. This form action is especially useful when you need your multiple-item Data Views to link to a Single Item Form that is used for creating or editing records.
For example, Northwind Traders, a gourmet food distribution company, is building an intranet Web application to view and manage its products. You want to enable your customers to link from a Data View to an edit form, and then return automatically to the Data View when they submit their changes in the edit form.
Add a hyperlink to the source Data View
In order for the Navigate to source action to function for your buttons, you must first make sure that you include the attributes that add the data to the URL that the Navigate to source form action needs to return the customer to the source. The attributes you need to add are the onclick and target attributes.
For example, the <a> tag for the hyperlink in the source Data View might resemble the following.
          <td class="ms-vb">
   <a href="http://northwindtraders/Lists/Products/EditForm.aspx?ID={@ID}"
      onclick="GoToLink(this);return false;"
      target="_self">
      <xsl:value-of select="@Product_x0020_Name" />
   </a>
</td>
For more information about how to add these attributes to a hyperlink in a Data View, see the article Add a hyperlink to a Data View.
Add the Navigate to source action to the target Data View
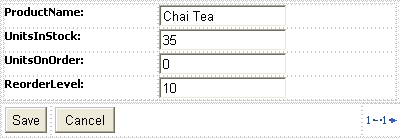
For example, you have a single-item form such as this.

When the customer of your Web application clicks Save or Cancel, you want that customer to be returned to the source Data View from which they came.
-
In Design view, on the page that contains the single-item form, click Save to select the button.

-
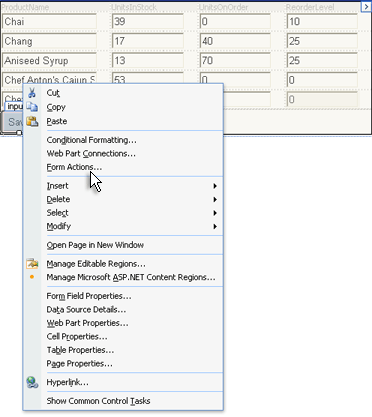
After the button is selected, right-click it, and then click Form Actions.
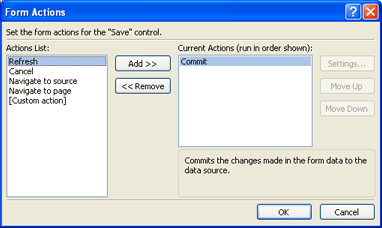
The Form Actions dialog box appears.

By default, the Commit action is already in the Current Actions list. The Commit action saves the changes to the data.
-
In the Actions List list, click Navigate to source, and then click Add.
-
Click OK.
-
Repeat the previous steps for the Cancel button.
Now, when a visitor viewing the site in a browser modifies data in the form and then clicks Save (or cancels their changes by clicking Cancel), they are automatically returned to the Data View from which they came.
Add the Navigate to page form action to an existing button
You can easily add the Navigate to page built-in form action to a Data View that has been inserted as a form.
To follow the example, first create the Data View described in the article Insert a Data View as a form.
When you insert a Data View as a form, the form includes both a Save button and a Cancel button for saving or canceling changes to the data. The associated actions are triggered when the user clicks either button. When you apply a new form action, you are actually adding the action to the button. When the user clicks the button, the new action is triggered in addition to the default action. You can also change the order in which the actions are run, or add or remove actions at any time.
In this example, a user will be directed to a new page after saving changes to the data. For the destination page, you can use any existing page in your Folder List, or create a new page.
-
Open the page that contains the Data View to which you want to add a form action.
-
On the page with the form, click Save to select the button.

After the button is selected, right-click it, and then click Form Actions on the shortcut menu.

The Form Actions dialog box appears.

By default, the Commit action is already in the Current Actions list. The Commit action saves the changes to the data.
-
In the Actions List list, click the new built-in action that you want to add when a user clicks Save in the form.
To follow the example, click Navigate to page, and then click Add.
Note: When an action in the Current Actions list is selected, a description of the selected action appears in the space under the Current Actions list.
-
To specify which page the user is redirected to when they click Save, click Navigate to page, and then click Settings.
-
In the Form Actions Settings dialog box, click Browse.
-
Locate the page to which you want to redirect the user, click it, and then click OK three times.
-
On the File menu, click Save to save the changes to the form. Alternatively, you can press CTRL+S.
Now, when a visitor viewing the site in a browser modifies data in the form and then clicks Save, they are automatically redirected to the page specified in the Form Actions Settings dialog box.
Remove or change the order of actions
-
The actions in the Current Actions list in the Form Actions dialog box occur in the order in which they appear on the list. To change the order in which the actions occur, select an action in the Current Actions list, and then click the Move Up and Move Down buttons to position the action where you want it.
-
You can easily remove an action from the Current Actions list by clicking the action, and then clicking Remove.
Microsoft Office Tutorials: Add A Built-In Form Action To A Data View >>>>> Download Now
ReplyDelete>>>>> Download Full
Microsoft Office Tutorials: Add A Built-In Form Action To A Data View >>>>> Download LINK
>>>>> Download Now
Microsoft Office Tutorials: Add A Built-In Form Action To A Data View >>>>> Download Full
>>>>> Download LINK K7