Create Custom Functions in Excel 2007
Microsoft Office Excel 2007 Inside Out
By Mark Dodge and Craig Stinson
Mark Dodge is a former senior technical writer for the Microsoft Office User Assistance group, and is the coauthor of four editions of Running Microsoft Excel. He was also a technical editor for over a dozen books on Microsoft applications. Mark has been honored with six awards from the Society for Technical Communication.
Craig Stinson has been an industry journalist since 1981, serving as a contributing editor of PC Magazine and author of the several editions of the best-selling Running Microsoft Windows®. In addition to being a coauthor on Running Microsoft Excel, he is the coauthor of Running Microsoft Windows NT® Workstation, Version 4. He has also written music reviews for such well-known publications as Billboard, the Boston Globe, and the Christian Science Monitor.
To learn more about other books on the 2007 Microsoft Office system, visit Microsoft Press.
In this article
Although Microsoft Office Excel 2007 includes a multitude of built-in worksheet functions, chances are it doesn't have a function for every type of calculation you perform. The designers of Excel couldn't possibly anticipate every calculation need of every user. So instead, Excel 2007 provides you with the ability to create custom functions, which are explained in this article.
Creating a Simple Custom Function
Custom functions, like macros, use the Visual Basic for Applications (VBA) programming language. They differ from macros in two significant ways. First, they use function procedures instead of sub procedures. That is, they start with a Function statement instead of a Sub statement and end with End Function instead of End Sub. Second, they perform calculations instead of taking actions. Certain kinds of statements (such as statements that select and format ranges) are excluded from custom functions. In this article, you'll learn how to create and use custom functions.
Suppose your company offers a quantity discount of 10 percent on the sale of a product, provided the order is for more than 100 units. In the following paragraphs, you'll build a function to calculate this discount.
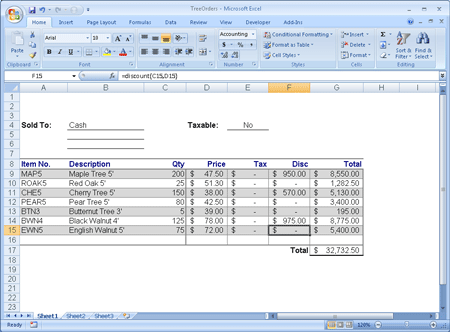
The worksheet in Figure 1 shows an order form that lists each item, the quantity, the price, the discount (if any), and the resulting extended price.
To create a custom DISCOUNT function in this workbook, follow these steps:
-
Press Alt+F11 to open the Visual Basic Editor, and then click Insert, Module. A new module appears, as shown in Figure 2.
 Figure 1 In column F, we want to calculate the discount for each item ordered.
 -
In the new module, type the following code. To make the code more readable, use the Tab key to indent lines. (The indentation is for your benefit only and is optional. The code will run with or without indentation.) After you type an indented line, the Visual Basic Editor assumes your next line will be similarly indented. To move out (that is, to the left) one tab character, press Shift+Tab.
Function Discount(quantity, price)
If quantity >=100 Then
Discount = quantity * price * 0.1
Else
Discount = 0
End If
Discount = Application.Round(Discount, 2)
End Function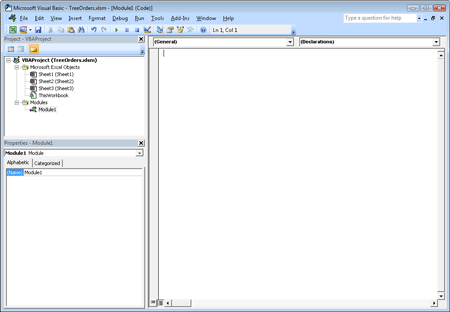 Figure 2 Clicking Insert, Module adds a new module to the workbook.
Using Custom Functions
Now you're ready to use the new DISCOUNT function. Press Alt+F11 to switch to the worksheet shown in Figure 1. Select cell F9, and type the following:
=DISCOUNT(C9,D9)
Excel calculates the 10 percent discount on 200 units at $47.50 per unit and returns $950.00.
In the first line of your VBA code, Function Discount(quantity, price), you indicated that the DISCOUNT function requires two arguments, quantity and price. When you call the function in a worksheet cell, you must include those two arguments. In the formula =DISCOUNT(C9,D9), C9 is the quantity argument, and D9 is the price argument. Now you can copy the DISCOUNT formula to F10:F15 to get the worksheet shown in Figure 3.
Let's consider how Excel interprets this function procedure. When you press Enter, Excel looks for the name DISCOUNT in the current workbook and finds that it is a procedure in Module1. The argument names enclosed in parentheses—quantity and price—are placeholders for the values on which the calculation of the discount is based.
The If statement in the following block of code examines the quantity argument and determines whether the number of items sold is greater than or equal to 100:
        If quantity >= 100 Then
 Discount = quantity * price * 0.1
Else
 Discount = 0
End If
If the number of items sold is greater than or equal to 100, VBA executes the following statement, which multiplies the quantity value by the price value and then multiplies the result by 0.1:
Discount = quantity * price * 0.1
The result is stored as the variable Discount. A VBA statement that stores a value in a variable is called an assignment statement, because it evaluates the expression on the right side of the equal sign and assigns the result to the variable name on the left. Because the variable Discount has the same name as the function procedure, the value stored in the variable is returned to the worksheet formula that called the DISCOUNT function.
If quantity is less than 100, VBA executes the following statement:
Discount = 0
Finally, the following statement rounds the value assigned to the Discount variable to two decimal places:
Discount = Application.Round(Discount, 2)
VBA has no ROUND function, but Excel does. Therefore, to use ROUND in this statement, you tell VBA to look for the Round method (function) in the Application object (Excel). You do that by adding the word Application before the word Round. Use this syntax whenever you need to access an Excel function from a VBA module.
Understanding Custom Function Rules
A custom function must start with a Function statement and end with an End Function statement. In addition to the function name, the Function statement usually specifies one or more arguments. You can, however, create a function with no arguments. Excel includes several built-in functions—RAND and NOW, for example—that don't use arguments.
Following the Function statement, a function procedure includes one or more VBA statements that make decisions and perform calculations using the arguments passed to the function. Finally, somewhere in the function procedure, you must include a statement that assigns a value to a variable with the same name as the function. This value is returned to the formula that calls the function.
Using VBA Keywords in Custom Functions
The number of VBA keywords you can use in custom functions is smaller than the number you can use in macros. Custom functions are not allowed to do anything other than return a value to a formula in a worksheet or to an expression used in another VBA macro or function. For example, custom functions cannot resize windows; edit a formula in a cell; or change the font, color, or pattern options for the text in a cell. If you include "action" code of this kind in a function procedure, the function returns the #VALUE! error.
The one action a function procedure can do (apart from performing calculations) is display a dialog box. You can use an InputBox statement in a custom function as a means of getting input from the user executing the function. You can use a MsgBox statement as a means of conveying information to the user. You can also use custom dialog boxes, or UserForms, but that's a subject beyond the scope of this introduction.
Documenting Macros and Custom Functions
Even simple macros and custom functions can be difficult to read. You can make them easier to understand by typing explanatory text in the form of comments. You add comments by preceding the explanatory text with an apostrophe. For example, Figure 4 shows the DISCOUNT function with comments. Adding comments like these makes it easier for you or others to maintain your VBA code as time passes. If you need to make a change to the code in the future, you'll have an easier time understanding what you did originally.
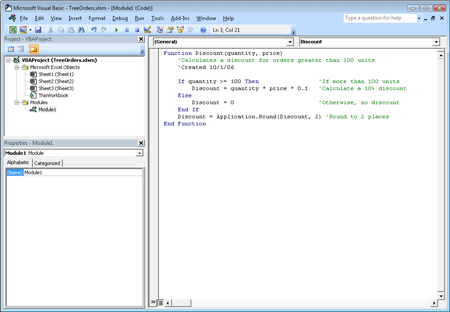
An apostrophe tells Excel to ignore everything to the right on the same line, so you can create comments either on lines by themselves or on the right side of lines containing VBA code. You might begin a relatively long block of code with a comment that explains its overall purpose and then use inline comments to document individual statements.
Another way to document your macros and custom functions is to give them descriptive names. For example, rather than name a macro Labels, you could name it Month Labels to describe more specifically the purpose the macro serves. Using descriptive names for macros and custom functions is especially helpful when you've created many procedures, particularly if you create procedures that have similar but not identical purposes.
How you document your macros and custom functions is a matter of personal preference. What's important is to adopt some method of documentation and use it consistently.
Making Your Custom Functions Available Anywhere
To use a custom function, the workbook containing the module in which you created the function must be open. If that workbook is not open, you get a #NAME? error when you try to use the function. Even if the workbook is open, if you use the function in a different workbook, you must precede the function name with the name of the workbook in which the function resides. For example, if you create a function called DISCOUNT in a workbook called Personal.xlsb and you call that function from another workbook, you must type =personal.xlsb!discount(), not simply =discount().
You can save yourself some keystrokes (and possible typing errors) by selecting your custom functions from the Insert Function dialog box. Your custom functions appear in the User Defined category:
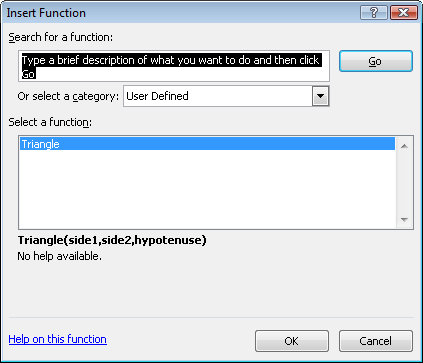
An easier way to make your custom functions available at all times is to store them in a separate workbook and then save that workbook as an add-in. You can then make the add-in available whenever you run Excel. Here's how to do this:
-
After you have created the functions you need, click the Microsoft Office Button, and click Save As.
-
In the Save As dialog box, open the Save As Type drop-down list, and select Excel Add-In. Save the workbook under a recognizable name—such as MyFunctions—in the AddIns folder. (The Save As dialog box will propose that folder, so all you need to do is accept the default location.)
-
After you have saved the workbook, click the Microsoft Office Button, and click Excel Options.
-
In the Excel Options dialog box, click the Add-Ins category.
-
In the Manage drop-down list, select Excel Add-Ins. Then click the Go button.
-
In the Add-Ins dialog box, select the check box beside the name you used to save your workbook, as shown below.
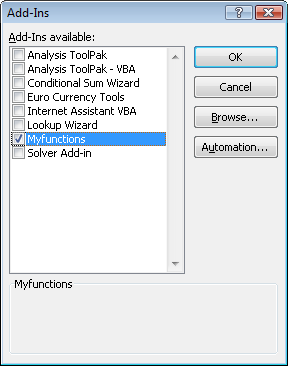
After you follow these steps, your custom functions will be available each time you run Excel. If you want to add to your function library, press Alt+F11 to return to the Visual Basic Editor. As Figure 5 shows, in the Visual Basic Editor Project Explorer under a VBAProject heading, you will see a module named after your add-in file. (Your add-in will have the extension .xlam.)
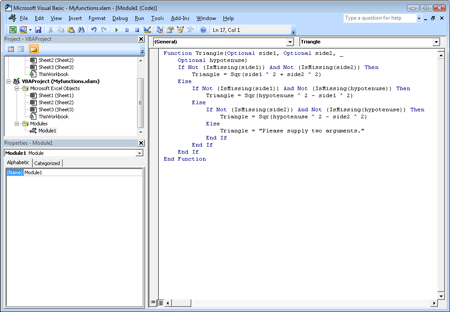
Double-clicking that module in the Project Explorer causes the Visual Basic Editor to display your function code. To add a new function, position your insertion point after the End Function statement that terminates the last function in the Code window, and begin typing. You can create as many functions as you need in this manner, and they will always be available in the User Defined category in the Insert Function dialog box.

No comments:
Post a Comment