Sometimes you need data that is stored outside of Excel, such as a local file or database. In this case, you connect to the external data source first, and then you can work with the data.
For more information about using Power Query (also called Get & Transform), see Import data in Excel for Mac (Power Query).
-
Open the Excel workbook.
-
If you get a security warning about external data connections being disabled, select Enable Content.
-
If the Grant File Access dialog box appears, select Select, and then select Grant Access to the top-level folder containing the data source files.
-
Select Data > From Text (Legacy). The Finder dialog box appears.
-
Locate the .txt or .csv file, and the select Open. The Text Import Wizard appears.
Tip Repeatedly check the Preview of selected data pane to confirm your choices. -
In the first page, do the following:
File Type To choose the type of text file, select Delimited or Fixed width.
Row Number In Start import at row, select a row number to specify the first row of data that you want to import.
Character Set In File origin, select the character set that is used in the text file. In most cases, you can leave this setting at its default. -
In the second page, do the following:
Delimited
If you chose Delimited on the first page, under Delimiters, select the delimiter character or use the Other check box to enter one not listed.
Select Treat consecutive delimiters as one if your data contains a delimiter of more than one character between data fields or if your data contains multiple custom delimiters.
In Text qualifier, select the character that encloses values in your text file, which is most often the quote (") character.Fixed width
If you chose Fixed width on the first page, follow the instructions to create, delete, or move a break line in the Preview of selected data box. -
In the third page, do the following:
For each column under Preview of selected data, select it, and then change it to a different column format if you want. You can further set the date format and select Advanced to change numeric data settings. You can also convert the data after you import it.
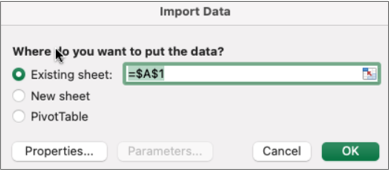
Select Finish. The Import Data dialog box appears. -
Choose where you want the data to be added: either on the existing sheet, on a new sheet, or in a PivotTable.
-
Select OK.
To ensure the connection is working, enter some data, and then select Connections > Refresh.
-
Select Data > From SQL Server ODBC. The Connect to SQL Server ODBC Data Source dialog box appears.

-
Enter the server in the Server Name box, and optionally, enter the database in the Database Name box.
Get this information from the database administrator. -
Under Authentication, select a method from the list: Username/Password, Kerberos, or NTLM.
-
Enter credentials in the User Name and Password boxes.
-
Select Connect. The Navigator dialog box appears.
-
In the left pane, navigate to the table you want, and then select it.
-
Confirm the SQL statement on the right pane. You can change the SQL statement as you see fit.
-
To preview the data, select Run.
-
When you're ready, select Return Data. The Import Data dialog box appears.
-
Choose where you want the data to be added: either on the existing sheet, on a new sheet, or in a PivotTable.
-
To set connection properties on the Usage and Definition tabs of the Properties dialog box, select Properties. After you import the data, you can also select Data > Connections, and then in the Connection Properties dialog box, select Properties.
-
Select OK.
-
To ensure the connection is working, enter some data, and then select Data > Refresh All.
If you want to use an external source that is not a SQL Database (for example, FileMaker Pro), you can use an Open Database Connectivity (ODBC) driver installed on your Mac. Information on drivers is available on this web page. Once the driver for your data source is installed, follow these steps:
-
Select Data > From Database (Microsoft Query).
-
Add the data source for your database, and then select OK.
-
At the SQL Server credentials prompt, enter the authentication method, the username and the password.

-
On the left, select the arrow next to the server to see the databases.
-
Select the arrow next to the database you want.
-
Select the table you want.
-
To preview the data, select Run.
-
When you're ready, select Return Data.
-
In the Import Data dialog box, choose where you want the data to be located: either on the existing sheet, on a new sheet, or in a PivotTable.
-
Select OK.
-
To ensure the connection is working, enter some data, and then select Data > Refresh All.
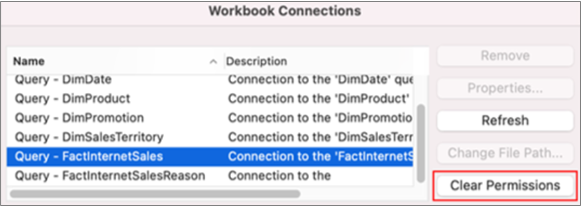
If your permissions are not working, you may not to clear them first, and then log in.
-
Select Data > Connections. The Workbook Connections dialog box appears.
-
Select the connection you want in the list, and then select Clear Permissions.
See Also
To import data from a database, such as Microsoft SQL Server, you must have an ODBC driver that is compatible with Microsoft Query installed on your computer. Compatible ODBC drivers are available from third-party vendors. For more information, see ODBC drivers that are compatible with Excel for Mac. For more information about installing ODBC drivers, see Microsoft Query Help.
-
On the Data menu, point to Get External Data, and then click New Database Query.
-
Use Microsoft Query to connect to a data source and to create a query. When you have finished, click Return Data to import the data into Excel.
For more information about connecting to a data source and using Microsoft Query, see Microsoft Query Help.
-
In the Returning External Data to Microsoft Excel dialog box, do any of the following:
| To | Do this |
|---|---|
| Choose query definition, refresh control, and data layout options | Click Properties. |
| Change the settings for a parameter query | Click Parameters. |
| Return the external data to the active sheet | Click Existing sheet. On your sheet, click the cell where you want to place the upper-left corner of the external data range, and then click OK. |
| Return the external data to a new sheet | Click New sheet, and then click OK. Excel adds a new sheet to your workbook, and automatically pastes the external data range at the upper-left corner of the new sheet. |
| Create a PivotTable by using the external data | Click PivotTable, and then click OK. |
Notes:
-
Excel 2011 for Mac cannot import data from OLE DB or OLAP data sources.
-
By default, Excel for Mac uses tables to import data. To turn off tables when importing data, in the Returning External Data to Microsoft Excel dialog box, click Properties, and then clear the Use Table check box.
-
If the external data source you want to access is not on your local computer, you might need to contact the administrator of the database for a password, user permission, or other connection information.
No comments:
Post a Comment