The Quick Access Toolbar is a customizable toolbar that contains a set of commands that are independent of the tab on the ribbon that is currently displayed. You can move the Quick Access Toolbar from one of the two possible locations, and you can add buttons that represent commands to the Quick Access Toolbar.

Notes:
-
You cannot increase the size of the buttons representing the commands by an option in Microsoft Office. The only way to increase the size of the buttons is to lower the screen resolution you use.
-
You cannot display the Quick Access Toolbar on multiple lines.
-
Only commands can be added to the Quick Access Toolbar. The contents of most lists, such as indent and spacing values and individual styles, which also appear on the ribbon, cannot be added to the Quick Access Toolbar. However, you can Customize the ribbon in Office to personalize the ribbon the way that you want it. For example, you can create custom tabs and custom groups to contain your frequently used commands.
What do you want to do?
Add a command to the Quick Access Toolbar
-
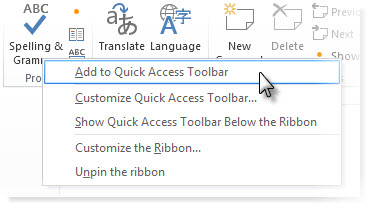
On the ribbon, click the appropriate tab or group to display the command that you want to add to the Quick Access Toolbar.
-
Right-click the command, and then click Add to Quick Access Toolbar on the shortcut menu.
Add a command to the Quick Access Toolbar that isn't on the ribbon
-
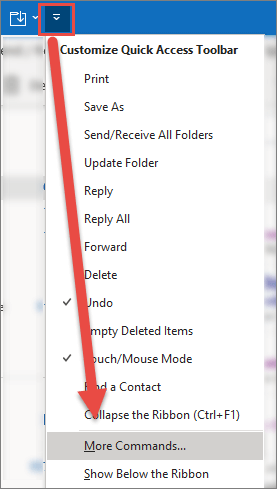
Click Customize the Quick Access Toolbar > More Commands.
-
In the Choose commands from list, click Commands Not in the Ribbon.
-
Find the command in the list, and then click Add.
Tip: If you can't find the command you want on the Commands Not in the Ribbon list, try setting Choose commands from to All commands.
Remove a command from the Quick Access Toolbar
-
Right-click the command you want to remove from the Quick Access Toolbar, and then click Remove from Quick Access Toolbar on the shortcut menu.
Change the order of the commands on the Quick Access Toolbar
-
Right-click the Quick Access Toolbar, and then click Customize the Quick Access Toolbar on the shortcut menu.
-
Under Customize Quick Access Toolbar, click the command you want to move, and then click the Move Up or Move Down arrow.
Group the commands by adding a separator between the commands
You can group the commands by using the separator to make the Quick Access Toolbar appear to have sections.
-
Right-click the Quick Access Toolbar, and then click Customize the Quick Access Toolbar on the shortcut menu.
-
In the Choose commands from list, click Popular Commands.
-
Click <Separator>, and then click Add.
-
To place the separator where you want it, click the Move Up or Move Down arrow.
Move the Quick Access Toolbar
The Quick Access Toolbar can be located in one of two places:
-
Upper-left corner, on the title bar. (default location)

-
Below the ribbon.

If you don't want the Quick Access Toolbar to be displayed in its current location, you can move it to the other location. If you find that the default location next to the program icon is too far from your work area to be convenient, you might want to move it closer to your work area. The location below the ribbon encroaches on the work area. Therefore, if you want to maximize the work area, you might want to keep the Quick Access Toolbar in its default location.
-
Click Customize Quick Access Toolbar (on the right-end of the QAT).
-
In the list, click Show Below the Ribbon or Show Above the Ribbon.
Customize the Quick Access Toolbar by using the Options command
You can add, remove, and change the order of the commands on the Quick Access Toolbar by using the Options command.
-
Click the File tab.
-
Under Help, click Options.
-
Click Quick Access Toolbar.
-
Make the changes you want.
Reset the Quick Access Toolbar to the default settings
-
Right-click the Quick Access Toolbar, and then click Customize the Quick Access Toolbar on the shortcut menu.
-
In the Customize the Quick Access Toolbar window, click Reset Defaults, and then click Reset only Quick Access Toolbar.
Export a customized Quick Access Toolbar
You can export your ribbon and Quick Access Toolbar customizations into a file that can be imported and used by a coworker or on another computer.
-
Click the File tab.
-
Under Help, click Options.
-
Click Quick Access Toolbar.
-
Click Import/Export, and then click Export all customizations.
For more information about how to customize the ribbon, see Customize the ribbon in Office.
Import a customized Quick Access Toolbar
You can import customization files to replace the current layout of the ribbon and Quick Access Toolbar. By being able to import the customization, you can keep Microsoft Office programs looking the same as your coworkers or from computer to computer.
Important: When you import a ribbon customization file, you lose all prior ribbon and Quick Access Toolbar customizations. If you think that you might want to revert to the customization you currently have, you should export them before importing any new customizations.
-
Click the File tab.
-
Under Help, click Options.
-
Click Quick Access Toolbar.
-
Click Import/Export, and then click Import customization file.
For more information about how to customize the ribbon, see Customize the ribbon in Office.
Why am I seeing a green ball?
You see a green ball if you added a custom group or command to the Quick Access Toolbar after you customized the ribbon, but didn't assign an icon to represent that custom group or command.
The icon is used if you do the following:
-
Add the custom group to the Quick Access Toolbar.
-
To help differentiate between your own customized ribbon and the default ribbon.
Add an icon to represent the custom group or command
-
Click the File tab.
-
Under Help, click Options.
-
Click Customize Ribbon.
-
In the Customize the Ribbon window, under the Customize the Ribbon list, click the custom group or command that you added.
-
Click Rename, and then in the Symbol list, click an icon.
-
In the Rename dialog box, click OK.
-
To see and save your customizations, click OK.
For more information about how to customize the ribbon, see Customize the ribbon in Office.
Microsoft Office Tutorials: Customize The Quick Access Toolbar >>>>> Download Now
ReplyDelete>>>>> Download Full
Microsoft Office Tutorials: Customize The Quick Access Toolbar >>>>> Download LINK
>>>>> Download Now
Microsoft Office Tutorials: Customize The Quick Access Toolbar >>>>> Download Full
>>>>> Download LINK Dd