Turn the snap to grid and snap to object options on or off
When you draw, resize, or move a shape or other object in Excel, PowerPoint, or Word, you can set it so that it will align or "snap" to the nearest intersection in the grid (even if the grid is not visible) or snap to other shapes or objects. However, you can control the alignment and snap-to capabilities by turning it off.
Note: This article applies to Windows desktop versions of Excel, PowerPoint, and Word. If you're looking for Mac information, see the related links at the bottom of the page.
Excel
Turn on the snap-to options
-
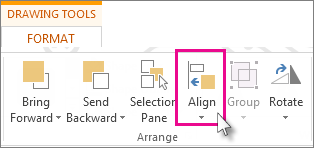
Click the shape or other object, and then under Drawing Tools, on the Format tab, click Align.
-
Do one or both of the following:
-
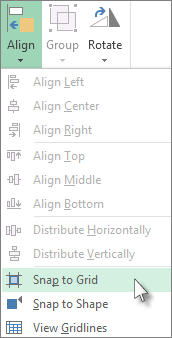
To snap shapes or other objects to the closest intersection of the grid, click Snap to Grid.
-
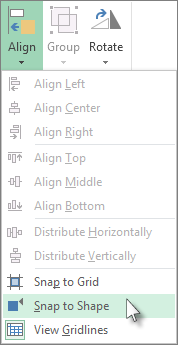
To snap shapes or other objects to grid lines that go through the vertical and horizontal edges of other shapes or objects, click Snap to Shape.
-
Turn off the snap-to options
-
Click the shape or other object, and then under Drawing Tools , on the Format tab, click Align.

-
To turn off these options, uncheck Snap to Grid or Snap to Shape.
PowerPoint
Turn on the snap-to options
-
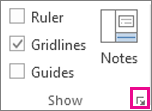
On the View tab, in the Show group, click the dialog box launcher
 .
. 
-
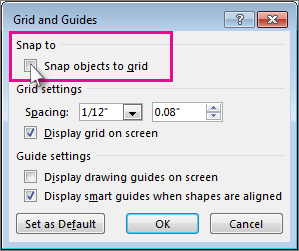
To snap shapes or other objects to the closest intersection of the grid, under Snap to, check Snap objects to grid.
Turn off the snap-to options
-
On the View tab, in the Show group, click the dialog box launcher
 .
. 
-
Uncheck Snap objects to grid.
Word
Turn on the snap-to options
-
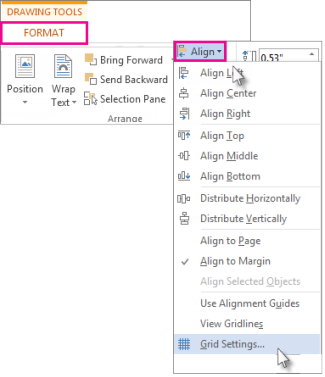
Click the shape or other object, and under Drawing Tools, on the Format tab, click Align, and then click Grid Settings.
-
Do one or both of the following:
-
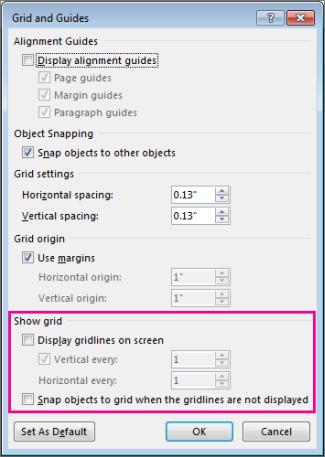
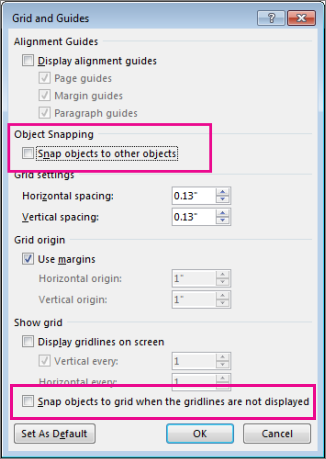
To snap shapes or other objects to the closest intersection of the grid when the grid is not visible, under Show grid, check Snap objects to grid when the gridlines are not displayed.
-
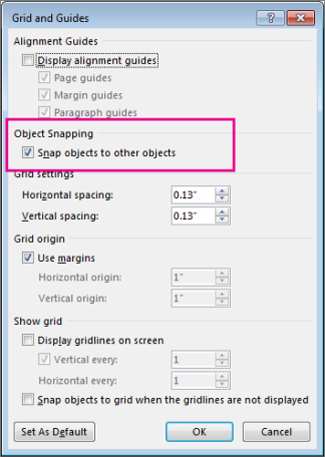
To snap shapes or other objects to grid lines of other shapes or objects, under Object Snapping, check Snap objects to other objects.
-
Turn off the snap-to options
-
Click the shape or other object, and under Drawing Tools, on the Format tab, click Align, and then click Grid Settings.

-
Uncheck Snap objects to grid when the gridlines are not displayed and Snap objects to other objects.
Excel
Turn on the snap-to options
-
Click the shape or object in the worksheet.
-
Under Drawing Tools on the Format tab, in the Arrange group, click Align.

If you do not see the Drawing Tools or Format tabs, make sure that you selected a shape or an object. You might have to double-click the shape or object to open the Format tab.
-
Do one or both of the following:
-
To position shapes or objects to the closest intersection of the grid, click Snap to Grid.
-
To position shapes or objects to grid lines that go through the vertical and horizontal edges of other shapes or objects, click Snap to Shape.
-
Note: To temporarily override the snap-to options, hold down ALT while you drag the shape or object.
Turn off the snap-to options
-
Click the shape or object in the worksheet.
-
Under Drawing Tools on the Format tab, in the Arrange group, click Align.

If you do not see the Drawing Tools or Format tabs, make sure that you selected a shape or an object. You might have to double-click the shape or object to open the Format tab.
-
Depending on which options are selected click Snap to Grid or Snap to Shape to disable these options.
PowerPoint
Turn on the snap-to options
-
On the Home tab, in the Drawing group, click Arrange, point to Align, and then click Grid Settings.

Tip: You can also right-click on an empty area of the slide (not a placeholder) or the margin around the slide, and then click Grid and Guides.
-
Do one or both of the following:
-
To position shapes or objects to the closest intersection of the grid, under Snap to, select the Snap objects to grid check box.
-
To position shapes or objects to grid lines that go through the vertical and horizontal edges of other shapes or objects, under Snap to, select the Snap objects to other objects check box.
Notes:
-
To temporarily override the snap-to options, hold down ALT while you drag the shape or object.
-
If you want the current settings in the Grid and Guide dialog box to be the default settings for all presentations, rather than just this one, click Set as Default.
-
If the Snap objects to grid check box is selected, you can draw in straight lines when you draw a freeform shape
 .
.
-
-
Turn off the snap-to options
-
On the Home tab, in the Drawing group, click Arrange, point to Align, and then click Grid Settings.
Tip: You can also right-click on an empty area of the slide (not a placeholder) or the margin around the slide, and then click Grid and Guides.
-
To turn off Snap objects to grid or Snap objects to other objects, clear the respective check box.
Note: If you want the current settings in the Grid and Guide dialog box to be the default settings for all presentations, rather than just this one, click Set as Default.
Word
Turn on the snap-to options
-
Click the shape or object in the document.
-
Under Drawing Tools on the Format tab, in the Arrange group, click Align
 , and then click Grid Settings.
If you do not see the Drawing Tools or Format tabs, make sure that you clicked a shape or an object.
-
Do one or both of the following:
-
To position shapes or objects to the closest intersection of the grid even when the grid is not visible, under Show grid, select the Snap objects to grid when the gridlines are not displayed check box.
-
To position shapes or objects to grid lines that go through the vertical and horizontal edges of other shapes or objects, under Object Snapping, select the Snap objects to other objects check box.
Notes:
-
To temporarily override the snap-to options, hold down ALT while you drag the shape or object.
-
If you want these settings to be the default settings for all documents, click Default.
-
By default, shapes and other objects will snap to the nearest intersection of gridlines only if the grid is displayed, unless you select the Snap objects to grid when the gridlines are not displayed check box.
-
-
Turn off the snap-to options
-
Click the shape or object in the document.
-
Under Drawing Tools on the Format tab, in the Arrange group, click Align
 , and then click Grid Settings.
If you do not see the Drawing Tools or Format tabs, make sure that you clicked a shape or an object. You may need to double-click the object. You may need to double-click the object to open the tabs.
-
To turn off the Snap objects to grid when the gridlines are not displayed or Snap objects to other objects settings, clear the respective check box.
Note: If you want these settings to be the default settings for all documents, click Set As Default.
See Also
Turn snap to grid on or off in PowerPoint 2016 for Mac
Turn snap to grid on or off in Word 2016 for Mac
No comments:
Post a Comment