Add or edit headers and footers in Word for Mac
Headers and footers are areas in the top and bottom margins of each page in a document. You can add, edit, or delete headers and footers.
Add a header or footer
-
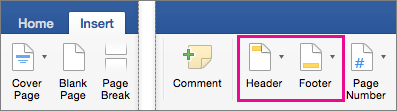
Click Insert, and then click either Header or Footer.
-
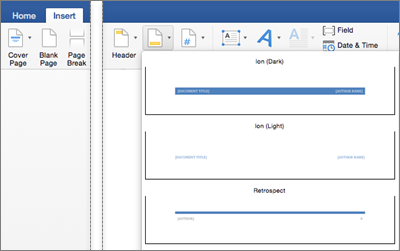
Click the layout you want to use. Word comes with lots of built-in layouts, so you might need to scroll to see them all.
Notes:
-
The header and footer area is marked by a Header or Footer tag and a line near the top or bottom of your document. You won't be able to edit the body of your document while the header or footer area is open.
-
-
-
Most headers and footers contain some placeholder text. Type over the placeholder text with your own text.
-
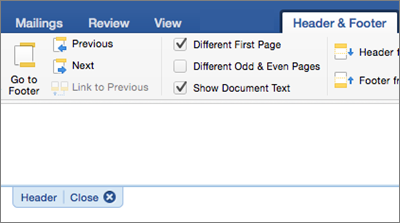
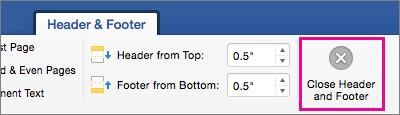
When you're done, on the Header & Footer Tools tab, click Close Header and Footer.
Edit a header or footer
-
Double-click inside the header or footer area (near the top or bottom of the page) to open the Header & Footer tab.
-
Select the text you want to change and type your new header or footer in its place.
-
When you're done, on the Header & Footer tab, click Close Header and Footer. Or, double-click anywhere outside of the header or footer area to close the Header & Footer Tools.
Change the design of the header or footer
You can change the look of a header or footer by applying a different design from the built-in collection.
Note: Changing header or footer styles overwrites your current header or footer, so you'll have to type the information in again.
-
Double-click inside the header or footer area (near the top or bottom of the page) to open the Header & Footer tab.
-
Under Header & Footer, click Header or Footer.
-
Choose a style from the gallery.
When you're done, double-click anywhere outside of the header or footer area to go back to the body of your document.
Delete a header or footer
-
Double-click inside the header or footer area (near the top or bottom of the page) to open the Header & Footer tab.
-
Under Header & Footer, click Header or Footer.
-
Click Remove Header or Remove Footer at the bottom of the window.
When you're done, double-click anywhere outside of the header or footer area to go back to the body of your document.
See also
Delete a header or footer from a single page in Word 2016 for Mac
Remove all headers or footers in Word 2016 for Mac
Create different headers or footers for odd and even pages in Word for Mac 2016
Add a header or footer
-
On the View menu, click Print Layout.
-
On the Document Elements tab, under Header and Footer, click Header or Footer, and then select a header or footer style from the gallery.
-
In the document, click within the header or footer, and then type any text or add any graphics.
-
Click the Header and Footer tab, and then under Insert, under Options, or under Position, select the options that you want.
Tip: The Header and Footer tab is a purple contextual tab that appears on the ribbon only when you are in the header or footer.
-
To return to your document, click
 .
.Tips:
-
To prevent headers and footers from appearing on the first page of your document, on the Header and Footer tab, under Options, click Different First Page, and then leave the headers and footers blank.
-
To create different headers and footers for odd and even pages in your document, on the Header and Footer tab, under Options, click Different Odd & Even Pages.
-
To insert other common header or footer items, such as the document file name or the author name, on the Insert menu, point to AutoText, and then click the item that you want to add.
-
To insert pictures in the document headers and footers, in the header or footer, click where you want to insert the picture. On the Insert menu, click Picture, and then select the appropriate picture type. To resize the picture, click the picture, and then drag the sizing handles.
-
To add the current date or time to a header or footer, on the View menu, click Header and Footer. Place the cursor in the header or footer, and on the Header and Footer tab, under Insert, click Date or Time.
-
Add different headers or footers for different sections in your document
You can add different headers or footers to each section of your document. This is frequently useful when you work with long documents that contain many chapters.
-
At the end of the chapter or section, click where you want to insert the section break.
-
On the Document Elements tab, under Insert Pages, click Break, and then insert the kind of section break that you want.
-
On the Document Elements tab, under Header and Footer, click Header or Footer, and then insert the kind of header or footer that you want.
-
Click the Header and Footer tab, and then under Options, clear the Link to Previous check box and edit the headers and footers in the new section of your document.
Tip: The Header and Footer tab is a purple contextual tab that appears on the ribbon only when you are in the header or footer.
Edit a header or footer
-
On the View menu, click Print Layout.
-
In the document, double-click the header or footer, and then make your changes.
Tip: You can use the Header and Footer tab to add page numbers, dates, and formatting. The Header and Footer tab is a purple contextual tab that appears on the ribbon only when you are in the header or footer.
-
To return to your document, click
.Note: When you change a header or footer, Word automatically changes the same header or footer throughout the whole document. To create a different header or footer for part of a document, divide the document into sections by Insert, delete, or change a section break.
Delete a header or footer
-
On the View menu, click Print Layout.
-
In the document, double-click the header or footer that you want to remove.
-
On the Edit menu, click Select All.
-
Press DELETE .
-
To return to your document, click
.
Change the space between a header or footer and the top or bottom of the page
-
On the View menu, click Print Layout.
-
In the document, double-click the header or footer.
-
Do any of the following:
| To | Do this |
| Change the space between a header and the top of the page | Click the Header and Footer tab, and then under Position, change the setting for Header from Top. |
| Change the space between a footer and the bottom of the page | Click the Header and Footer tab, and then under Position, change the setting for Footer from Bottom. |
-
When you are finished, return to the header or footer and then click
.Notes:
-
When you change a header or footer, Word automatically changes the same header or footer throughout the whole document. To create a different header or footer for part of a document, divide the document into sections by Insert, delete, or change a section break.
-
Word determines the spacing based on the default unit of measurement, for example, inches. To change the unit of measurement, on the Word menu, click Preferences, click General, and then on the Measurement units pop-up menu, choose a unit of measure.
-
Move between headers and footers in your document
You can scroll between the header and footer in your document, or you can use the tools on the Header and Footer tab to move between headers and footers in different sections of your document.
-
On the View menu, click Print Layout.
-
In the document, double-click the header or footer.
-
Click the Header and Footer tab, and then under Navigation, select one of the options.
Tip: The Header and Footer tab is a purple contextual tab that appears on the ribbon only when you are in the header or footer.
-
When you are finished, return to the header or footer and then click
.
I just want to share an online converter that will convert your one file to other formats;
ReplyDeleteFile Spinner
That will convert your one file to other file like this;
ReplyDeleteDocx to Zip
Mp2 to Mp3
Mp4 to Png
Oga to Mp3
Tga to Jpg
Microsoft Office Tutorials: Add Or Edit Headers And Footers In Word For Mac >>>>> Download Now
ReplyDelete>>>>> Download Full
Microsoft Office Tutorials: Add Or Edit Headers And Footers In Word For Mac >>>>> Download LINK
>>>>> Download Now
Microsoft Office Tutorials: Add Or Edit Headers And Footers In Word For Mac >>>>> Download Full
>>>>> Download LINK Lu