Check out, check in, or discard changes to files in a library
If you want to make changes to a file on a site and you want to make sure no one else can edit it, check out the file. When you have the file checked out, you can edit it online or offline, and save it—multiple times, if necessary. This topic shows how to check out, check in, and discard changes you make to files in SharePoint libraries. See Top questions about check out, check in, and versions for answers to common questions.
When you finish editing and check the file back into the library, other people can see your changes and edit the file, if they have permission. And, if you decide not to make or keep any changes in the file, you can simply discard your checkout so you don't affect version history.
Tip: If you want to edit an Office document at the same time as other people (also called co-authoring), don't check out the document. Just open it and edit it. We recommend turning on versioning for the library first, though, just in case someone makes a mistake later and you need to restore an earlier version of the document. For more information about co-authoring, see Document collaboration and co-authoring.
When you want to check out and edit a document, whether it's working online, or downloading, do it in the following sequence:
-
Check out the document
-
Download or open the document in an online app
-
Edit the document
-
Upload the document or save it from the online app
-
Check in the document
Check out files
Some libraries are set up to require checkout of files. If checkout is required, you will be prompted to check out any files that you want to edit. When you are finished with the file, you need to check it back in or discard the checkout.
If checkout isn't required in the library, you don't need to check it out as long as you don't mind letting other people edit at the same time as you.
Tip: If your team plans to use co-authoring, we recommend turning on at least major versioning in the library, just in case someone makes a mistake and uploads a document of the same name in a library where everyone is co-authoring. This way, if you lose changes, you can restore a previous version of the document. See Enable and configure versioning for a list or library for more info.
-
Go to the library where your file is saved. If you're looking at a view of the library on another page, you may have to click the title of the library first. For example, you may have to click Documents first to go to the Documents library.
-
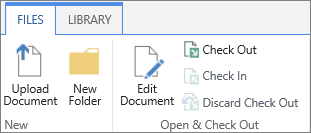
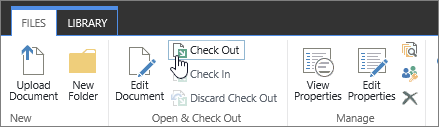
Select the file, or files, that you want to check out, and click Files and then click Check Out.
Notes:
-
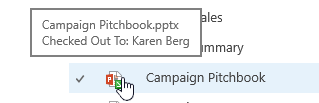
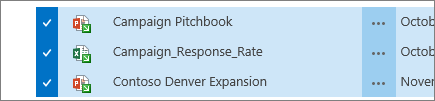
When the file is checked out, the icon next to the file name is partially covered by a green, downward-pointing arrow
 . This tells you, or anyone else, that the file is checked out. If you point to the icon of any checked-out file, you can see the name of the document and the name of the person who has it checked out.
-
When you check out a document, you still need to open the file, download it, or edit it online. When you check out a document, it only sets it so only you can do something with the file. If you just want to view it, double click the document name to open it in Office 365.
While not recommended, you could theoretically check out a file and leave it checked out indefinitely so nobody else can change it. However there are better ways to do that. To keep someone from editing a file, but still share it, give that person, or group view rights only, which you do when you initially share it. See Share ideas, sites, and content for more info.
When you check out a file, the file is only marked as being checked out. Until you actually download it or edit it online, nothing else happens to that file. You can edit it in an online application, such as Excel or Word online, or download the file to your local drive to work offline.
To open a document online without downloading, follow these steps:
Open your checked out document online in Office 365
-
Do one of the following:
-
Right click on the document, and click "Open in Word Online", or another the appropriate Office 365 online program (Excel, PowerPoint, etc).
-
Click the ellipses (...) next to the document, click the ellipses (...) again, and then click Open in Word Online (or the appropriate Office 365 program. )
-
-
When you are done, save the file, or close the app (Office 365 apps automatically save).
-
Check the file back in .
To download files, follow these steps:
Download your checked out file
-
Do one of the following:
-
Right click on the document and then click Download.
-
Select the file, and then click Download a Copy from the Files ribbon.
-
Click the ellipses (...), click the ellipse (...) again, and then click Download a Copy.,
-
-
At the bottom of the browser, click Save. Click Open or Open Folder to see the file once it's downloaded. By default the file will be in your Downloads folder.
Check in files
Your files and any changes you make to them, will not be available to your colleagues until you check the files back into your library.
If you downloaded your document to work locally, you'll want to upload it before checking it. in. See Upload files to a library to see how to do this.
-
Go to the library where your file is saved. If you're looking at a view of the library on another page, you may have to click the title of the library first. For example, you may have to click Documents first to go to the Documents library.
-
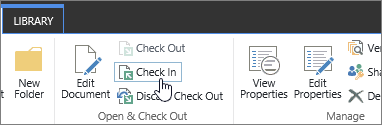
Select the file, or files, that you want to check in, click Files and then click Check In.
-
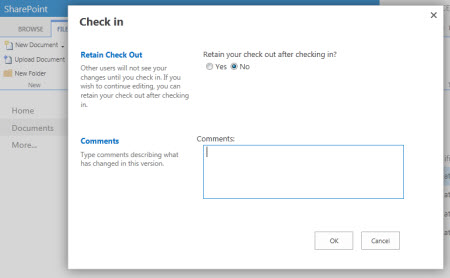
If you want to do an interim check-in so you can continue working on the file, click Yes in the Retain Check Out area. Otherwise, leave No selected.
-
In the Comments area, add a comment that describes the changes you made. This step is optional but recommended as a best practice. Check-in comments are especially helpful when several people work on a file. Moreover, if versions are being tracked in your organization, the comment becomes part of the version history, which may be important to you in the future, if you need to restore to an earlier version of the file.
-
Click OK. The green arrow disappears from the file icon when the file is checked back in.
Discard a check-out
If you check out a file and don't make changes to it, or you make changes that you don't want to keep, you can simply discard the checkout, rather than saving the file. If your organization tracks versions, a new version is created each time you check a file back into the library. By discarding the checkout, you can avoid making new versions when you haven't made any changes to the file.
-
Go to the library where your file is saved. (If you're looking at a view of the library on another page, you may have to click the title of the library first. For example, you may have to click Documents first to go to the Documents library.)
-
Select the file, or files, that you want to discard changes for, click Files and then click Discard Checkout.

-
Click OK to finish discarding the checkout. The green arrow disappears from the file icon when the file is checked back in.
Check in someone else's document
Usually your SharePoint users will check documents in and out in a responsible manor. However, if someone checks out a document and leaves the company or goes on vacation, it can block other users who need to work on those files. If you have Full Control permissions, you can check a file back in that was checked out by someone else. To do that, follow these steps:
-
If you have Full Control permissions, follow the instructions to check in a file.
-
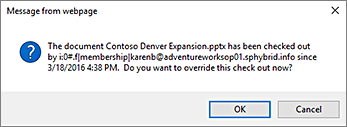
When you click OK in the check-in dialog, you'll get a warning dialog that the file is checked out to another user. Click OK if you want to override and check it in.
See who's got a file checked out
If you need to get to a file but it's checked out, you can view which user has it checked out so you can contact them. To see the user, hover your mouse cursor over the document's icon to get a tooltip pop-up that contains the name of the user that has it checked out.
To check in multiple files at once
You can check files in one at a time, or in a batch. When you check multiple files in, they will all have the same setting for retaining the check out, or comments. Follow these steps.
-
In the document library, select all the files you want to check in by clicking on the check mark to the left of the document's icon.
-
Click the Files tab, and then click Check In. If you have selected any files that aren't checked out, you'll get a warning message.
-
If you want to do an interim check-in so you can continue working on the file, click Yes in the Retain Check Out area. Otherwise, leave No selected.
-
In the Comments area, add a comment that describes the changes you made. This comment will be used on all the files you're checking in.
-
Click OK. The green arrow disappears from the file icon when the file is checked back in.
Microsoft Office Tutorials: Check Out, Check In, Or Discard Changes To Files In A Library >>>>> Download Now
ReplyDelete>>>>> Download Full
Microsoft Office Tutorials: Check Out, Check In, Or Discard Changes To Files In A Library >>>>> Download LINK
>>>>> Download Now
Microsoft Office Tutorials: Check Out, Check In, Or Discard Changes To Files In A Library >>>>> Download Full
>>>>> Download LINK xO