Show the critical path of your project
Every task is important, but only some of them are critical. The critical path is a chain of linked tasks that directly affects the project finish date. If any task on the critical path is late, the whole project is late.
Show the critical path in the Gantt Chart view
The Gantt Chart view will likely be your most used view for showing the critical path.
-
Click View > Gantt Chart.
-
Click Format, and then select the Critical Tasks check box.
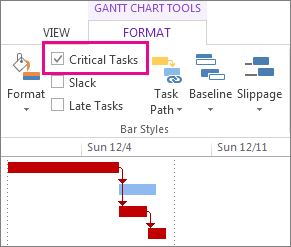
Tasks on the critical path now have red Gantt bars.
Show the critical path in other task views
You can see the critical path in any task view by highlighting it.
-
Click the View tab, and then pick a view from the Task Views group.
-
Staying on the View tab, select Critical from the Highlight list.
The critical path shows up in yellow. -
To see only the tasks on the critical path, click the Filter arrow, then pick Critical.

Tip: In a Network Diagram, tasks on the critical path automatically show up in red. No highlighting is needed.
View the critical path in a master project
When you're managing a master project, whole subprojects can be on the critical path. You can see if this is true by telling Project to treat the subprojects like they are summary tasks.
-
Click File > Options.
-
Click Schedule and then scroll down to the Calculation options for this project area.
-
Make sure the Inserted projects are calculated like summary tasks box is selected.
Tip: This setting does not affect other projects. That is, it only applies to the master project you're working on.
Change what tasks show up on the critical path
Typically, critical tasks have no slack. But you can tell Project to include tasks with one or more days of slack on the critical path so you can see potential problems coming from farther away.
-
Click File > Options.
-
Click Advanced, and then scroll down to the Calculation options for this project area.
-
Add a number to the Tasks are critical if slack is less than or equal to box.
These instructions are specific to Microsoft Project 2007.
Learn more about the critical path
The critical path is a series of tasks (or sometimes only a single task) that controls the calculated start or finish date of the project. When the last task in the critical path is complete, the project is also complete.
The tasks that make up the critical path are typically interrelated by task dependencies. There are likely to be many such networks of tasks throughout your project plan.
When you display the project's critical path, Project 2007 shows only a single, overall critical path, which is the only critical path that controls the project's finish date.
However, you can set up your plan so that you can also see an additional critical path for each independent network or each series of tasks. You might find this useful for keeping track of each of the subprojects within a master project, or of each phase or milestone of a project that is divided into multiple phases.
By knowing and tracking the critical path for your project, as well as the resources that are assigned to each critical task, you can identify the tasks that can affect your project's finish date and thus discover whether your project will finish on schedule.
If it is important that your project finish on schedule, pay close attention to the tasks on the critical path, as well as to the resources assigned to those tasks. These elements all affect whether your project will finish on time.
Be aware that the critical path can change from being one series of tasks to being another series as you progress through the project's schedule. The critical path might change as critical tasks are completed, or as tasks in another series of tasks are delayed. A new critical path immediately becomes the series of tasks that you track most closely to ensure finishing on or before the desired date.
Display the critical path for your project
To verify that adjustments that you make to the project plan don't adversely affect the critical path, you can review the critical path and critical tasks in any of several ways.
Note: By default, Project 2007 does not display a project's critical path.
| To do this | Follow these steps |
| Show the critical path in the context of all tasks | On the View menu, click More Views, click Detail Gantt, and then click Apply. |
| Show only critical tasks | On the View menu, click Gantt Chart. Then, click Critical in the Filter list To display all tasks again, click All Tasks in the Filter list on the toolbar. You can also group all critical tasks together. On the Project menu, point to Group by and then click Critical. |
| Show the critical path by using the Gantt Chart Wizard | On the View menu, click Gantt Chart, and then click Gantt Chart Wizard By default, the Gantt chart bars and link lines for critical tasks are displayed in red. This format change overrides any direct formatting changes previously made to bar styles or to individual bars. Note that this formatting of critical tasks applies only to the current Gantt Chart view in the current file. To use the same formatting in another file, you can use the Organizer (Tools menu) to copy formatted Gantt Charts to other files. |
| Show multiple critical paths in a single project | On the Tools menu, click Options, click the Calculation tab, and then select the Calculate multiple critical paths check box. |
| Show the overall critical path across multiple projects | Important: This procedure is only effective in a consolidated project. If you don't have a consolidated project, you must first create one. On the Tools menu, click Options, click the Calculation tab, and then select the Inserted projects are calculated like summary tasks check box. This is a project-level setting. All projects inserted into this project will be calculated like summary tasks. |
 on the toolbar.
 on the Formatting toolbar. Follow the instructions in the Gantt Chart Wizard to format the critical path.
Change which tasks are defined as critical
In Project 2007, a critical task has zero days of slack (float). However, you can change this default value and define a task as critical that has, for example, one or two days of slack.
-
On the Tools menu, click Options, and then click the Calculation tab.
-
In the Tasks are critical if slack is less than or equal to box, enter the maximum amount of slack, in days, that you want to use to define critical tasks.
-
If you want this value to be the default value for all of your projects, click Set as Default.
To learn how to find a task's slack, see Find slack (float) in your schedule.
For instructions about changing a task's slack, see Set lead or lag time (float) between tasks.
Microsoft Office Tutorials: Show The Critical Path Of Your Project >>>>> Download Now
ReplyDelete>>>>> Download Full
Microsoft Office Tutorials: Show The Critical Path Of Your Project >>>>> Download LINK
>>>>> Download Now
Microsoft Office Tutorials: Show The Critical Path Of Your Project >>>>> Download Full
>>>>> Download LINK S3