Create and schedule a new project
When you create a new project, you can choose to schedule the project from a start date or a finish date, and you can define file properties to help you organize or find your project.
What do you want to do?
Create and schedule a new project
-
Click the File tab, and then click New.
-
Make sure that Blank Project is selected, and then click Create on the right pane.
-
On the Project tab, in the Properties group, click Project Information.

-
Schedule the project in the Project Information dialog box:
-
To schedule from the start date, click Project Start Date in the Schedule from box, and then select the start date in the Start date box.
-
To schedule from the finish date, click Project Finish Date in the Schedule from box, and then select the finish date in the Finish date box.
Tip: Schedule from the finish date if you need to find out how late you can start a project. However, we recommend that you change this setting to schedule from the start date when work begins on the project.
-
-
If you are using Project Professional 2010, you can include enterprise custom fields in the project. In the Enterprise Custom Fields section, click the Value field for a custom field, and then select the value.
Note: You must enter values for required enterprise custom fields, marked by an asterisk (*), or you won't be able to save the project.
If your plans change, you can change this initial project information at any time in the Project Information dialog box. However, if you have applied actual data, such as actual start or finish dates, to tasks, the tasks will not be rescheduled based on the updated project information. In addition, if you have put constraints on tasks, moving the project's start or finish date won't necessarily move all tasks relative to the new date.
A few notes for Project Professional 2010 users:
-
If you want to save the project as an enterprise project, you should connect to Project Server before creating the project.
-
If you create and save the project locally and then decide to save it to Project Server later, the project will be updated with settings from the enterprise global template. Your project may be updated with different views, tables, fields, and other items. In addition, any formatting that is inconsistent with the enterprise global template will be lost.
Define file properties for your project
-
Open the project. (Learn more about opening a project.)
-
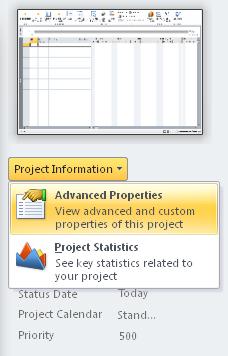
Click the File tab, and then click Info.
-
On the right pane, click Project Information and then click Advanced Properties.

-
On the Summary tab, type the relevant project information in the boxes.
-
On the Custom tab, type the custom information in the Name, Type, and Value boxes, and then click Add.
-
Click OK.
Note: For printing purposes, you can also add project details to the header, footer, or legend of a project view or report. See Print a view or report for details.
No comments:
Post a Comment