Add a color to a flag
In Microsoft Office Outlook 2003, you could choose from different flag colors when you flagged an item. In Microsoft Office Outlook 2007, flags are not associated with colors by design. To associate a color with a flagged item, you must assign a color category to the flagged item. To assign a color to an item that is flagged with a specific criterion, such as Important, you associate the item with a color category that you create for that specific criterion. For example, you can create a color category called Important and associate the red color with it. You can then assign the color category to the item that is flagged as Important.
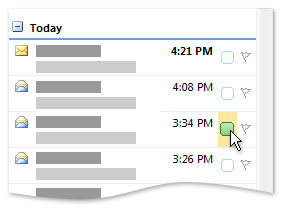
The color of the assigned category appears in your Inbox or other table views next to the Flag Status column, so you can scan quickly for your flagged, categorized items.
What do you want to do?
Create a new color category
Unless you want to associate an existing color category with a flag, you must first create a color category for your purpose, give it a name and color that are meaningful to you, and then assign the category to the flagged item.
-
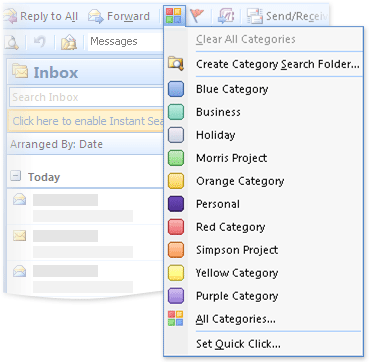
On the toolbar, click Categorize
 .
. -
Click All Categories.

Note: If you don't see the All Categories command, click the Expand button
 .
. -
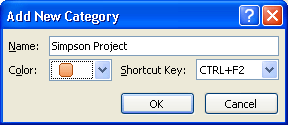
Click New.

-
In the Name box, type the name for the new color category.
-
In the Color list, select a color, and then click OK.
Selecting a keyboard shortcut in the Shortcut Key list is optional.
Assign a color category to a flagged item
-
In any Mail or Contacts view, select a flagged item.
-
On the toolbar, click Categorize
 .
. -
On the Categorize menu, click the color category that you want to assign to the item.
-
If you don't see the color category on the menu, click All Categories.
Note: If you don't see the All Categories command, click the Expand button
 .
. -
Select the check box next to the color category that you want to assign to the item.
-
Click OK.
The color is displayed in each item to which you assign the color category and appears in a column in your Inbox for easy scanning. By default, the Categories column is displayed next to the Flag Status column.
Use color categories to identify items
Color categories have been enhanced to provide a variety of ways to identify and connect items. You can assign color categories to all items in Outlook, not just e-mail messages and contacts. After you categorize an item, you can track and organize all occurrences of the item across Outlook. You can also use a Quick Click category to assign a default color category with a single click in your Inbox or in other table views.

Colors for color categories appear in the Categories column, next to the Flag Status column, for greater visibility.
No comments:
Post a Comment