Record audio or video notes
When you're at a lecture, Q&A session, or interview and you know you won't be able to type notes fast enough, you can use OneNote to record audio or video notes.
Note: Before you get started, make sure your computer has a microphone and a webcam, and that both are set up in the Windows Control Panel.
-
Click a location on the page in OneNote where you want to place the recording, and then do one of the following:
-
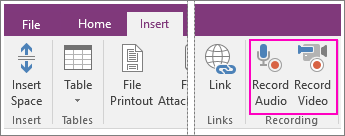
To create an audio-only recording, click Insert > Record Audio.
-
To create a video recording with optional audio, click Insert > Record Video.

Recording starts as soon as OneNote adds a media icon to the page.
-
-
To end the recording, press Pause or Stop on the Audio & Video tab.
-
To play a recording, click the media icon on the page and then click Play.
If you take notes during the recording, they'll be linked to the audio and video created with OneNote. This way you can search your notes and find specific parts of the audio or video recording.
Note: If you select the See Playback button on the Audio & Video tab, OneNote will position the cursor within any notes that you took during the recording. For example, if you're recording an interview and you took notes two minutes into the clip, OneNote will jump to that exact part of your notes whenever you play back the clip and it reaches the two minute mark. This is immensely useful for retaining context between a recorded event and any reactions, thoughts, and ideas that you had at any particular moment during that event.
Audio and video recordings you make in OneNote are directly linked to any notes you take when the recording is made. This lets you later search your notes for keywords or specific text that is associated with a particular recording. For example, if you are in a meeting and the speaker is explaining a complex work process, you can record the presentation and then, in your notes, type "work process" to indicate the topic of the recording. Whenever you play back the recording, OneNote shows you the accompanying notes that you took.
To record audio or video clips in OneNote, Microsoft DirectX 9.0a or later and Microsoft Windows Media Player 9 or later are required.
-
Click the location on the page where you want to place the recording — for example, beside a paragraph or photo that you are commenting on.
-
On the Standard toolbar, click the arrow next to the Record button, and then click either Record Audio Only or Record Video.
A time stamp is placed on the page.
-
Start recording your audio notes or video notes.
-
To finish the recording, click Stop
 on the Audio and Video Recording toolbar.
Note:
-
If you choose Record Audio Only, OneNote records the sound clip as a .wma file. If you choose Record Video, OneNote combines audio and video in a .wmv file, provided that a microphone is connected to your computer or is available as part of the camera. Once a video recording has been created in OneNote, you cannot separate the audio portion from the video portion in your notes.
-
If OneNote is not running, you can still initiate an audio recording by right-clicking the OneNote icon at the far right of the Windows taskbar, and then clicking Start Recording Audio.
Share audio or video recordings with others
You can share the audio and video recordings that you make with other people, even if they do not have OneNote installed on their computers.
Send audio and video files in an e-mail message
-
On the Tools menu, click Options.
-
In the Category list in the Options dialog box, click E-mail.
-
Select the Attach embedded files to the e-mail message as separate files option, and then click OK.
-
Click the tab of the page that contains the audio or video files you want to send.
-
On the File menu, point to Send Page To, and then click Mail Recipient (as Attachment).
-
Fill out the e-mail form, and then click Send.
Note:
-
In the e-mail message, instruct your recipients to save the .wma or .wmv files to the same location as the OneNote file so that they can play the audio or video right from the page.
-
You can also send just the audio or video recording by sending only the .wma or .wmv file.
Publish pages that contain audio and video files
-
Click the page tab for the page you want to publish.
-
On the File menu, click Save As.
-
In the Save As dialog box, navigate to the shared location where you want to publish the .one file and the .wma or .wmv files.
-
In the Save as type box, click OneNote Sections.
-
Click Save.
To listen to shared audio recordings or to view shared video recordings, your recipients must do the following:
-
They must have Microsoft Windows Media Player 9 or later installed on their computer. The media player comes installed with the Microsoft Windows operating system and can be downloaded from the Microsoft Web site.
-
Save both the OneNote page and the Windows Media Player file (.wma for audio or .wmv for video) to the same location.
No comments:
Post a Comment