Insert a master/detail control
In Microsoft Office InfoPath, you can use the master/detail control to link one control to another, so that the selection in the first control determines what appears in the other.
In this article
When to use a master/detail control
A master/detail control is actually a set of two related controls. One control is the designated master control, and the other is the detail control. The master control is always a repeating table. The detail control can be either a repeating table or a repeating section.
Use a master/detail control when you want to:
-
Enable users who are filling out forms that are based on your form template to work more efficiently with large amounts of data.
-
Display the equivalent of a one-to-one relationship. For example, you can use a master/detail control when you design a human resources form template that is connected to a database of employee records. The master control can display an employee's name and job title, and the detail control can display an employee's location, hire date, and date of birth.
-
Display the equivalent of a one-to-many relationship. For example, you can use the master control to display one set of records (for example, customer names) and the detail control to display related records (for example, customer orders).
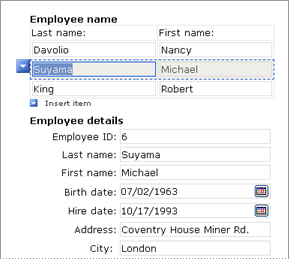
In the following illustration, employees in a human resources department click a row in a repeating table to access detailed information about an employee.

When users click a specific row in a repeating table (the master control), one or more detail records are displayed in a repeating section or repeating table (the detail control) elsewhere on the form.
InfoPath provides a predefined master/detail control that you can insert by using the Controls task pane. You can also create a master/detail control by inserting a repeating table and repeating section (or two repeating tables) and then changing the properties for each control.
If your form template is intended mainly for onscreen viewing, consider placing the detail control inside a scrolling region on your form template. That way, if there is a large amount of data displayed in the control, your users can scroll through the data. Note that this isn't the best option if you think users will want to print their forms, because any data that is hidden in the scrolling region onscreen will also be hidden on the printed form.
Compatibility considerations
When you design a form template in InfoPath, you can choose to design a browser-compatible form template. When you design a browser-compatible form template, master/detail controls are unavailable in the Controls task pane because they cannot be displayed in a Web browser.
In addition, although you can access the Master/Detail tab in the Repeating Section Properties and Repeating Table Properties dialog boxes, all settings on that tab are unavailable (appear dimmed).
To work around this limitation, you may want to design your form template so that users can display two views, a "master" view that lists certain items and a "detail" view with expanded information specific to each item in the master view.
Insert a master/detail control
The procedure for inserting a master/detail control differs slightly depending on whether you are designing a new, blank form template or basing the design of your form template on a database or other external data source.
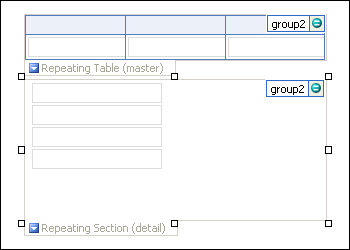
When you insert a master/detail control from the Controls task pane, InfoPath inserts a repeating table and a repeating section that are bound to the same repeating group in the data source. By default, both controls contain other controls, which are bound to fields in that repeating group.
The following illustration shows a master/detail control in design mode.

Controls can be bound or unbound. When a control is bound, it is connected to a field or group in the data source so that data entered into the control is saved in the underlying form (.xml) file. When a control is unbound, it is not connected to a field or group, and data entered into the control is not saved. When you select or move your pointer over a control, text and a binding icon appear in the upper-right corner of the control. The text indicates the group or field to which the control is bound in the data source. The icon indicates whether the control is correctly bound to that group or field. When the binding is correct, a green icon appears. If there's something wrong with the binding, you'll see a blue or red icon instead.
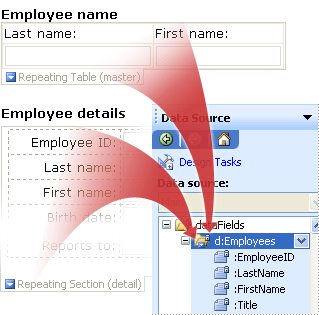
The data source for the form template consists of fields and groups that appear in a hierarchical view in the Data Source task pane. Master/detail controls are always bound to repeating groups. In the following example, both the master control and the detail control are bound to the d:Employees repeating group in the Data Source task pane.

Note: In a one-to-many relationship, master and detail controls are typically bound to separate repeating groups. To learn how to establish a one-to-many relationship instead of a one-to-one relationship, see Change the default master/detail relationship later in this article.
Insert a master/detail control on a new, blank form template
InfoPath provides a predefined master/detail control that you can insert by using the Controls task pane. You can also create a master/detail control by inserting a repeating table and a repeating section (or two repeating tables) and then changing the properties for each control.
When you design a new, blank form template, the Automatically create data source check box in the Controls task pane is selected by default. This enables InfoPath to automatically create fields and groups in the data source as you add controls to the form template. These fields and groups are represented by folder and file icons in the Data Source task pane.
-
On the form template, place the cursor where you want to insert the control.
-
If the Controls task pane is not visible, click More Controls on the Insert menu, or press ALT+I, C.
-
Under Insert controls, click Master/Detail.
-
In the Number of columns in master box in the Insert Master/Detail dialog box, enter the number of columns for the master control.
-
In the Number of fields in detail box, enter the number of fields for the detail control.
InfoPath inserts two controls on your form template. The first is labeled Repeating Table (master), and the second is labeled Repeating Section (detail).
-
To test the master/detail relationship, click Preview on the Standard toolbar, and then enter data in the master control. Related data should appear in the detail control.
Insert a master/detail control on a form template that is based on an existing data source
If you base the design of your form template on an existing Extensible Markup Language (XML) file, database, or Web service, InfoPath derives the fields and groups in the Data Source task pane from that existing data source. In this scenario, you can insert a master/detail control from the Controls task pane, as described in the following procedure.
Master and detail controls can be bound to the same repeating group or to different repeating groups, depending on your needs. The controls that appear inside a master/detail control are bound to fields that are part of a repeating group.
-
On the form template, place the cursor where you want to insert the control.
-
If the Controls task pane is not visible, click More Controls on the Insert menu, or press ALT+I, C.
-
Under Insert controls, click Repeating Table.
-
On the first page of the Repeating Table Binding Wizard, click the repeating group that you want to bind the table rows to, and then click Next. If your table has only one column, you can select a repeating field instead of a repeating group.
Tip: To create a new repeating group to bind the table to, right-click the group to which you want to add the repeating group, click Add on the shortcut menu, and then in the Add Field or Group dialog box, enter the repeating group's properties.
-
To add the columns that you want to include in the table, double-click the fields in the Data binding list.
Tip: To create a new field to add as a column, right-click the group to which the table is bound, click Add on the shortcut menu, and then in the Add Field or Group dialog box, enter the field's properties.
-
To rearrange the columns, click a column in the Columns in table list, click Move Up or Move Down, and then click Finish.
-
Double-click the Repeating Table label below the table on your form template.
-
Click the Master/Detail tab.
-
Click Set as master, type a name in the Master ID box, and then click OK.
-
Place the cursor on your form template where you want to insert the repeating section (the detail control).
-
Under Insert controls in the Controls task pane, click Repeating Section.
Note: Alternatively, you can use another repeating table as the detail control.
-
On the first page of the Repeating Section Binding Wizard, click the repeating group that you want to bind the section to, and then click OK.
-
Double-click the Repeating Section label that appears below the section on your form template.
-
Click the Master/Detail tab.
-
Click Set as detail, and then click the name of the master control in the Link to master ID list.
-
To change the default, one-to-one relationship of the master/detail control to a one-to-many relationship, click By key field under Master/detail relationship, and then click Select XPath
 next to the Key field (master) and Key field (detail) boxes to select the key fields that you want.
 -
To test the master/detail relationship, click Preview on the Standard toolbar, and then enter data in the master control. Related data should appear in the detail control.
Tip: You can also use the Data Source task pane to insert master/detail controls. To create the master control, in the Data Source task pane, right-click the repeating group that you want to bind the master control to, and then click Repeating Table on the shortcut menu. Follow the same general steps to create the detail control.
Change the default master/detail relationship
When you insert a master/detail control on your form template by using the Controls task pane, InfoPath establishes a one-to-one relationship between the master control and the detail control. A one-to-one relationship means that for each selection in the master control, a single matching result appears in the detail control.
You can change the master/detail relationship from the default one-to-one relationship to a one-to-many relationship. A one-to-many relationship means that for each selection in the master control, multiple matching results can appear in the detail control.
When you insert a master/detail control on your form template, InfoPath inserts a repeating table and a repeating section by default. Both of these controls are bound to the same repeating group in the data source. By default, both controls contain other controls that are bound to fields in that repeating group. In a one-to-many relationship, however, master and detail controls are typically bound to separate repeating groups.
If you inserted a master/detail control on your form template from the Controls task pane, and you want to establish a one-to-many relationship instead of a one-to-one relationship, you can delete the detail control that InfoPath creates. Then you can create a new detail control that better suits your needs, as outlined in the following procedure:
-
Select the repeating section that is designated as the detail control, and then press DELETE.
-
Insert a new repeating section on the form template.
How?
-
On the form template, place the cursor where you want to insert the control.
-
If the Controls task pane is not visible, click More Controls on the Insert menu, or press ALT+I, C.
-
In the Controls task pane, select the Automatically create data source check box.
-
Under Insert controls, click Repeating Section.
-
-
Insert the controls that you want in the repeating section.
How?
-
On the form template, place the cursor where you want to insert the control.
-
If the Controls task pane is not visible, click More Controls on the Insert menu, or press ALT+I, C.
-
In the Controls task pane, select the Automatically create data source check box.
-
Under Insert controls, click the control that you want to insert.
-
Repeat steps 1 through 4 for each control that you want to insert.
-
-
Double-click the repeating section on your form template.
-
Click the Master/Detail tab.
-
Under Master/detail settings, click Set as detail.
-
In the Link to master ID list, click the name of the master control.
-
Under Master/detail relationship, click By key field.
-
Click Select XPath
 next to the Key field (master) box, and then in the Select a Field or Group dialog box, click the key field for the master control, and then click OK.
 -
Click Select XPath
 next to the Key field (detail) box, and then in the Select a Field or Group dialog box, click the key field for the detail control, and then click OK.
Tip: If you want to create a one-to-many relationship when you initially create a master/detail control, consider manually creating your own master/detail control instead of using the predefined master/detail control that is available in the Controls task pane. You can create your own control by establishing a master/detail relationship between a repeating table and a repeating section or between two repeating tables on a form template. To do this, open the Properties dialog box for each control, and then designate one control as the master control and the other control as the detail control. By modifying the properties for the detail control, you can set up a one-to-many relationship through the use of key fields.
No comments:
Post a Comment