Fix email delivery issues for error code 5.7.12 in Office 365
This topic will walk you through the steps of what to do if you see status code 550 5.7.12 or 5.7.12 in a non-delivery report (NDR) or delivery status notification (DSN). You'd see this automated notification when the sender's message is rejected because the recipient address is set up to reject messages sent from outside of its organization. Only an email admin for the recipient's organization can change this.
I'm the email admin for the recipient. How do I allow the sender to send a message to this email address?
There are several ways you can allow the sender to send a message to the address noted in the NDR. The most common methods are listed here.
Allow anyone (both inside and outside your organization) to send messages to this email address-
In the Exchange admin center go to recipients.
-
If the recipient address is a mailbox, select mailboxes, otherwise skip to step 3.
-
From the displayed list of mailboxes select the recipient and then select Edit
 .
. -
In the User Mailbox dialog box select mailbox features > Message Delivery Restrictions > View details.
-
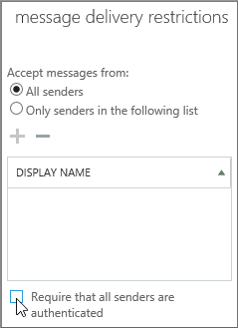
In the message delivery restrictions box uncheck the checkbox for Require that all senders are authenticated.

-
Click OK > Save.
-
-
If the recipient address is a group select groups, otherwise skip to step 4.
-
From the displayed list of groups select the group name and then select Edit
 .
. -
In the Distribution group dialog box select delivery management.
-
Select the option Senders inside and outside of my organization.
-
Click Save.
-
-
If the recipient address is a mail user, select contacts, otherwise skip to The sender is trying to send to a public folder.
-
From the displayed list of contacts and mail users select the recipient name and then select Edit
 .
. -
In the Mail User dialog box select mail flow settings > Message Delivery Restrictions > View details.
-
In the Message Delivery Restrictions dialog box select the Accept message from: > All senders option.
-
In the message delivery restrictions box uncheck the checkbox for Require that all senders are authenticated.
-
Select OK > Save.
-
-
Rather than allowing all external senders to send to this email address you can selectively allow just internal senders and a few specific external senders to send to it. You do this by creating a custom allowed senders list that includes everyone in your organization plus one or more specific external senders.
-
Notes:
-
To add someone from outside your organization to an allowed senders list you must first create a Mail Contact for them. See Manage mail contacts to learn how.
-
If you want to use the allowed senders list method to allow everyone in your organization to send to this recipient you can create a distribution group (or a dynamic distribution group) that contains everyone in your organization. Learn how at Create and use distribution groups. Once it's created, you can add the group to the allowed senders list.
-
-
This example shows how to set up an allowed senders list for a mailbox, but you can perform the same or similar actions within the mail user or group dialogs for a mail user or group respectively.
-
In the Exchange admin center select recipients > mailboxes.
-
From the displayed list of mailboxes select the recipient and then select Edit
 .
. -
In the User mailbox dialog box select mailbox features > Message Delivery Restrictions > View details.
-
In the message delivery restrictions box uncheck the checkbox for Require that all senders are authenticated.
-
Select to Accept messages from > Only senders in the following list.
-
Select Add
 .
. -
In the Select Members dialog box, select the members you want to add to the allowed senders list, then select Add.
-
Click OK > OK > Save.
-
If the recipient address is a shared mailbox do the following:
-
In the Exchange admin center go to public folders > public folders.
-
From the displayed list of public folders select the public folder name.
-
In the public folder details window (located on the side) select Folder permissions > Manage
-
In the Public Folder Permisions dialog box select Add .
-
In the Public Folder Permisions dialog box select Browse.
-
In the Select Recipient dialog box select the recipient you wish to grant permission to send to this public folder.
-
Select OK > Save > Save.
-
After the changes are applied click Close.
No comments:
Post a Comment