Fix email delivery issues for error code 5.7.134 in Office 365
This topic walks you through the steps for what to do if you see error code 550 5.7.134 in a nondelivery report (NDR). You'd see the NDR when an email is rejected because the recipient address is a mailbox that is set up to reject messages sent from outside of its organization. Only an email admin for the recipient's organization can change this.
I'm the email admin for the recipient. How do I allow the sender to send a message to this email address?
There are two methods you can use to allow the sender to send a message to the address noted in the NDR. Here's how.
Method 1: Allow anyone (both inside and outside your organization) to send messages to this email address
-
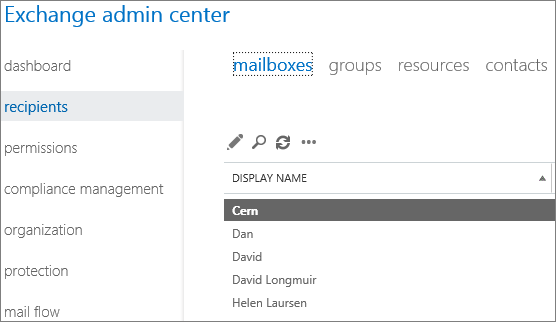
In the Exchange admin center go to recipients > mailboxes.

-
From the displayed list of mailboxes select the recipient, and then select Edit
 .
. -
In the User Mailbox dialog box, select mailbox features > Message Delivery Restrictions > View details.
-
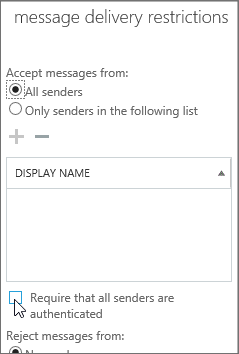
Make certain the check box for Require that all senders are authenticated is clear, and then click OK > Save.

Method 2: Create a custom allowed senders list for the recipient
To accept messages from someone outside of your organization but still reject messages from everyone else outside of your organization, you can create a custom allowed senders list that includes both that person and everyone in your organization. Here's how to set it up.
-
In the Exchange admin center go to recipients > mailboxes.

-
From the displayed list of mailboxes, select the recipient shown in the NDR, and then select Edit
 .
. -
In the User Mailbox dialog box, select mailbox features > Message Delivery Restrictions > View details.
-
In the message delivery restrictions box, clear the check box for Require that all senders are authenticated.
-
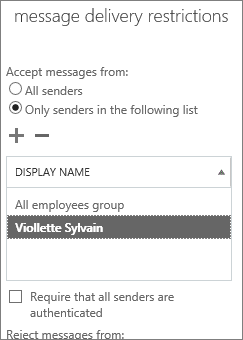
Select to Accept messages from > Only senders in the following list.
-
Select Add
 .
. -
In the Select Members dialog box, select the members you want to add to the allowed senders list, then select Add, and then click OK > OK > Save.
Tips:
-
To add someone from outside your organization to an allowed senders list, you must first create a Mail Contact for them. See Manage mail contacts to learn how.
-
If you want to use the allowed senders list method to allow everyone in your organization to send to this recipient, you can create a distribution group (or a dynamic distribution group) that contains everyone in your organization. Learn how at Create and use distribution groups. Once it's created, you can add the group to the allowed senders list.

-
Note: The allowed senders listed referred to here is not the same as the Exchange Online Protection anti-spam allowed or blocked senders list, which you manage from Exchange admin center > Protection > Spam filter.
Still need help with error code 550 5.7.134?


No comments:
Post a Comment