Use Business Contacts in Business Contact Manager
You can use Business Contact records to organize and store lots of information about the people you do business with.
This article describes how to create new records and complete the Business Contact form.
What do you want to do?
You can do the following with Business Contact records:
-
Add them by using a variety of methods.
-
Assign them to an employee or co-worker.
-
Link Accounts to them.
By linking Business Contact records to Account records, you can connect the information about your Business Contacts with information about the companies they work for. For example, when you link one or more Business Contacts to an Account record, the communication history of the Account record includes the communication history items for each of the Business Contacts that is linked to that Account. -
Link communication history items to Business Contacts, track e-mail messages, and filter the list of communication history items.
You can keep track of many of your activities (including phone calls, e-mail messages, letters or files) related to your Business Contact on the History page in the Business Contact record.You can automatically link e-mail messages to Business Contact records. For more information, see Link and track e-mail messages in Business Contact Manager.
-
Convert a Business Contact into a Lead or other record that is based on the Business Contact record type.
-
Edit the information in Business Contact records.
-
Customize the Business Contact form by adding or removing fields and items in the field lists.
For information about customizing forms or creating other forms to store your business information, see Create and customize record types and lists.
Create new Business Contact records
Business Contact records can help you keep track of the information you have about the people you do business with.
In this section
Manually add a new Business Contact record
Import Business Contacts from another program
Move or copy Outlook contacts into Business Contact Manager
Create a Business Contact record from an e-mail message
Convert a Lead record into a Business Contact record
There are several ways to get information into the Business Contact records. You can type information into records, import data from Outlook or other programs, and copy an Outlook contact.
The information can include:
-
Business information, such as the company or organization of the Business Contact.
-
Personal information such as birth date.
-
Communication history items, such as e-mail messages and appointments.
-
Any details that you record in the customized fields that you add to the form.
Tip: You can customize your Business Contact forms by adding fields that are specific to your business, or moving the sections to emphasize the information that is most important to you. For example, a florist might create a field named "Favorite Flower" and a heating specialist might create a field named "Furnace Model". For more information about customizing forms, see Create and customize record types and lists.
Manually add a new Business Contact record
It takes just minutes to open a blank Business Contact form and enter a few key pieces of data. Saving the form creates the new Business Contact record. Later, as you develop your relationship with the person, you can re-open the record and add more details.

You will notice many similarities between the Business Contact form and the Outlook Contact form.
Open a Business Contact form
-
In the Navigation Pane, under Business Contact Manager, click Contact Manager.
-
On the Ribbon, in the New group, click New Business Contact.
Complete the Business Contact form
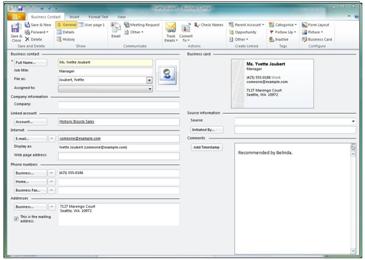
Like most of the other forms, the Business Contact form includes a General, Details, and History page.
You can customize the form by moving the sections and fields, renaming fields, and adding items to the lists. For information about customizing forms or creating other forms to store your business information, see Create and customize record types and lists.
General page
Business Contact section
-
Enter the full name and job title of the Business Contact. Select the File as name, as you would in an Outlook contact form.
Full Name is the only required field. Adding information to other fields is optional.
-
Assign the Business Contact To assign the Business Contact to another employee, in the Assigned to field, click the employee name.
Note: The names in the Assigned to list are the employees with whom you have shared your Business Contact Manager database. For more information about sharing, see Share your Business Contact Manager data with other users.
Company information section
You can use either the Company field or the Account field to store the name of the company of the Business Contact. Use the Company field if you do not use Account records.
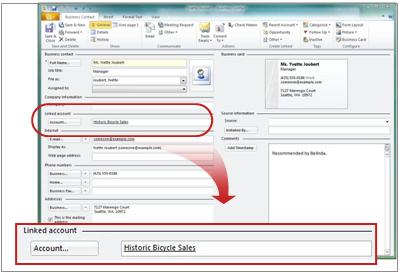
Linked account section

-
Link the Business Contact to an Account Click Account to link the Business Contact to an Account.
-
In the Select an Account to link to this Business Contact dialog box, click the Account, and then click Link To.
The value of linking Business Contacts to an Account is that the communication history of the Business Contact is also listed in the communication history of the Account record. If more than one Business Contact is linked to the same account, the communication history of each linked Business Contact is also listed in the communication history of the Account. This enables you to see all of the communication history and all of the Business Contacts associated with an organization in one place. For more information about choosing a record to link, see Link records in Business Contact Manager.Internet, Phone numbers, Addresses, and Business Card sections
-
Enter the e-mail and Web page addresses, telephone numbers, business and home addresses. Enter the information to complete the business card, just as you would in an Outlook Contact form.
An arrow next to a field name (such as E-mail) indicates that you can make multiple entries in the field.Tip: If you enter more than one address for a Business Contact, select the This is the mailing address check box to establish which address is used during mail merge.
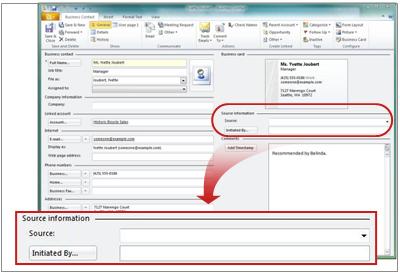
Source information section

-
In the Source information section, enter information in the following fields:
-
Source Click the method or action whereby this Business Contact learned about your business. For example, an advertisement, or word-of-mouth.
-
Initiated by Click this button to select the marketing activity or other business record (such as another Business Contact) that brought this Business Contact to your business.
Tip: Entering the name of a marketing activity allows Business Contact Manager for Outlook to track the type and number of records that resulted from the activity. It also links the marketing activity record to the Business Contact. For more information about marketing activities, see Market your products and services in Business Contact Manager.
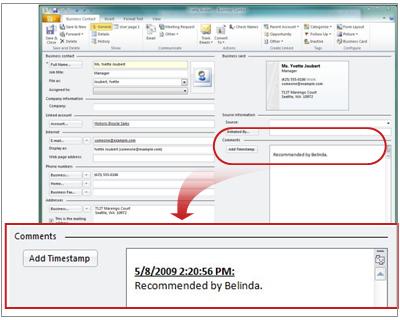
Comments section
-
-
In the Comments section, type notes, paste comments from other files, or attach files, Outlook items, or business cards.

Tip: If more than one colleague works with a Business Contact, it may be helpful to note when you entered a comment. Click Add timestamp to record the date and time of each entry.
-
When you're done entering information, click Save & Close.
Details page
-
On the Ribbon, in the Show group, click Details to display the Details page.
-
Enter more information about the person's job, and data, such as birth date, payment status, whether the record is active, and select the preferred method of communication.
History page
-
On the Ribbon, in the Show group, click History to display the History page.
-
Add or view communication history items such as e-mail messages, business notes, or appointments.
How do I add a communication history item?
-
Under Communication History, click New, and then click the type of item that you want to add.
-
Type the information on the form, and then click Save & Close.
For more information about communication history items, see Track your communications with customers in Business Contact Manager.
-
-
If you want to look for a particular item, you can search or filter the list of communication history items.
-
How do I search the list of communication history items?
-
In the Search box, type the information that you're looking for, and then click the Search
 button.
 Note: Only the Subject and Linked To fields are searched. To list all items of a certain type, such as e-mail messages, use a filter.
-
-
How do I filter the list of communication history items?
-
On the Ribbon, click the View tab.
-
In the Filter group, do one of the following:
-
Click the type of filter, such as Item Type that you want to apply, and then click the filter.
-
Click Filter, and then select the criteria for the filter.
For more information about filtering, see Filter records in Business Contact Manager.
-
-
-
Import Business Contacts from another program
You can import Business Contact and other types of records from programs such as ACT! and Microsoft Excel.
For information about how to import data from other programs, or your Outlook Contacts folder, see Import your data into Business Contact Manager.
Move or copy Outlook contacts into Business Contact Manager
-
In the Navigation Pane, click the Contacts button.
-
In the Contacts list, click the contact that you want to move to Business Contact Manager for Outlook.
How do I select more than one record?To select records that are adjacent to each other, press the SHIFT key, and then click the first and last records of the group that you want to add. To select nonadjacent records, press the CTRL key, and then click the individual records. To select all records, click one, and then press CTRL+A.
To copy the entire contents of your Outlook Contacts folder to Business Contact Manager, import your Outlook Contacts folder into Business Contacts. For information about how to import, see Import your data into Business Contact Manager.
-
On the Ribbon, in the Business group, do one of the following.
-
Move the contact
-
Click Create Record.
-
Point to Move to Business Contact Manager, and then click Business Contact or the type of record that you want.
-
-
Copy the contact
-
Click Create Record.
-
Point to Copy to Business Contact Manager, and then click Business Contact or the type of record that you want.
-
-
If you want to access your Business Contacts on your mobile phone just as you do your Outlook contacts, you can use the Business Contact Synchronization feature to include your Business Contacts in your Outlook Contacts folder. For information about Business Contact Synchronization, see Access your Business Contacts remotely: Use Synchronization in Business Contact Manager.
Important: You could end up with duplicate records in your Contacts folder if the Business Contact Synchronization feature is enabled. The Business Contact Synchronization feature automatically includes Business Contact records in your Outlook Contacts folder. When contacts are moved or copied to the Business Contacts folder, they will be shown in your Contacts folder as Business Contacts too.
Create a Business Contact record from an e-mail message
You can create a Business Contact record from an e-mail message from a new customer.
-
In the Navigation Pane, click Inbox.
-
Double-click an e-mail message to open it.
-
On the Ribbon, in the Business group, click Create Record.
-
Click Business Contact, or the type of Business Contact record that you want to create by using the e-mail address on the From line of the message.
You can create Business Contacts from other e-mail addresses in a message by right-clicking the name, pointing to Create in Business Contact Manager, and then clicking Business Contact.
Convert a Lead record into a Business Contact record or convert a Lead into a Business Contact
Generally, information about a potential customer is stored in a Lead record. When that person becomes an actual customer, you can convert the Lead record into a Business Contact record.
You can also convert a Business Contact into a Lead or another record type that is based on the Business Contact record type.
You can create new record types such as Employee or Vendor by starting with the Business Contact form. For more information about how to create new record types, see Create and customize record types and lists.
-
In the Navigation Pane, under Business Contact Manager, click Contact Management.
-
In the workspace, click the Leads tab.
-
Double-click the record that you want to convert.
-
On the Ribbon, in the Edit group, click Convert To, and then click Business Contact.
-
Edit the new record as necessary.
-
When you're done, click Save & Close.
Edit Business Contact records
As you do business with your Business Contacts, you learn more about them, possibly including how they prefer to be contacted, their assistants' names, new telephone numbers, and so forth. Keeping up with this flow of information is a daily task that you can simplify by continuously updating and saving your Business Contact records. You can open a Business Contact record to add or edit information, or to see communication history items such as e-mail messages that are linked to the Business Contact.
-
In the Navigation Pane, under Business Contact Manager, click Contact Management.
-
In the workspace, click the Business Contacts tab, and then:
-
Scroll to the Business Contact that you want to open, and then double-click it.
—or—
-
Use the search box to type information about the Business Contact that you're looking for, and then double-click the record.
-
-
Add or edit information as necessary.
Tip: If you have an e-mail address for the Account, you can ensure that e-mail messages to and from the Account are automatically included in the communication history of the record. In the Edit group, click E-mail Tracking and then click Manage Linking and Tracking. Select the check box for the e-mail address of the Account, and then click OK. For more information about automatically linking e-mail messages to records, see Link and track e-mail messages in Business Contact Manager.
-
When you're done, click Save & Close.
Tip: With a feature called Bulk Edit, you can edit the contents of a field in multiple Business Contact records. This is handy, for example, if you want to enter a Web address for a dozen Business Contacts who all work at the same company. For more information about how to simultaneously edit multiple records, see Edit many records simultaneously in Business Contact Manager.
Filter your list of Business Contacts
You don't have to scroll through all of your Business Contacts to find what you want. Instead, you can filter any Business Contact list so that you see only the records that interest you.
-
In the Navigation Pane, under Business Contact Manager, click Contact Management.
-
In the workspace, right-click the Business Contacts tab, and then click Modify.
-
In the Modify Tab dialog box, click Filter.
-
In the Filter Business Contacts dialog box, you can use one or both of the following:
-
Simple Filter Select or clear preset categories.
-
Advanced Filter Create multiple filters to refine your selection.
-
This filtered list can be used to create a customized tab, a call list, or mailing list. It can also be used as the basis of a report or a gadget.
For more information about filtering, see Filter records in Business Contact Manager. For more information about reports, see Use reports and charts in Business Contact Manager. For more information about gadgets, see Use gadgets in Business Contact Manager.
No comments:
Post a Comment