Add, format, and delete tables from a page
You can add a table to a page on a site, and then configure the table using tools that are similar to those in word processors, such as Microsoft Word 2010.
What do you want to do?
Add a table to a Page
-
From the page where you want to add the Table, in the ribbon, click the Page tab, and then click the Edit command.

Note: If the Edit command is disabled, you may not have the permissions to edit the page. Contact your administrator.
-
Click on the page where you want to add a table, click the Insert tab, and then click Table.

-
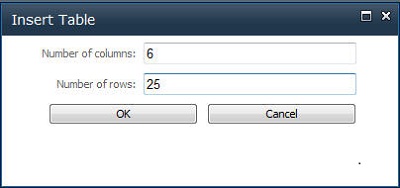
From the Table drop-down menu, click Insert Table, enter the number of columns and rows you want in the Insert Table dialog box, and then click OK.

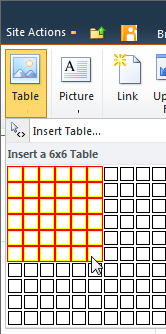
Alternatively, you can select the number of columns and rows you want from the grid provided in the Table drop-down menu. Under Insert Table, drag your mouse across the grid to select the number of rows and columns you want. -
After you add a table to a page, you can use the Table Tools available from the ribbon to customize the design and layout of your table. When you are satisfied with the appearance of your table, click the Page tab, and then click Save.
Format a table
After you create a table, you can format the entire table by using Table Styles. By resting your pointer over each of the preformatted table styles, you can preview what the table will look like before you actually apply the style.
You can also customize the layout of your table by splitting or merging cells, adding or deleting columns or rows, or changing the width and height of your table.
Use Table Styles to format an entire table
-
In Edit view, click in the table that you want to format.
-
Under Table Tools, click the Design tab.
-
In the Table Styles group, rest your pointer over each table style until you find a style that you want to use.
-
Click the style to apply it to the table.
-
If you want to display special formatting for the first or last row or column in your table, select the check box next to the appropriate table element in the Table Style Options group.
-
Select Header Row to apply special formatting to the first row of your table.
-
Select First Column to apply special formatting to the first column of your table.
-
Select Footer Row to apply special formatting to the last row of your table.
-
Select Last Column to apply special formatting to the last column of your table.
-
Resize your table
You can change the height or width of your table or the height of a specific row and width of a specific column within your table.

-
To resize your table, in Table Tools, on the Layout tab, in the Width and Height group, click the up or down arrow for Table Width and Table Height until your table is the size you want.
-
To resize a column or row, click in the specific column or row you want to resize, and then click the up or down arrow for Column Width or Row Height until the selected column or row is the size you want.
Note: You can also change the width and height of a table, column, or row by typing %, for the percentage of the page, after the number or by typing the desired width and height into the box.
Display or hide gridlines
Gridlines show the cell boundaries of a table on the screen wherever the table doesn't have borders applied. Unlike borders, gridlines appear only on the screen; they do not display in viewing mode.
-
On the Layout tab, in the Table group, click Show Gridlines to display the gridlines.
Add a row to your table
-
Click in a cell that is located just below or above where you want to add a row.
-
Under Table Tools, on the Layout tab, do one of the following:
-
To add a row just above the cell that you clicked in, in the Rows and Columns group, click Insert Above.
-
To add a row just below the cell that you clicked in, in the Rows and Columns group, click Insert Below.
-
Add a column to your table
-
Click in a cell that is located just to the right or left of where you want to add a column.
-
Under Table Tools, on the Layout tab, do one of the following:
-
To add a column just to the left of the cell that you clicked in, in the Rows and Columns group, click Insert Left.
-
To add a column just to the right of the cell that you clicked in, in the Rows and Columns group, click Insert Right.
-
Merge and split cells
You can combine two cells in the same row or column into a single cell. For example, you can merge two cells horizontally to create a table heading that spans several columns.
-
Click in one of the cells you want to merge.
-
Under Table Tools on the Layout tab, in the Merge group, select the option you want. You can choose to merge the cell you have clicked with the cell above it, below it, or to the left or right of it.
Note: You cannot merge more than two cells at one time.
If you want to split cells, click in the cell that you want to split, click Split Cells, and then click Split Horizontal or Split Vertical.
Delete a table from a Page
-
From the page where the Table is displayed, in the ribbon, click the Page tab, and then click the Edit command.
-
Click in the table you want to delete.
-
In the ribbon, under Table Tools, click the Layout tab.
-
In the Rows & Columns group, click Delete, and then in the drop-down menu, select Delete Table.
No comments:
Post a Comment