Schedule a meeting with other people
You can send a meeting request to one or more people. Outlook tracks who accepts the request and blocks out time on your calendar for the meeting. When you create a meeting request, you can add attachments, set a location, and use the Scheduling Assistant to choose the best time for your meeting.
What would you like to do?
Schedule a meeting
When you schedule a new meeting, you can set a topic for the meeting, choose attendees, and specify when and where the meeting will take place. Responses to your meeting requests appear in your Inbox.
-
On the Home tab, in the New group, do one of the following:
-
From the Inbox, choose New Items > New Meeting.

-
In Calendar, click New Meeting.

Tip: You also can use the keyboard shortcut Ctrl+Shift+Q to create a new meeting request.
-
-
In the To box, you can add attendees.
Note: You also can add—or remove—attendees when you use the Scheduling Assistant in the Show group on the Meeting tab.
-
In the Subject box, tell your recipients what the meeting is about.
-
In the Location box, tell your recipients where this meeting will be held.
Tip: If you use a Microsoft Exchange account, click Rooms to check availability and reserve rooms.
-
Choose one of the following:
-
For a specific start and end time, in the Start time and End time lists, click the meeting start and end times.
-
For an all day event, select the All day event check box and the event shows as a full 24-hour event, lasting from midnight to midnight.
Note: If you want to schedule meetings based on an alternate time zone, on the Meeting tab, in the Options group, click Time Zones.
-
-
In the meeting request message box, you can type any information you want to share with the recipients.
Tip: You also can attach a file. On the Insert tab, choose Attach File, and then choose the file you want to add to the meeting request.
-
Click Scheduling Assistant and the Scheduling Assistant for Exchange accounts helps you find the best time for your meeting by analyzing when recipients and meeting resources, such as rooms, are available.
Tip: If you're not using an Exchange account, click Scheduling.
-
Choose one of the following:
-
Click Add Attendees, and then type the recipients' names, email addresses, or resource names (separated by semicolons) in the Required, Optional, or Resources boxes.
Tip: If you're not using an Exchange account, click Add Others > Add from Address Book.
-
In the Search box, type the name of a potential attendees, click Go, choose a name in the results list, and then click Required, Optional, or Resources.
Notes:
-
Vertical lines represent the start and end times of the meeting. You can click and drag the lines to a new start and end time.
-
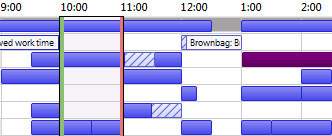
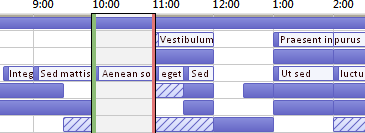
For Exchange accounts, the free/busy grid shows the availability of attendees. A green vertical line represents the start of the meeting. A red vertical line represents the end of the meeting.

-
-
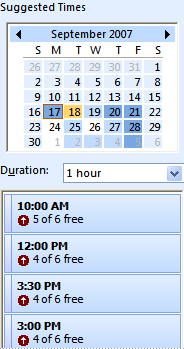
For Exchange accounts, the Room Finder pane contains suggested best times for your meeting (when most attendees are available). To select a meeting time, click a time suggestion in the Room Finder pane in the Suggested times section, or pick a time on the free/busy grid.
-
After your attendees are added, to switch back to the meeting request, on the ribbon, click Appointment.
Note: After you've set the meeting time, if you don't want to make the meeting recurring, choose Send, or choose Appointment if you have more information to add to the body of the meeting.
-
Choose one of the following:
-
If you don't want to make this a recurring meeting, click Send.
-
If you do want to make this a recurring meeting, go to Make a meeting recurring.
-
Make a meeting recurring
-
Click Meeting > Recurrence.

Note: Use the keyboard shortcut Ctrl+G to schedule the meeting to repeat regularly.
-
Choose the options for the recurrence pattern you want, and then click OK.
Note: When you add a recurrence pattern to a meeting request, the Meeting tab changes to Meeting Series.
-
To send the meeting request, click Send.
What would you like to do?
Schedule an in-person meeting
-
On the File menu, point to New, and then click Meeting Request.
Note: Use the keyboard shortcut Ctrl+Shift+Q to create a new meeting request.
-
In the Subject box, type a description.
-
In the Location box, type a description or click Rooms to choose from rooms available for automatic scheduling by using Microsoft Exchange.
-
In the Start time and End time lists, select the start and end time for the meeting. If this is an all day event, select the All day event check box.
An all day event is a full 24-hour event lasting from midnight to midnight.
Note: By default, the current time zone setting on your computer system is used to schedule meetings. If you want to schedule meetings based upon an alternate time zone, on the Meeting tab, in the Options group, click Time Zones.
-
Type any information that you want to share with the recipients, attach any files, or create a Meeting Workspace.
For more information about Meeting Workspaces, see the See Also section.
-
On the Meeting tab, in the Show group, click Scheduling Assistant.
The Scheduling Assistant helps to find the best time for your meeting.
-
Click Add Others, and then click Add from Address Book.
-
In the Select Attendees and Resources dialog box, in the Search box, enter the name of a person or resource that you want to invite to the meeting. If you are searching with the More Columns option, then click Go.
-
Select the name from the results list, and click Required, Optional, or Resources, and then click OK.
Required and Optional attendees appear in the To box on the Meeting tab, and Resources appear in the Location box.
The free/busy grid shows the availability of attendees. A green vertical line represents the start of the meeting. A red vertical line represents the end of the meeting.

The Suggested Times pane locates the best time for your meeting, which is defined as the time when most attendees are available. The best meeting time appears at the top of the pane. To select any of the suggested times, click the time suggestion in the Suggested Times pane. You can also manually pick a time on the free/busy grid.

-
If you want to make the meeting recur, on the Meeting tab, in the Options group, click Recurrence, select the recurrence pattern, and then click OK.
When you add a recurrence pattern to a meeting request, the Meeting tab changes to Recurring Meeting.
-
On the Meeting tab, in the Show group, click Appointment.
-
Click Send.
Change a meeting
-
Open the meeting that you want to change.
-
Do one of the following:
-
Change options for a meeting that is not part of a series
-
Change the options, such as subject, location, and time, that you want to change.
-
Click Send Update.
-
-
Change options for all meetings in a series
-
Click Open the series.
-
Change any options, such as subject, location, and time, that you want to change.
-
To change recurrence options, on the Recurring Meeting tab, in the Options group, click Recurrence, change the options, such as time, recurrence pattern, or range of recurrence, and then click OK.
-
Click Send Update.
-
-
Change options for one meeting that is part of a series
-
Click Open this occurrence.
-
On the Recurring Meeting tab, change the options, such as subject, location, and time, that you want.
-
Click Send Update.
-
-
Tip: In Calendar, you can drag the meeting to a different date and you can also edit the subject by clicking the description text, pressing F2, and then typing your changes.
Make a meeting recurring
-
Open the meeting that you want to make recurring.
-
On the Meeting tab, in the Options group, click Recurrence.
-
Click the frequency—Daily, Weekly, Monthly, or Yearly—with which you want the meeting to recur, and then select options for the frequency, and then click OK.
-
Click Send Update.
Make a meeting private
-
Create or open the meeting that you want to make private.
-
On the Meeting tab, in the Options group, click Options, and then click Private.
Important: You should not rely on the Private feature to prevent access by other people to the details of an meeting, contact, or task. To make sure that other people cannot read the item that you marked as private, do not grant them read permission to your Calendar, Contacts, or Tasks folder. A person with read permission to access your folders could use programmatic methods or other email applications to view details of a private item. Use the Private feature only when you share folders with people who you trust.
Set up or remove a reminder
Do one of the following:
-
For all new meetings that you'll create
-
On the Tools menu, click Options.
-
To have a reminder automatically turned on or off for new meetings, select or clear the Default reminder check box.
-
If you selected the check box, enter the amount of time before the meeting that you want the reminder to appear.
-
-
For existing meetings
-
Open the meeting or series if the meeting is recurring.
-
To have a reminder turned on or off, on the Meeting tab, in the Options group, select None or a listed reminder time.
-
No comments:
Post a Comment