Wednesday, May 31, 2017

Slide masters in PowerPoint 2016 for Mac

Slide masters in PowerPoint 2016 for Mac

A slide master is the top slide in a hierarchy of slides that stores information about the theme and slide layouts of a presentation, including the background, color, fonts, effects, placeholder sizes, and positioning.

Every presentation contains at least one slide master that is created automatically when you open a new presentation. The key benefit to modifying and using slide masters is that you can make universal style changes to all the slides in your presentation, including slides added later. When you use a slide master, you save time because you don't have to apply styles on more than one slide.

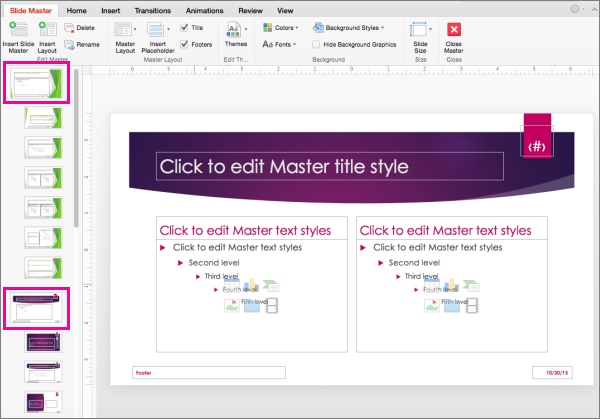
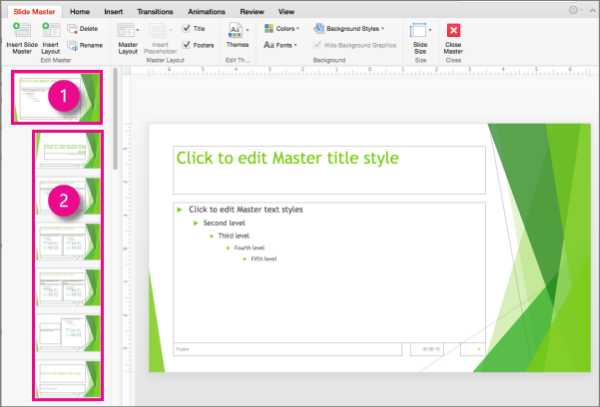
To get to Slide Master view, on the View tab, click Side Master. The master slide is the top slide in the thumbnail pane on the left side of the screen. The related slide layouts appear just below the slide master.

Slide master and slide layouts

1 Slide master

2 Slide layouts

When you edit the slide master, all slides in your presentation that are based on that master will contain your changes. However, the majority of your changes will likely be to the slide layouts related to the master. When you modify one or more of the slide layouts beneath a slide master, you are essentially modifying the slide master. You'll see that there are several default layouts associated with any given slide master, and you probably won't use all of the layouts provided. You can choose the ones that work best to display your information.

Each slide layout is set up differently, yet all layouts that are associated with a given slide master contain the same theme (color scheme, fonts, and effects). The following image shows a single slide master with the Facet theme applied, and two of the default slide layouts. Notice how both of the layouts portray a different version of the Facet theme—using the same color scheme but a different slide arrangement. Each layout provides text boxes and footers in different locations on the slide, and different list styles and font sizes in the various text boxes.

Slide master with two slide layouts

You can change anything about a layout to suit your needs. For example, to change the font style or size of slides titles or body text on all slides in your presentation, select the slide master, select the master text you want to change, click the Home tab, and then make changes by selecting options in the Font group. These changes are applied to all of your slide layouts and any new slides that you add to your presentation.

Notes: 

  • It's a good idea to edit your slide master and layouts before you start to build individual slides so that all slides that you add to your presentation will be based on your custom edits. When you change a slide master or slide layout and then go to Normal view, every slide you add after that will be based on the modified layout and will reflect the changed look of the layout. However, if there are existing slides in your presentation that are based on the old version of the layout, you'll need to reapply the layout to those slides.

  • You can override some of the slide master customizations on individual slides by using the background and text formatting features, but others (such as footers and logos) can be modified only in Slide Master view.

When you want your presentation to contain two or more different styles or themes (such as backgrounds, color schemes, fonts, and effects), you need to insert a slide master for each different theme. The following image shows a presentation with two slide masters in Slide Master view. Each slide master has a different theme applied to it. To add another slide master to your presentation, click Themes on the Slide Master tab, and then select the theme you want.

Presentation with two slide masters

Related information

Create or change slide layouts in PowerPoint 2016 for Mac

Customize and save a theme in PowerPoint 2016 for Mac

Start using Lync for IM and online meetings

Start using Lync for IM and online meetings

Office 365 includes Lync , which lets you have instant messaging (IM), audio and video conversations, and Lync Meetings. To download Lync, sign in to Office 365, then at the top of the page, click Settings Settings: update your profile, install software and connect it to the cloud > Office 365 settings > Software > Lync.

With Lync you can:

  • See when people are available, away from their desk, or in a meeting

  • Send an instant message

  • Set up a Lync Meeting

  • Share your desktop or a program in a Lync Meeting

  • Make and receive audio and video calls

Your browser does not support video. Install Microsoft Silverlight, Adobe Flash Player, or Internet Explorer 9.

Basic tasks in Lync

Videos

Sign In As

Sign In As

Click the presence status that you want to appear when you sign in to Communicator Web Access:

  • Available

  • Busy

  • Do Not Disturb

  • Be Right Back

  • Away

See also

Signing In to Communicator Web Access

Using Quick Sign In

FormatPercent Function

FormatPercent Function

Returns an expression formatted as a percentage (multipled by 100) with a trailing % character.

Syntax

FormatPercent ( Expression [, NumDigitsAfterDecimal ] [, IncludeLeadingDigit ] [, UseParensForNegativeNumbers ] [, GroupDigits ] )

The FormatPercent function syntax has these arguments:

Argument

Description

Expression

Required. Expression to be formatted.

NumDigitsAfterDecimal

Optional. Numeric value indicating how many places to the right of the decimal are displayed. Default value is –1, which indicates that the computer's regional settings are used.

IncludeLeadingDigit

Optional. Tristate constant that indicates whether or not a leading zero is displayed for fractional values. See Settings section for values.

UseParensForNegativeNumbers

Optional. Tristate constant that indicates whether or not to place negative values within parentheses. See Settings section for values.

GroupDigits

Optional. Tristate constant that indicates whether or not numbers are grouped using the group delimiter specified in the computer's regional settings. See Settings section for values.


Settings

The IncludeLeadingDigit, UseParensForNegativeNumbers, and GroupDigits arguments have the following settings:

Constant

Value

Description

vbTrue

–1

True

vbFalse

0

False

vbUseDefault

–2

Use the setting from the computer's regional settings.


Remarks

When one or more optional arguments are omitted, the values for omitted arguments are provided by the computer's regional settings.

Note:  All settings information comes from the Regional Settings Number tab.

Office Communicator 2007 Error Message Center

Office Communicator 2007 Error Message Center

Sorry. We currently have no content for this error message. To help ensure that we have useful information for this error message in the future, please use the feedback mechanism at the bottom of this page to provide information about the conditions under which this error occurred. Please include the Error ID with your feedback.

Additional Resources

  • Microsoft Office Communicator Forum on Microsoft TechNet. View and post messages about Office Communicator 2007 R2 with other users and administrators in the community.

  • Microsoft Office Communicator Team Blog. Read blog posts from the Office Communicator team at Microsoft. Provide feedback on the product and find links to other related blogs, forums, and Web sites.

  • Communic ator Configuration Information. You or your system administrator may find the Communicator configuration information helpful when troubleshooting problems.

    1. In the Windows System Tray, press CTRL and right-click the Communicator icon.

    2. Click Configuration Information.

  • Communicator Logs. You or your system administrator might find Communicator logs helpful. For information on using logging, see the Logging Options heading at the end of the Sign in to Communicator 2007 R2 topic.

Thank you from the Office Communicator team.

Assign Skype for Business licenses

Assign Skype for Business licenses

This article gives you tips about assigning Skype for Business licenses to your users. It also provides scripts for assigning licenses in bulk.

IMPORTANT: See Skype for Business add-on licensing for information about what licenses you need to buy and how to buy them - depending on your Office 365 plan - so users get dial-in conferencing, toll free numbers, and the ability to call phone numbers outside your business.

Cloud PBX and PSTN Calling: Tips and scripts for assigning licenses

What you need to know before assigning Cloud PBX and PSTN Calling licenses

  • IMPORTANT: For you to see the Voice option in the left navigation in the Skype for Business admin center, you must first buy at least one Enterprise E5 license, one Skype for Business Cloud PBX add-on license, or one Skype for Business PSTN Conferencing add-on license.

  • Using on-premises PSTN connectivity for hybrid users? If so, you only need to assign a Skype for Business Cloud PBX license. You should NOT assign a PSTN Calling plan.

  • Latency after assigning licenses: Because of the latency between Office 365 and Skype for Business Online, it can possibly take up to 24 hours for a user to be enabled for PSTN Calling after you assign a license. If after 24 hours, the user isn't enabled for PSTN Calling please call us.

  • Error messages: You will get an error message if you haven't purchased the correct number of licenses. If you need to buy more licenses to enable this user for PSTN Calling, choose Buy more.

  • Next steps: After you assign PSTN Calling plan licenses to your users, you will need to get your phone numbers for your organization, and then assign those numbers to the people in your organization. For step-by-step instructions, see Set up PSTN Calling for Skype for Business.

How to assign a Cloud PBX and PSTN Calling license to one user

The steps are the same as assigning an Office 365 license. See Assign licenses to users in Office 365 for business licenses.

How to assign Cloud PBX and PSTN Calling licenses in bulk

  1. Install the Microsoft Online Services Sign-In Assistant for IT Professionals RTW. Don't have the module installed? See Microsoft Online Services Sign-In Assistant for IT Professionals RTW to download it.

  2. Install the Windows Azure Active Directory Module. Don't have the module installed? See Manage Azure AD using Windows PowerShell for download instructions and cmdlet syntax.

  3. Once you get the modules installed, use the Windows PowerShell command prompt and the following syntax to assign the licenses to your users:

    This example assigns an Enterprise E3 license along with a Skype for Business Cloud PBX and Skype for Business PSTN Domestic Calling PSTN calling plan license.

    The name of the licenses or product names in the script are listed in italics text (see Cloud PBX and PSTN Calling product names or SKUs used for scripting, after the example).

    #Create a text file with a single row containing list of UserPrincipalName (UPN) of users to license. The MSOLservice uses UPN to license user accounts in Office 365.  #Example of text file:  #user1@domain.com  #user2@domain.com    #Import Module  ipmo MSOnline    #Authenticate to MSOLservice.  Connect-MSOLService    #File prompt to select the userlist txt file.  [System.Reflection.Assembly]::LoadWithPartialName("System.windows.forms") | Out-Null    $OFD = New-Object System.Windows.Forms.OpenFileDialog    $OFD.filter = "text files (*.*)| *.txt"    $OFD.ShowDialog() | Out-Null    $OFD.filename    If ($OFD.filename -eq '')  {  Write-Host "You did not choose a file. Try again" -ForegroundColor White -BackgroundColor Red  }    #Create a variable of all users.  $users = Get-Content $OFD.filename    #License each user in the $users variable.  #Use MCOPSTN1 for PSTN Domestic Calling and MCOPSTN2 for Domestic and International Calling.  foreach ($user in $users)      {      Write-host "Assigning License: $user"      Set-MsolUserLicense -UserPrincipalName $user -AddLicenses "companyname:ENTERPRISEPACK" -ErrorAction SilentlyContinue      Set-MsolUserLicense -UserPrincipalName $user -AddLicenses "companyname:MCOEV" -ErrorAction SilentlyContinue      Set-MsolUserLicense -UserPrincipalName $user -AddLicenses "companyname:MCOPSTN1" -ErrorAction SilentlyContinue      }   

Cloud PBX and PSTN Calling product names or SKUs used for scripting

Product name

SKU part name

Enterprise E5 (with Cloud PBX)

ENTERPRISEPREMIUM

Enterprise E3

ENTERPRISEPACK

Enterprise E1

STANDARDPACK

Skype for Business Online Standalone Plan 2

MCOSTANDARD

Skype for Business Cloud PBX

MCOEV

Skype for Business PSTN Domestic and International Calling

MCOPSTN2

Skype for Business PSTN Domestic Calling

MCOPSTN1

Skype for Business PSTN Consumption

MCOPSTNPP

PSTN conferencing: Tips and scripts for assigning licenses

What you need to know before assigning PSTN conferencing licenses

  • Third-party conferencing provider: If someone is already set up to use a third-party dial-in conferencing provider, when you assign them a Skype for Business PSTN Conferencing license, they will be changed to use Microsoft as the dial-in conferencing provider. You can change them back to the third-party provider.

  • Next steps: After you assign PSTN conferencing licenses, you need to assign a dial-in conferencing provider. Do one of the following:

How to assign a PSTN Conferencing license to one user

The steps are the same as assigning an Office 365 license. See Assign licenses to users in Office 365 for business licenses.

How to assign PSTN conferencing licenses in bulk

  1. Download and install Microsoft Online Services Sign-In Assistant for IT Professionals RTW.

  2. Download and install the Windows Azure Active Directory Module. See Manage Azure AD using Windows PowerShell for download instructions and cmdlet syntax.

    Once you get the modules installed, use the Windows PowerShell command prompt and the following syntax to assign the licenses to your users:

    The name of the licenses or product names in the script are listed in italics text. See Dial-in conferencing product names or SKUs used for scripting for all of the product names.

    This example assigns an Enterprise E3 license along with a PSTN Conferencing license.

    #Create a text file with a single row containing list of UserPrincipalName (UPN) of users to license. The MSOLservice uses UPN to license user accounts in Office 365.  #Example of text file:  #user1@domain.com  #user2@domain.com    #Import Module  ipmo MSOnline    #Authenticate to MSOLservice  Connect-MSOLService    #File prompt to select the userlist txt file  [System.Reflection.Assembly]::LoadWithPartialName("System.windows.forms") | Out-Null    $OFD = New-Object System.Windows.Forms.OpenFileDialog    $OFD.filter = "text files (*.*)| *.txt"    $OFD.ShowDialog() | Out-Null    $OFD.filename    If ($OFD.filename -eq '')  {  Write-Host "You did not choose a file. Try again" -ForegroundColor White -BackgroundColor Red  }    #Create a variable of all users  $users = Get-Content $OFD.filename    #License each user in the $users variable  foreach ($user in $users)      {      Write-host "Assigning License: $user"      Set-MsolUserLicense -UserPrincipalName $user -AddLicenses "companyname:ENTERPRISEPACK" -ErrorAction SilentlyContinue      Set-MsolUserLicense -UserPrincipalName $user -AddLicenses "companyname:MCOMEETADV" -ErrorAction SilentlyContinue      }   

Dial-in conferencing product names or SKUs used for scripting

Product name

SKU part name

Skype for Business PSTN Conferencing

MCOMEETADV

Skype for Business Online Standalone Plan 2

MCOSTANDARD

Enterprise E1

STANDARDPACK

Enterprise E3

ENTERPRISEPACK

Enterprise E5 (with dial-in conferencing)

ENTERPRISEPREMIUM_NOPSTNCONF

Enterprise E5 (with dial-in conferencing)

ENTERPRISEPREMIUM

PSTN Consumption

What you need to know before assigning PSTN Consumption licenses

  • Enterprise E5 customers: Even if your users are assigned Enterprise E5 licenses, we still recommend that you assign them Skype for Business PSTN Consumption licenses.

  • Next steps: After you assign these licenses, you will need to get your phone numbers for your organization, and then assign those numbers to the people in your organization. For step-by-step instructions, see Set up PSTN Calling for Skype for Business.

How to assign a PSTN Consumption license to one user

The steps are the same as assigning an Office 365 license. See Assign licenses to users in Office 365 for business licenses.

How to assign PSTN Consumption licenses in bulk

Take a look at the sample script for assigning PSTN Conferencing licenses. Update it with the info for assigning PSTN Consumption licenses.

Related articles

Set up dial-in or PSTN conferencing for Skype for Business

Set up PSTN Calling for Skype for Business

Add funds and manage Skype for Business PSTN Consumption

Link projects to create a master project

Link projects to create a master project

To help keep a large project more organized, you can link several project files together to create a master project/ subproject arrangement (also known as external dependencies). For example, a construction master project might have subproject files for plumbing, electrical, and carpentry work.

These instructions are specific to Microsoft Project 2016, 2013, and 2010.

Linking Project files

  1. Create separate Project files for each subproject, then open or create the project that you want to be the master project.

  2. In the master project, click View > Gantt Chart.

  3. In the Task Name field, click the row below which you want to insert the subproject. You can insert a subproject anywhere in the task list of the master project.

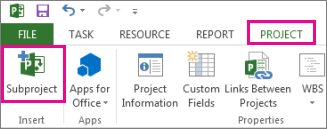
  4. Click Project > Subproject.

    The Project ribbon tab, showing the Insert subproject command.

  5. In the Insert Project box, select the subproject you want to insert.

    • To insert multiple subprojects, hold down Ctrl and click the subprojects in the order that you want to insert them.

    • In most cases, you'll want to leave the Link to project box checked, so that changes in the subproject are reflected in the master project, and vice-versa. But if you just want to copy the subproject into the master project without the files being dynamically linked, uncheck the box.

  6. Click Insert, or to insert a project in read-only format, click the arrow on the Insert button, and then click Insert Read-Only. Inserting a project read-only creates a link between the two projects, but prevents you from updating the subproject from within the master project. If you update the subproject file directly, however, its changes are reflected in the master project. The Insert Read-Only option is only available when the Link to project box is checked.

Avoiding duplicate resource names in linked projects

If you link projects that have resources with the same name, you'll create duplicate resource names, which could be confusing. To avoid this, uncheck the Link to project box in the Insert Project dialog box. Doing this will ensure that the resource information in the master project (such as pay rates, resource calendars) will be honored over the subproject resource information.

Note:  When you update an unlinked subproject from within the master project, the original subproject file will not show this change.

These instructions are specific to Microsoft Project 2007.

When should I use cross-project links, instead of inter-project dependencies?

If your project has a specific task that depends on a specific task in another project, use cross-project links to tie the task dates to one another. This way, if the task that you are dependent upon slips, the new dates are reflected in your own task. If your project is dependent on some aspect of another project, and the dependency is not necessarily tied to a specific task, use inter-project dependencies to identify exactly what each project brings to the relationship.

  1. Open both projects: the project that contains the task that you want to link to and the project that contains the task that you want to link from.

    On the Window menu of one of the projects, click Arrange All.

  2. Click the task for which you want to create a dependency to an external predecessor.

  3. Click Task Information Button image , and then click the Predecessors tab.

  4. In the ID column, type the project name and task ID number of the external predecessor, separated by a backslash. For example, type Project1\1 for task ID 1 in a file named Project1.

By default, you are notified if the data in an externally linked project has changed. The external predecessors and successors and the impacts to your schedule are displayed when you open a project with external links, and you can choose to accept any or all changes.

  • Both projects must be saved before you can link to an external task.

  • When you link tasks in different projects that are stored in Microsoft Office Project Server, the predecessor's task ID must be formatted correctly. In the Task Information dialog box, on the Predecessors tab, in the ID column, the task ID must be formatted as shown in the following example: <>\project1\42. In this example, project1 is the name of the project that contains the predecessor, and 42 is the task ID of the predecessor task.

  • Externally linked tasks appear dimmed in the task list. Double-clicking a task with an external successor or an external predecessor opens the project that contains the external task, if the project is available.

I linked tasks between projects, but the data doesn't match.

When you use the Paste Link option in the Paste Special dialog box (Edit menu) to connect tasks, Project uses Object Linking and Embedding (OLE) to make the connection. Only the fields that you have selected are linked. However, a task may have many more fields of information associated with it that affect how the task is scheduled, and these fields may be hidden if you have a split-screen view.

If you need to create a dependency between tasks in different projects, create external dependencies (instead of pasting a link) to maintain an accurate schedule.

When you use the Paste Link option, select individual fields instead of entire rows, and link only as much information as is needed to avoid conflicting schedule information.

Control Flow shape

Control Flow shape

A transition in an activity diagram, a control flow Control Flow shape icon represents a relationship between two states or action states and indicates that an object in the first state will enter the second state and perform specified actions.

The trigger that makes the transition fire is the occurrence of the event that labels the transition. A control flow is shown as a solid arrow from the source state to the target state and is labeled with a transition string with the following format:

event-name (parameters) [guard condition] / action > send-clause

For example:

right-mouse-down (location) [location in window] / object:=pick-object (location) > object.highlight ()

Name a Control Flow shape and add other property values

Open the element's UML Properties dialog box by double-clicking the icon that represents the element in the tree view or the shape that represents the element in a diagram.

Tip

Control which property values display on a shape in a diagram by right-clicking the shape, and then clicking Shape Display Options. In the UML Shape Display Options dialog box, select and clear options to display or hide property values.

Hide a Control Flow shape's guard condition, events, or actions

Right-click the shape, click Shape Display Options, and then clear Guard, Event, or Action.

LOG10 function

LOG10 function

Returns the base-10 logarithm of a number.

Syntax

LOG10(number)

Number     is the positive real number for which you want the base-10 logarithm.

Examples

Formula

Description (Result)

=LOG10(86)

Base-10 logarithm of 86 (1.934498451)

=LOG10(10)

Base-10 logarithm of 10 (1)

=LOG10(1E5)

Base-10 logarithm of 1E5 (5)

=LOG10(10^5)

Base-10 logarithm of 10^5 (5)

Database Driver dialog box

Database Driver dialog box

Consult your database driver's documentation for details about configuring options for the various drivers.

  • IBM DB2 Universal Database

  • Informix

  • Microsoft Access

  • Microsoft SQL Server

  • OLE DB Provider

  • Oracle

Older versions of Microsoft Office cannot open a restricted file

Older versions of Microsoft Office cannot open a restricted file

Cause: Older versions of Microsoft Office do not support Information Rights Management.

Solution:    Open the document with a version that supports Information Rights Management.

Open the file with Microsoft Office 2003 for Windows, Microsoft Office 2008 for Windows, Microsoft Office 2010 for Windows, or Microsoft Office for Mac 2011.

See also

File formats that work with IRM

Block or unblock a sender

Block or unblock a sender

If you want to stop receiving e-mail from someone, you can add his or her e-mail address to your blocked senders list. Outlook automatically moves any new mail that you receive from this person to the Junk E-mail folder. When you want to receive mail from this person again, you can remove his or her e-mail address or domain from your blocked senders list.

Do any of the following:

Block a sender

  1. In the message list, select a message from the sender whom you want to block.

  2. On the Home tab, click Junk, and then click Block Sender.

    Home tab, group 4

    Outlook adds the sender's e-mail address to the blocked senders list.

    Note: You can restore any of the mail that is in the Junk E-mail folder. Click the message that you want to move to the Inbox folder, and then on the Home tab, click Junk, and then click Mark as Not Junk.

Unblock a sender

  1. On the Tools menu, click Junk E-mail Protection.

  2. On the Blocked Senders tab, in the Blocked Senders text box, select the e-mail address or domain that you want to unblock, and then press the Delete key.

See also

Label a message as "junk" or "not junk"

About junk e-mail protection

Page Setup - Paper options

Page Setup - Paper options

The Paper tab of the Page Setup dialog box is where you choose the paper size for your printed document. You can also specify which printer tray to use for the first and subsequent pages--for example, if you want the cover page to be printed on heavier paper or a different color from the rest of the document.

Switch between inches and centimeters

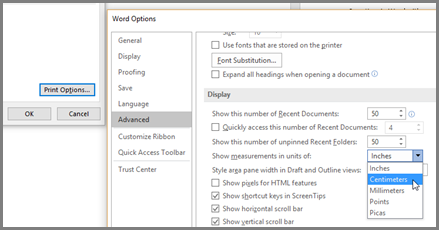
To set your paper size in inches or centimeters, click Print Options on the Paper tab of the Page Setup dialog box to open Word Options. Click Advanced, and scroll to Display. Next to Show measurements in units of, choose the unit you want.

In Word Options, click Advanced, scroll to Display for the option, "Show measurements in units of"

Choose a paper size and paper source

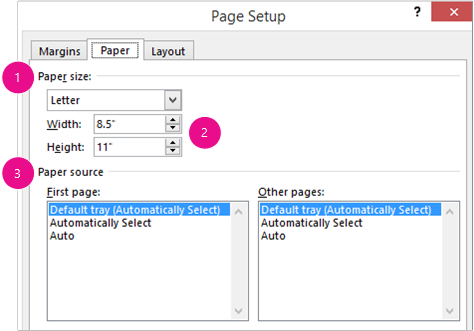
Page Setup, Paper tab
  1. Under Paper size, to choose from the many commonly-used printer paper and envelope sizes, click the Paper size drop-down and make a selection.

    To adjust your working paper size, choose Custom size at the bottom of the drop-down...

  2. ...then enter the Width and Height you want.

    Note: If you select a standard paper size, and then make adjustments to the width or height, the Paper size field will automatically change to "Custom size."

  3. Choose a paper source for your document's first page, and then for all subsequent pages. These options are populated based on your printer driver and may be different from the illustration above. Many printer drivers include these similar sounding, but different, settings:

    • Default tray (Automatically select) is the tray selected as the default on your printer.

    • Automatically Select chooses the tray that is named "Automatically Select" on your printer.

    • Auto tells the printer to select the tray based on the paper size and availability--so that if the first appropriate tray is empty, the printer will select the second tray with the same sized paper.

    Some other possible paper source options are Manual feed, Tray 1, Tray 2..., Upper tray, Lower Tray, and so on.

    Note: If you are confused about which paper source selection to make, refer to your printer's manual.

Video: Create Web Part connections using SharePoint Designer 2010

Video: Create Web Part connections using SharePoint Designer 2010

Your browser does not support video. Install Microsoft Silverlight, Adobe Flash Player, or Internet Explorer 9.

Learn how to connect Web Parts using SharePoint Designer 2010. This video is presented by Asif Rehmani, a SharePoint MVP, consultant, trainer, and author.

Learn more about SharePoint Designer 2010 in the See Also section.

Start a Lync conference call

Start a Lync conference call

A Lync conference call is an ad hoc meeting that you can quickly start with multiple people to work on a subject that requires immediate attention. Just like a scheduled meeting, you can share PowerPoint slides, collaborate on a whiteboard, or share your screen in a conference call.

Start a conference call

Make sure your contacts are available by checking their present status first. Then follow the steps below to invite them to the conference call.

  1. Hold down the Ctrl key on your keyboard, and click the names of your contacts to select them.

  2. Right-click the selection and click Start a Conference Call.

  3. Choose how you want to start the conference call:

  4. Lync Call – Lync makes the call using computer audio.

  5. Mobile, Work, or another number – Lync calls you and your contacts from the phone you choose.

Your contacts then receive a notification, and can accept or decline your request for the conference call.

Screenshot of starting a conference call

Add more people to the conference call

If you need to add more people to your conference call, you can drag their names into the meeting, or add them by using the people menu.

  1. Pause on the people icon in the meeting.

  2. Click Invite More People to add additional participants.

  3. You can invite by selecting someone from the list, or by a phone number.

Simply type a number and click OK. Lync calls the person for you, and adds them to the meeting. Note that your account must be enabled for calling out a number, in order to invite someone by phone.

Screenshot of invite more people from IM window

Remove names from a distribution list before sending an item

Remove names from a distribution list before sending an item

An e-mail message or meeting request sent to a distribution list goes to all recipients included in that list. To send something to only part of a distribution list, you must edit the list manually to remove the names you don't want included.

What do you want to do?

Send a message to part of a distribution list

Send a meeting request to part of a distribution list

Send a message to part of a distribution list

  1. Open a new message.

  2. Click To, and then in the Search box, type the name of the distribution list.

  3. In the Name list, single-click the name to highlight it, click To to place it in the "To" line, and then click OK.

    Why don't I see the Name list in the Address Book?

    You may have used the More columns search option the last time that you used the Address Book. To restore the name list view, click Name only next to Search.

  4. In the message, in the To box, click the plus sign (+) next to the name of the distribution list to show the list members, and then delete the names that you do not want the message sent to.

Note: When you expand the list, the distribution list name is replaced in the message's To line with all the individual names on the list. You cannot collapse the list again in a message once it's been expanded.

Top of Page

Send a meeting request to part of a distribution list

  1. In a new Meeting Request, in the Scheduling Assistant, click Add Attendees.

  2. In the Search box, type the name of the distribution list.

  3. In the list below, click the name, and then click Required. Click OK.

  4. In the All Attendees list, click the plus sign (+) next to the name of the distribution list to show the individuals on the list.

  5. Clear the check mark next to the name of each person whom you do not want to send the meeting request to. When you switch back to the Appointment view, only the names that you didn't remove will appear in the To box.

Note: When you expand a distribution list, the distribution list name for this invitation is replaced with all the individual names on the list. You cannot collapse the list again in an invitation once it's been expanded.

Top of Page

Create and link tasks with Project 2007

Create and link tasks with Project 2007


By Carl Chatfield and Timothy Johnson

Carl Chatfield is a certified Project Management Professional (PMP) with extensive knowledge of Microsoft Office Project as well as specific usability issues.

Timothy Johnson has previously worked as an Office Project support professional for several years. Tim possesses in-depth technical knowledge about the software.

Carl and Timothy are the authors of Microsoft Project 2000 Step by Step, Microsoft Project Version 2002 Step by Step, Microsoft Office Project 2003 Step by Step and Microsoft Office Project 2007 Step by Step, all from Microsoft Press.

In this article

Enter tasks

Estimate durations

Organize tasks into phases

Link tasks

Tasks are the most basic building blocks of any project — tasks represent the work to be done to accomplish the goals of the project. Tasks describe project work in terms of sequence, duration, and resource requirements. There are two levels of tasks — summary tasks, which summarize or "roll up" the durations and costs of tasks, and subtasks — that together comprise the significant events in the life of a project. This article provides an introduction to some key concepts about tasks that will help you use Microsoft Office Project 2007.

Enter tasks

Project 2007 can be used to track tasks related to a project you are managing. To enter tasks for a project, begin by starting Project 2007 if it's not already running. After opening the project you're working on, type your first task in the cell directly below the Task Name column heading, and then press ENTER.
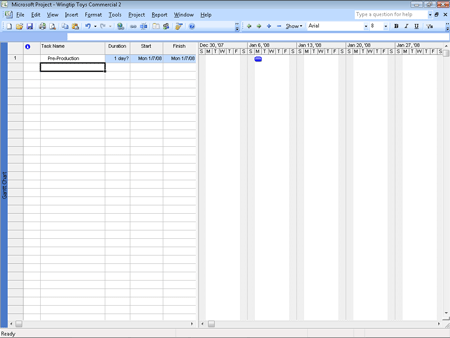
entering tasks into a project

For example, if you are using Project 2007 to track the tasks required for a video project, you might begin by entering Pre-Production in the first cell. Next, enter the remaining tasks below the task name, pressing ENTER after each task name:

Develop script

Develop production boards

Pick locations

Hold auditions

Production

Rehearse

Shoot video

Log footage

Project 2007 assigns a duration of one day to the new task, and the question mark indicates that this is an estimated duration. A corresponding task bar of one day's length appears in the Gantt Chart. By default, the task start date is the same as the project start date.

task bar in a gantt chart

Tip: In addition to typing task information directly into Project 2007, you can develop task lists in other applications and then import them into Project 2007. For example, Project 2007 installs an Excel template named Microsoft Project Task List Import Template, which you or others can complete and then import into Project 2007 with the proper structure. In Excel, this template appears on the Spreadsheet Solutions tab of the Templates dialog box. You can also import your Outlook task list into a project plan. In Project 2007, on the Tools menu, click Import Outlook Tasks.

Define the right tasks for the right deliverable

Every project has an ultimate goal or intent: the reason that the project was started. This is called the project deliverable. This deliverable is usually a product, such as a TV commercial, or a service or event, such as a software training session. Defining the right tasks to create the right deliverable is an essential skill for a project manager. The task lists you create in Project 2007 should describe all of the work required, and only the work required, to complete the project successfully.

In developing your task lists, you might find it helpful to distinguish product scope from project scope. Product scope describes the quality, features, and functions of the deliverable of the project. For example, if the deliverable is a TV commercial, the product scope might include its length, subject, and audience. Project scope, on the other hand, describes the work required to deliver such a product or service. In our scenario, the project scope includes detailed tasks relating to the creation of a TV commercial such as holding auditions, shooting the video, editing it, and so on.

Top of Page

Estimate durations

A task's duration is the amount of time you expect it will take to complete the task. Project 2007 can work with task durations that range from minutes to months. Depending on the scope of your project, you'll probably want to work with task durations on the scale of hours, days, and weeks.

For example, a project might have a project calendar with working time defined as 8 A.M. through 5 P.M. with a one-hour lunch break Monday through Friday, leaving nonworking time defined as evenings and weekends. If you estimate that a task will take 16 hours of working time, you could enter its duration as 2d to schedule work over two eight-hour workdays. By starting the task at 8 A.M. on a Friday, you should then expect that it wouldn't be completed until 5 P.M. on the following Monday. No work would be scheduled over the weekend because Saturday and Sunday have been defined as nonworking time.

Tip: You determine the overall duration of a project by calculating the difference between the earliest start date and the latest finish date of the tasks that compose it. The project duration is also affected by other factors, such as task relationships. Because Project 2007 distinguishes between working and nonworking time, a task's duration doesn't necessarily correlate to elapsed time.

Tip: You can schedule tasks to occur during working and nonworking time. To do this, assign an elapsed duration to a task. You enter elapsed duration by preceding the duration abbreviation with an e. For example, type 3ed to indicate three elapsed days. You might use an elapsed duration for a task that you don't directly control but that nonetheless is critical to your project. For instance, you might have the tasks Pour foundation concrete and Remove foundation forms in a construction project. If so, you might also want a task called Wait for concrete to cure because you don't want to remove the forms until the concrete has cured. The task Wait for concrete to cure should have an elapsed duration because the concrete will cure over a contiguous range of days, whether they are working or nonworking days. If the concrete takes 48 hours to cure, you can enter the duration for that task as 2ed, schedule the task to start on Friday at 9 A.M., and expect it to be complete by Sunday at 9 A.M. In most cases, however, you'll work with nonelapsed durations in Project 2007.

Project 2007 uses standard values for minutes and hours for durations: one minute equals 60 seconds, and one hour equals 60 minutes. However, you can define nonstandard durations for days, weeks, and months for your project. To do this, on the Tools menu, click the Options command, and in the Options dialog box, click the Calendar tab, illustrated here.
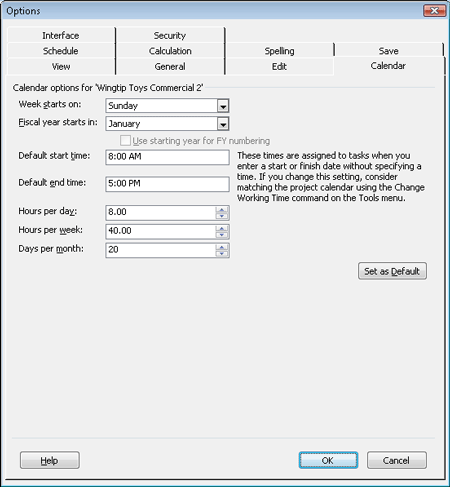
options dialog box

How do you come up with accurate task durations?

You should consider two general rules when estimating task durations.

  • Overall project duration often correlates to task duration; long projects tend to have tasks with longer durations than do tasks in short projects.

  • If you track progress against your project plan, you must consider the level of detail you want to apply to your project's tasks. If you have a multi-year project, for example, it might not be practical or even possible to track tasks that are measured in minutes or hours. In general, you should measure task durations at the lowest level of detail or control that is important to you, but no lower.

For your real-world projects, you will often estimate task durations. Good sources of task duration estimates include:

  • Historical information from previous, similar projects.

  • Estimates from the people who will complete the tasks.

  • Expert judgment of those who have managed similar projects.

  • Standards of professional or industrial organizations that undertake projects similar to yours.

For complex projects, you probably would combine these and other sources to estimate task durations. Because inaccurate task duration estimates are a major source of risk in any project, making good estimates is well worth the effort expended.

One general rule of thumb to consider is called the 8/80 rule. This rule suggests that task durations between eight hours (or one day) and 80 hours (10 working days, or two weeks) are generally sized to a manageable duration. Tasks shorter than one day might be too granular, and tasks longer than two weeks might be too long to manage properly. There are many legitimate reasons to break this rule, but its guidelines are worth considering for most tasks in your projects.

Top of Page

Organize tasks into phases

It is helpful to organize groups of closely related tasks that represent a major portion of the project's work into phases. When reviewing a project plan, observing phases of tasks helps you and others to think in terms of major work items and detailed work items. For example, it is common to divide a film or video project into major phases of work such as pre-production, production, and post-production. You create phases by indenting and outdenting tasks. You can also collapse a task list into phases, much as you can work with an outline in Word. In Project 2007, phases are represented by summary tasks.

A summary task behaves differently from other tasks. You can't edit its duration, start date, or other calculated values directly because this information is derived or "rolled up" from the detail tasks, called subtasks (these appear indented under the summary tasks). Project 2007 calculates the duration of a summary task as the span of time from the earliest start date to the latest finish date of its subtasks.

Top-down and bottom-up planning

The two most common approaches to developing tasks and phases are top-down and bottom-up planning.

  • Top-down planning.     Identifies major phases or products of the project before filling in the tasks required to complete those phases. Complex projects can have several layers of phases. This approach works from general to specific.

  • Bottom-up planning.     Identifies as many bottom-level detailed tasks as possible before organizing them into logical groups, called phases or summary tasks. This approach works from specific to general.

Creating accurate tasks and phases for most complex projects requires a combination of top-down and bottom-up planning. It is common for the project manager to begin with established, broad phases for a project (top-down) and for the resources who will execute the project to provide the detailed tasks that fill out each phase (bottom-up).

Top of Page

Link tasks

Projects require tasks to be performed in a specific order. For example, the task of filming a scene must be completed before the task of editing the filmed scene can occur. These two tasks have a finish-to-start relationship (also called a link or dependency) that has two aspects:

  • The second task must occur later than the first task; this is a sequence.

  • The second task can occur only if the first task is completed; this is a dependency.

In Project 2007, the first task ("film the scene") is called the predecessor because it precedes tasks that depend on it. The second task ("edit the filmed scene") is called the successor because it succeeds tasks on which it is dependent. Any task can be a predecessor for one or more successor tasks. Likewise, any task can be a successor to one or more predecessor tasks.

Representing task relationships and handling changes to scheduled start and finish dates is one area in which the use of a scheduling engine, such as Project 2007, really pays off. For example, you can change task durations or add or remove tasks from a chain of linked tasks, and Project 2007 will reschedule tasks accordingly.

Task relationships appear in several ways in Project 2007:

  • In the Gantt Chart and Network Diagram views, task relationships appear as the lines connecting tasks.

  • In tables, such as the Entry table, task ID numbers of predecessor tasks appear in the Predecessor fields of successor tasks.

You create task relationships by creating links between tasks. When tasks are first entered, by default they are all scheduled to start on the same day — the project start date. However, you can use different methods to create links between several tasks. For example, you can create a finish-to-start dependence between two tasks by clicking Link Tasks on the Edit menu.

Tip: To create a finish-to-start dependency, you can click the Link Tasks button on the Standard toolbar.

The figure below shows that when Tasks 2 and 3 are linked with a finish-to-start relationship, Project 2007 changed the start date of task 3 to the next working day following the completion of task 2 (skipping over the weekend). The duration of the Pre-Production summary task grew correspondingly.

tasks linked with a finish-to-start relationship

Tip: To unlink tasks, select the tasks you want to unlink, and then click the Unlink Tasks button on the Standard toolbar. You can also click Unlink Tasks on the Edit menu. If you unlink a single task that is within a chain of linked tasks with finish-to-start relationships, Project 2007 reestablishes links between the remaining tasks.

You can link tasks in several other ways including:

  • Link several tasks at once

  • Link two tasks in which one task is the predecessor of the other task

  • Link a group of remaining tasks and then link two summary tasks

Tip: When working with summary tasks, you can either link summary tasks directly (as you did above) or link the latest task in the first phase with the earliest task in the second phase. The scheduling end result is the same in either situation. Under no circumstances, however, can you link a summary task to one of its own subtasks. Doing so would create a circular scheduling problem, and therefore Project 2007 doesn't allow it.

Tip: You can also create a finish-to-start relationship between tasks right in the Gantt Chart. Point to the task bar of the predecessor task until the pointer changes to a four-pointed star. Then, drag the mouse pointer up or down to the task bar of the successor task. While you're dragging the mouse pointer to create a task relationship, the pointer image changes to a chain link.

Top of Page
UPPER function

UPPER function

Converts text to uppercase.

Syntax

UPPER(text)

Text     is the text you want converted to uppercase. Text can be a column reference or text string.

Example

Formula

Description (Result)

=UPPER("total")

Upper case of string (TOTAL)

=UPPER("Yield")

Upper case of string (YIELD)

Sync the files on your computer with your mobile device

Sync the files on your computer with your mobile device

To access Office files that are saved on your computer from your iPad, iPhone, Android device, or Windows device, upload the files to OneDrive, Dropbox, or a team site. Or send yourself email attachments and open them on your mobile device.

Upload and open files

  1. On your computer, open your web browser and go to your OneDrive, Dropbox, or Office 365 team site.

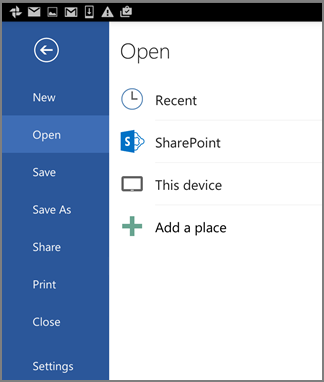
    Tip: To set up a new online location, tap Open > Add a place, and select your service. To see all locations that are currently available to you, tap Open > Browse.

  2. Upload your file.

  3. If you haven't already done so, sign in to your Android device.

  4. Tap Open, tap the service in which you saved the file, and find the file.

    Open file

    If you already have a file open, click the File icon or menu, tap Open, tap the service in which you saved the file, and then find the file.

    Screenshot of the File menu in an Office app on an Android phone

Open email attachments

  1. On your Android device, open your email app and then open the email message with the attachment. You'll find the attachment at the bottom of the message. You may have to tap the attachment to download it.

    Depending on its size, the download may take a few minutes. You'll see a progress screen while the file is downloading.

  2. Tap the attachment to open it in Word, PowerPoint, or Excel.

Upload and open files

  1. On your computer, open your web browser and go to your OneDrive, Dropbox, or Office 365 team site.

    Tip: To set up a new online location, tap Open > Add a place, and select your service. To see additional locations that are available to you, tap Open > More.

  2. Upload your file.

  3. If you haven't already done so, sign in to your iPad or iPhone.

  4. Tap and sign in to the service in which you saved the file, and tap Open to find the file.

    Find your file

    If you already have a file open, tap Back first.

    Tap back

Open email attachments

To open Word, Excel, PowerPoint, and Visio email attachments, do the following:

  1. On your mobile device, open your mail app and find the email message with the attachment. You'll see the attachments at the bottom of the message. You may have to tap the attachment once to download it.

  2. Tap and hold the attachment until a group of icons appears.

    App icons

  3. Tap the icon to open your file in Word, Excel, PowerPoint, or Visio.

Upload and open files

  1. On your computer, open your web browser and go to your OneDrive, Dropbox, or Office 365 team site.

    Tip: To see all locations that are currently available to you, tap Open > Browse.

  2. Upload your file.

  3. If you haven't already done so, sign in to your Windows Mobile device.

  4. Tap the Word, PowerPoint, or Excel icon to open the app, locate your file, and tap to open it.

    If you already have a file open, tap the File tab or menu, tap Open, and locate your file.

    File menu

Open email attachments

  1. On your Windows Mobile device, open your email app and open the email message with the attachment. You'll find the attachment at the bottom of the message.

  2. Tap the attachment to open it in Word, PowerPoint, or Excel.