To add text to a chart that is separate from the text in chart titles or labels, you can insert a text box on the chart. You can then enter the text that you want.
Tip: Instead of entering text in the text box, you can link the text box to data in a worksheet cell. When the text box is linked to a worksheet cell, any changes that you make to the data in that cell will appear automatically in the text box on the chart.
After you create a text box in a chart, you can move, resize, or remove it as needed.
-
Click the chart to which you want to add a text box.
-
In Office 2013 and newer versions: On the Format tab, in the Insert Shapes group, click the Text Box icon
 .
.In Office 2010: On the Layout tab, in the Insert group, click Text Box
 .
.
-
In the chart, click where you want to start a corner of the text box, and then drag until the text box is the size that you want.
-
In the text box, type the text that you want.
The text will wrap in the text box. To start a new line in the text box, press Enter.
-
When you finish typing, press Esc to cancel editing mode, or click anywhere outside of the text box.
See also
Insert a text box on a chart
-
Click the chart to which you want to add a text box.
-
On the Format tab, click Insert Shapes, and then click the Text Box icon
 .
. -
In the chart, click where you want to start a corner of the text box, and then drag until the text box is the size that you want.
-
In the text box, type the text that you want.
The text will wrap in the text box. To start a new line in the text box, press Enter.
-
When you finish typing, press esc to cancel editing mode, or click anywhere outside of the text box.
Move or resize a text box
-
On the chart, click the text box that you want to move or resize.
-
Do one of the following:
-
To move the text box, position the cursor on the border of the text box so that it changes to a four-headed arrow, and then drag the text box to the location that you want.
-
To resize the text box, use one of the following ways:
-
Click any sizing handle, and then drag until the text box is the size that you want.
-
For precise sizing measurements in Windows, select the text box and on the Format tab, in the Size group, enter the size you want in the Height and Width boxes.
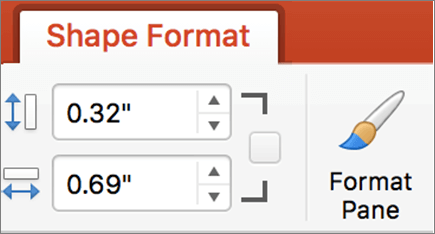
For precise sizing measurements in Mac, select the text box and on the Shape Format tab, enter the size you want in the Shape Height and Shape Width boxes.
 .
.
-
-
To rotate the text box, click the rotation handle, and then drag the text box to the degree of rotation that you want.
Tip: For precise rotation, on the Format tab, in the Arrange group, click Rotate, and then click the rotation option that you want.
-
Remove a text box
On the chart, click the border of the text box that you want to delete, and then press DELETE.
No comments:
Post a Comment