
With the new OneDrive sync client, files automatically sync in the background, the individual file size limit is increased to 10 gigabytes, and the 20,000 file limit has been removed. Like the previous sync client, the new one automatically synchronizes between OneDrive for Business and your devices. Unlike the previous sync client, if you don't have enough disk space on a device, you can selectively sync folders. Your Office 365 Admin can deploy the OneDrive sync client for you, or you can install it yourself.
Use the OneDrive sync client on Windows
-
Contact your Office 365 Admin to see if they have already deployed the OneDrive sync client for you. If not, you can install it on your computer. The first time you run it, you need to sign in and optionally select folders to sync. For more information, see the Additional resources section.
-
Go to the Windows taskbar.
-
Hover over the blue cloud icon to see the alt text. For example, if you worked for Contoso, you see this:

You may see more than one cloud icon in the taskbar. A white cloud icon is for OneDrive - personal.
-
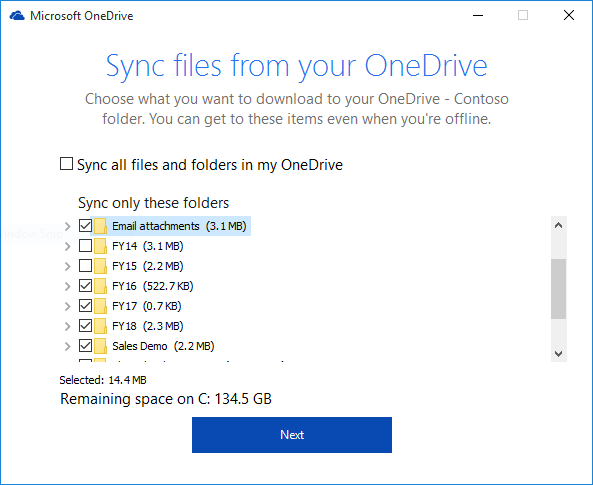
To select which folders to sync, right click the blue cloud icon, and then click Settings > Account > Choose folders.
Manage OneDrive for Business on Windows (Extra credit!)
-
Go to the Windows taskbar.
-
To see when OneDrive for Business was last updated, click the blue cloud icon.
-
To see the files on your computer, right click the blue OneDrive cloud icon, and then click Open your OneDrive – <Organization name> folder.
-
To see the files in the browser, right click the blue OneDrive cloud icon, and then click View online.
-
To see the current allocation of quota on your site, right click the blue OneDrive cloud icon, and then click Manage Storage.
Specific "how to" instructions for your device
Note: The OneDrive sync client only runs on a desktop device.
Use the Next Generation Sync Client on Mac OS X
Note: The OneDrive sync client is supported on OS X version 10.9 and above.
-
Contact your Office 365 Admin to see if they have already deployed the OneDrive sync client for you. If not, you can install it on your computer. The first time you run it, you need to sign in and optionally select folders to sync. For more information, see the Additional resources section.
-
Go to the Menu bar and click the OneDrive icon.

You may see more than one cloud icon in the taskbar. A black cloud icon is for your OneDrive personal account.
-
To select which folders to sync, click Preferences, click the Choose Folders tab, and then click Choose Folders.
Want more?
Which OneDrive sync client am I using?
Get started with the OneDrive for Business Next Generation Sync Client in Windows
Get started with the OneDrive for Business Next Generation Sync Client on Mac OS X
With the Next Generation Sync Client for OneDrive, my files automatically sync in the background, the individual file size limit is increased to 10 gigabytes, and I can sync as many files as I want.
I want to make sure we have it installed.
In the Windows taskbar, I hover over the blue OneDrive cloud icon. It says "OneDrive – Contoso Up to date." Looks like my Office 365 Admin has already deployed it.
Like the previous sync client, the new one synchronizes between OneDrive for Business and a device.
Unlike the previous sync client, if I don't have enough disk space on my device, I can selectively sync my folders.
To do this, I would right click the blue OneDrive cloud icon again, click Settings > Account > Choose folders, and select which folders to sync or not sync.
No comments:
Post a Comment