Information Rights Management in Office
If you've gotten a file permission error when trying to view a document or email, then you have come across Information Rights Management (IRM). You can use IRM to restrict permission to content in documents, workbooks, and presentations with Office. IRM lets people set access permissions to help prevent sensitive information from being printed, forwarded, or copied by unauthorized people. When permission for a file is restricted by using IRM, the access and usage restrictions are enforced even if the file reaches unintended recipients. This is because the access permissions are stored in the document, workbook, presentation, or e-mail message itself, and these must be authenticated against the IRM server.
IRM also helps people to enforce their personal preferences for the transmission of personal or private information. IRM allows organizations to enforce corporate policy governing the control and dissemination of confidential or proprietary information.
Using IRM in Office
Select the platform you're using from the tabs on this page.
Using IRM in Office, you can rights manage XML Paper Specification (.xps) files and the following file types:
Word files
| File type | Extension |
| Document | .doc |
| Document | .docx |
| Macro-enabled document | .docm |
| Template | .dot |
| Template | .dotx |
| Macro-enabled template | .dotm |
Excel files
| File type | Extension |
| Workbook | .xls |
| Workbook | .xlsx |
| Macro-enabled workbook | .xlsm |
| Template | .xlt |
| Template | .xltx |
| Macro-enabled template | .xltm |
| Non-XML binary workbook | .xlsb |
| Macro-enabled add-in | .xla |
| Macro-enabled add-in | .xlam |
PowerPoint files
| File type | Extension |
| Presentation | .ppt |
| Presentation | .pptx |
| Macro-enabled presentation | .pptm |
| Template | .pot |
| Template | .potx |
| Macro-enabled template | .potm |
| Show | .pps |
| Show | .ppsx |
| Macro-enabled show | .ppsm |
| Office theme | .thmx |
Notes:
-
When these file types are attached to a rights-managed e-mail message in Outlook, they will automatically be rights managed as well.
-
When you attach a message (.msg) file to a rights managed e-mail message, the attached message is not rights managed. IRM does not rights manage .msg file types.
Configure your computer to use IRM
To use IRM in Office, the minimum required software is Windows Rights Management Services (RMS) Client Service Pack 1 (SP1). The RMS administrator can configure company-specific IRM policies that define who can access information and what level of editing is permitted for an e-mail message. For example, a company administrator might define a rights template called "Company Confidential," which specifies that an e-mail message that uses that policy can be opened only by users inside the company domain.
Download permissions
The first time that you try to open a document, workbook, or presentation with restricted permission, you must connect to a licensing server to verify your credentials and to download a use license. The use license defines the level of access that you have to a file. This process is required for each file that has restricted permission. In other words, content with restricted permission cannot be opened without a use license. Downloading permissions requires that Office send your credentials, which includes your e-mail address, and information about your permission rights to the licensing server. Information contained in the document, workbook, or presentation is not sent to the licensing server. For more information, read the Privacy Statement Highlights for Microsoft Office 2010.
Restrict permission to content in files
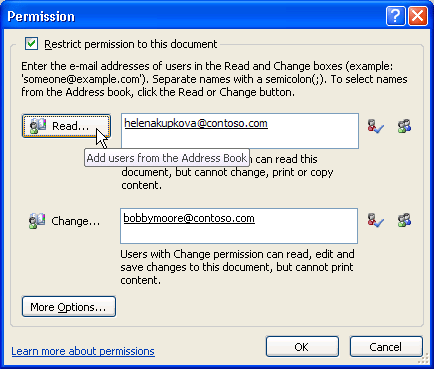
Authors can restrict permission for documents, workbooks, and presentations on a per-user, per-file, or per-group basis (group-based permissions require Active Directory directory service for group expansion). Authors use the Permission dialog box to give users Read and Change access, and to set expiration dates for content. For example, Ranjit, the author, can give Helena permission to read a Word document but not change it. Ranjit can then give Bobby permission to change the document and allow him to save the document. Ranjit might also decide to limit both Helena's and Bobby's access to this document for five days before the permission to the document expires. For information about how to set an expiration date for a document, workbook, or presentation, see Set an expiration date for a file.

-
Save the document, workbook, or presentation.
-
Click the File tab.
-
Do one of the following:
-
In Word, on the Info tab, click Protect Document, point to Restrict Permission by People, and then click Restricted Access.
-
In Excel, on the Info tab, click Protect Workbook, point to Restrict Permission by People, and then click Restricted Access.
-
In PowerPoint, on the Info tab, click Protect Presentation, point to Restrict Permission by People, and then click Restricted Access.
-
-
In the Permissions dialog box, do one of the following:
-
In Word, select Restrict permission to this document, and then assign the access levels that you want for each user.
-
In Excel, select Restrict permission to this workbook, and then assign the access levels that you want for each user.
-
In PowerPoint, select Restrict permission to this presentation, and then assign the access levels that you want for each user.
Your choices might be limited if an administrator has set custom permission policies that individuals cannot change.
Permission levels
-
Read Users with Read permission can read a document, workbook, or presentation, but they don't have permission to edit, print, or copy it.
-
Change Users with Change permission can read, edit, and save changes to a document, workbook, or presentation, but they don't have permission to print it.
-
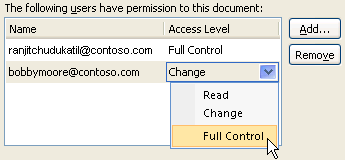
Full Control Users with Full Control permission have full authoring permissions and can do anything with the document, workbook, or presentation that an author can do, such as set expiration dates for content, prevent printing, and give permissions to users. After permission for a document, workbook, or presentation has expired for authorized users, the document, workbook, or presentation can be opened only by the author or by users with Full Control permission to the document, workbook, or presentation. Authors always have Full Control permission.
-
-
To give someone Full Control permission, in the Permissions dialog box, click More Options, and then in the Access Level column, click the arrow, and then click Full Control in the Access Level list.

-
After you assign permission levels, click OK.
The Message Bar appears, which indicates that the document, workbook, or presentation is rights-managed. If you must make any access permission changes to the document, workbook, or presentation, click Change Permission.

If a document, workbook, or presentation that has restricted permission is forwarded to an unauthorized person, a message appears with the author's e-mail address or Web site address so that the individual can request permission for the document, workbook, or presentation.

If the author chooses not to include an e-mail address, unauthorized users get an error message.
Set an expiration date for a file
-
Open the file.
-
Click the File tab
-
Do one of the following:
-
In Word, on the Info tab, click Protect Document, point to Restrict Permission by People, and then click Restricted Access.
-
In Excel, on the Info tab, click Protect Workbook, point to Restrict Permission by People, and then click Restricted Access.
-
In PowerPoint, on the Info tab, click Protect Presentation, point to Restrict Permission by People, and then click Restricted Access.
-
-
In the Permissions dialog box, do one of the following:
-
In Word, select the Restrict permission to this document check box, and then click More Options.
-
In Excel, select the Restrict permission to this workbook check box, and then click More Options.
-
In PowerPoint, select the Restrict permission to this presentation check box, and then click More Options.
-
-
Under Additional permissions for users, do one of the following:
-
In Word, select the This document expires on check box, and then enter a date.
-
In Excel, select the This workbook expires on check box, and then enter a date.
-
In PowerPoint, select the This presentation expires on check box, and then enter a date.
-
-
Click OK twice.
Use a different Windows user account to rights-manage files
-
Open the document, worksheet, or presentation.
-
Click the File tab.
-
Do one of the following:
-
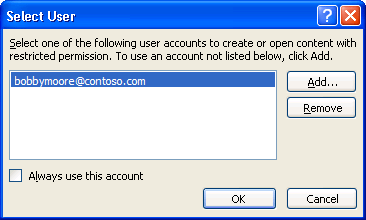
In Word, on the Info tab, click Protect Document, point to Restrict Permission by People, and then click Manage Credentials.
-
In Excel, on the Info tab, click Protect Workbook, point to Restrict Permission by People, and then click Manage Credentials.
-
In PowerPoint, on the Info tab, click Protect Presentation, point to Restrict Permission by People, and then click Manage Credentials.
-
-
Do one of the following:
-
In the Select User dialog box, select the e-mail address for the account that you want to use, and then click OK.
-
In the Select User dialog box, click Add, type your credentials for the new account, and then click OK twice.

-
View content with restricted permission
To view rights-managed content that you have permissions to by using Office, just open the document, workbook, or presentation.
If you want to view the permissions you have, either click View Permission in the Message Bar or click one of the following in the status bar at the bottom of the screen:
-
This document contains a permissions policy

-
This workbook contains a permissions policy

-
This presentation contains a permissions policy

Note: To restrict permission to content in a file, you have to have Office for Mac Standard 2011.
IRM in Office for Mac 2011 and Office for Mac 2016 provides three permission levels.
| Permission Level | Allows |
| Read | Read |
| Change | Read, edit, copy, save changes |
| Full Control | Read, edit, copy, save changes, print, set expiration dates for content, grant permissions to users, access content programmatically |
Do any of the following:
Set permission levels manually
-
On the Review tab, under Protection, click Permissions, and then click Restricted Access.

-
If this is the first time that you are accessing the licensing server, enter your user name and password for the licensing server, and then select the Save password in Mac OS keychain check box.
Note: If you do not select the Save password in Mac OS keychain check box, you might have to enter your user name and password multiple times.
-
In the Read, Change, or Full Control boxes, enter the e-mail address or name of the person or group of people that you want to assign an access level to.
-
If you want to search the address book for the e-mail address or name, click
 .
. -
If you want to assign an access level to all people in your address book, click Add Everyone
 .
. -
After you assign permission levels, click OK.
The Message Bar appears and displays a message that the document is rights-managed.
Use a template to restrict permission
An administrator can configure company-specific IRM policies that define who can access information permissions levels for people. These aspects of rights management are defined by using Active Directory Rights Management Services (AD RMS) server templates. For example, a company administrator might define a rights template called "Company Confidential," which specifies that documents that use that policy can be opened only by users inside the company domain.
-
On the Review tab, under Protection, click Permissions, and then click the rights template that you want.

Change or remove permission levels that you have set
If you applied a template to restrict permission, you can't change or remove permission levels; these steps only work if you have set permission levels manually.
-
On the Message Bar, click Change Permissions.
-
In the Read, Change, and Full Control box, enter a new e-mail address or name of the person or group of people that you want to assign an access level to.
-
To remove a person or group of people from an access level, click the e-mail address, and then press DELETE .
-
To remove Everyone from a permission level, click Add Everyone
 .
.
Set an expiration date for a restricted file
Authors can use the Set Permissions dialog box to set expiration dates for content. For example, Ranjit might also decide to limit both Helena's and Bobby's access to this document to May 25th, and then the permission to the document expires.
-
On the Review tab, under Protection, click Permissions, and then click Restricted Access.

-
Click More Options, and then select the This document expires on check box, and then enter the date.
After permission for a document has expired for authorized people, the document can be opened only by the author or by people with Full Control permission.
Allow people with Change or Read permission to print content
By default, people with Change and Read permission cannot print.
-
On the Review tab, under Protection, click Permissions, and then click Restricted Access.

-
Click More Options, and then select the Allow people with Change or Read permission to print content check box.
Allow people with Read permission to copy content
By default, people with Read permission cannot copy content.
-
On the Review tab, under Protection, click Permissions, and then click Restricted Access.

-
Click More Options, and then select the Allow people with Read permission to copy content check box.
Allow scripts to run in a restricted file
Authors can change settings to allow Visual Basic macros to run when a document is opened and to allow AppleScript scripts to access information in the restricted document.
-
On the Review tab, under Protection, click Permissions, and then click Restricted Access.

-
Click More Options, and then select the Access content programmatically check box.
Require a connection to verify permissions
By default, people have to authenticate by connecting to the AD RMS server the first time that they open a restricted document. However, you can change this to require them to authenticate every time that they open a restricted document.
-
On the Review tab, under Protection, click Permissions, and then click Restricted Access.

-
Click More Options, and then select the Require a connection to verify permissions check box.
Remove restrictions
-
On the Review tab, under Protection, click Permissions, and then click No Restrictions.

-
In the dialog box, click Remove Restrictions.
Related Topics
Restrict permission to content in a file
Open a file that has restricted permissions
Add credentials to open a rights-managed file or message
File formats that work with IRM
In the iOS versions of Office, any IRM-protected files that you receive will open if you are signed in with an account that has permissions to the file. When you open an IRM-protected file you will see an information bar at the top that offers to let you view the permissions that have been assigned to this file.
If you're an Office 365 Subscriber with Azure Rights Management and your IT-department has defined some IRM templates for you to use, you can assign those templates to files in Office on iOS.
To protect a file tap the edit button  in your app, go to the Review tab and tap the Restrict Permissions button. You'll see a list of available IRM policies; select the one you want and tap Done to apply.
Note: If the Restrict Permissions button is not enabled in your app, open any existing IRM-protected document to initialize it.
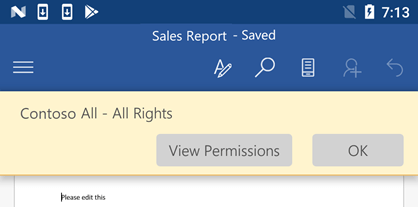
Though you can't currently assign IRM permissions in the Android versions of Office, any IRM-protected files that you receive will open if you are signed in with an account that has permissions to the file. When you open an IRM-protected file you will see an information bar at the top that offers to let you view the permissions that have been assigned to this file.

Information Rights Management (IRM) helps do the following:
-
Prevent an authorized recipient of restricted content from forwarding, copying, changing, printing, faxing, or pasting the content for unauthorized use
-
Restrict content wherever it is sent
-
Provide file expiration so that content in documents can no longer be viewed after a specified time
-
Enforce corporate policies that govern the use and dissemination of content within the company
IRM can't prevent restricted content from being:
-
Erased, stolen, or captured and transmitted by malicious programs such as Trojan horses, keystroke loggers, and certain kinds of spyware
-
Lost or corrupted because of the actions of computer viruses
-
Hand-copied or retyped from a display on a recipient's screen
-
Digitally photographed (when displayed on a screen) by a recipient
-
Copied by using third-party screen-capture programs
Note: For information about how you can restrict permission to content in e-mail messages, see Create a message with restricted permission.
Great work Man! if you need any converter for potx, ppt, pdf files then try this;
ReplyDeleteEasy Convert Files
It will surely convert one file to another. Some examples are there;
ReplyDeleteMp4 to M4a
Png to Bmp
Gif to Mov
Mp4 to Ogg
3gp to mp3
Microsoft Office Tutorials: Information Rights Management In Office >>>>> Download Now
ReplyDelete>>>>> Download Full
Microsoft Office Tutorials: Information Rights Management In Office >>>>> Download LINK
>>>>> Download Now
Microsoft Office Tutorials: Information Rights Management In Office >>>>> Download Full
>>>>> Download LINK Ix