Customize SharePoint site permissions
A SharePoint group is a collection of users who all have the same set of permissions to sites and content. Rather than assign permissions one person at a time, you can use groups to conveniently assign the same permission level to many people at once.
Note: To do the following steps, you need a permission level that includes permissions to Create Groups and Manage Permissions. The Full Control level has both. For more information, see Understanding permission levels in SharePoint.
I want to
Create a group
-
On your website or team site, click Settings
 , and then click Site Settings.
 -
On the Site Settings page, under Users and Permissions, click Site Permissions.
The permissions page opens. -
On the Permissions tab, click Create Group.
-
On the Create Group page, in the Name and About me boxes, type a name and description for this SharePoint group.
-
In the Group owner box, specify a single owner of this security group.
-
In the Group Settings section, specify who can view and edit the membership of this group.
-
In the Membership Requests section, select the settings that you want for requests to join or leave the group. You can specify the email address to which requests should be sent.
-
In the Give Group Permissions to this Site section, choose a permission level for this group.
-
Click Create.
Add users to a group
You can add users to a group at any time.
-
On your website or team site, click Share

-
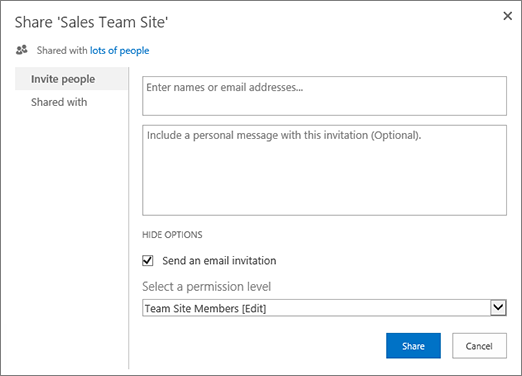
By default, the Share dialog that appears displays the message Invite people to Edit or Invite people. This invites the users who you add to join the SharePoint Members group. To choose a different group and permission level, click Show options and then choose a different SharePoint group or permission level under Select a group or permission level.
-
In the Enter names, email addresses, or Everyone box, enter the name or email address of the user or group that you want to add. When the name appears in a confirmation box below your entry, select the name to add it to the text box.
-
If you want to add more names, repeat these steps.
-
(Optional) Enter a personalized message to send to the new users in Include a personal message with this invitation .
-
Click Share.
-
Remove users from a group
-
On your website or team site, click Settings
, and then click Site Settings. -
On the Site Settings page, under Users and Permissions, click People and Groups.
-
On the People and Groups page, in the Quick Launch, click the name of the group that you want to remove users from.
-
Select the check boxes next to the users who you want to remove, click Actions, and then click Remove Users from Group.
-
In the confirmation window, click OK.
Grant site access to a group
-
On the Team Site, click Settings
, and then click Site Settings. -
On the Site Settings page, under Users and Permissions, click Site Permissions.
-
On the Permissions tab, click Grant Permissions.
-
In the Share dialog, type the name of the SharePoint group that you want to give access to.
-
By default, the Share dialog displays the message Invite people to Edit or Invite people with Can edit permissions. This grants permissions in the SharePoint Members group. To choose a different permission level, click Show options and then choose a different SharePoint group or permission level under Select a permission level or Select a group or permission level. The drop down box shows both groups and individual permission levels, like Edit or View Only.
-
Click Share.
Delete a group
Caution: We recommend that you don't delete any of the default SharePoint groups, because this can make the system unstable. You should only delete group(s) you have created and no longer want to use.
-
On your Team Site or website, click Settings
, and then click Site Settings. -
On the Site Settings page, under Users and Permissions, click People and Groups.
-
In the Quick Launch, click the name of the SharePoint group that you want to delete.
-
Click Settings, and then click Group Settings.
-
At the bottom of the Change Group Settings page, click Delete.
-
In the confirmation window, click OK.
Assign a new permission level to a group
If you have customized a permission level or created a new permission level, you can assign it to groups or users.
-
On your team site, click Settings
, and then clickSite Settings. -
On the Site Settings page, under Users and Permissions, click Site Permissions.
-
Select the check box next to the user or group to which you want to assign the new permission level.
-
On the Permissions tab, click Edit User Permissions.
-
On the Edit Permissions page, select the check box next to the name of the new permission level. If you select multiple permission levels, the permission level assigned to the group is the union of the individual permissions in the different levels. That is, if one level includes permissions (A, B, C), and the other level includes permissions (C, D), the new level for the group includes permissions (A, B, C, D).
-
Click OK.
Add, change, or remove a site collection administrator
-
On your team site or website, click Settings
, and then Site Settings. -
On the Site Settings page, under Users and Permissions, click Site Collection Administrators.
-
In the Site Collection Administrators box, do one of the following:
-
To add a site collection administrator, enter the name or user alias of the person who you want to add.
-
To change a site collection administrator, click the X next to the person's name, and then enter a new name.
-
To remove a site collection administrator, click the X next to the person's name.
-
-
Click OK.
Note: To view the Site Collection Administrators link, you must be a site collection administrator, a SharePoint Online Admin, or a Global admin. This link is not displayed to Site Owners.
| |
 New to Office 365?
No comments:
Post a Comment