Delete a document library in SharePoint
You can delete SharePoint libraries when you no longer need them. When you delete a library, you also delete documents, metadata about the documents, version history, library settings and specific permission levels that are associated with the library. If you delete one by accident or change your mind, depending on how your site is set up, you can restore a document library from the recycle bin. For more info, see Restore items in the Recycle Bin of a SharePoint site.
To create a library, see Create a document library in SharePoint.
Note: To create or delete a library, you must have permission to create or manage lists.
Updated February 17, 2017 thanks to customer feedback.
Note: A SharePoint site can be significantly modified in appearance and navigation. If you cannot locate an option, such as a command, button, or link, contact your administrator.
Delete a library in SharePoint Online
-
Navigate to the library you want to delete.
-
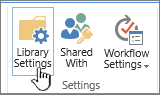
Click Settings
 and then click Library settings.
-
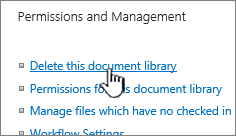
In the settings page, click Delete this document library under Permissions and Management.
-
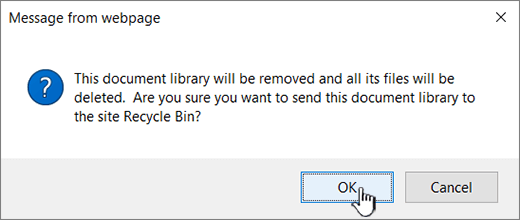
If you're sure you want to delete the library, click OK.
Delete a library in SharePoint Server 2016 or SharePoint Server 2013
-
Do one of the following:
-
Navigate to the library you want to delete.
Click the Library tab on the ribbon and then click Library settings.
-
Click Settings
 and then click Site contents.
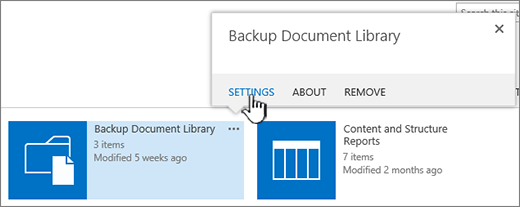
 Hover and click the ellipsis (...) for the library you want to delete and then click Settings.
-
-
On the settings page, click Delete this document library under Permissions and Management.
-
If you're sure you want to delete the library, click OK.
Delete a library in SharePoint Server 2010
-
Click the name of the library on the Quick Launch, or click Site Actions
 , click View All Site Content, and then under the appropriate Libraries section, click the name of the library.
 -
Do one of the following:
-
For a picture library, On the Settings menu
 , click <library type> Library Settings.
 -
For other libraries, under Library Tools, click the Library tab, and then in the Settings group, click Library Settings.
-
-
Under Permissions and Management, click Delete this <library type> library.
-
When you are prompted to confirm the deletion, click OK if you are sure that you want to delete the library.
Delete a library in SharePoint Server 2007
-
If the library is not already open, click its name on the Quick Launch.
If the name of your library does not appear on the Quick Launch, click Site Actions
 , click View All Site Content, and then click the name of your library.
 -
On the Settings menu
 , click the settings for the type of library that you are opening.
 For example, in a document library, click Document Library Settings.
-
Under Permissions and Management, click the option to delete your type of library. For example, in a document library, click Delete this document library.
-
When you are prompted to confirm the deletion, click OK if you are sure that you want to delete the library.
Other resources
Leave us a comment
Was this article helpful? If so, please let us know at the bottom of this page. If it wasn't helpful, let us know what was confusing or missing. Please include your SharePoint, OS, and browser versions you're using. We'll use your feedback to double-check the facts, add info, and update this article.
No comments:
Post a Comment