Import your data into Business Contact Manager
Business Contact Manager for Outlook makes it easy to import business records that are stored in other programs, such as Excel, or your Outlook Contacts folder.
You can import business records about your Accounts and Business Contacts into Business Contact Manager for Outlook, along with customizations, using the Import Business Data wizard.
In this article
For some file types, the wizard prompts you for a file to import, and then imports the file. For other file types, you need to enter the name of the file to import, and indicate how you want the wizard to handle certain records and customizations. If you're importing an Excel file, or a product and service items list using the file type known as a comma separated values file (.csv), the wizard also leads you through the process of matching the column headings of the list you're importing with their corresponding fields in Business Contact Manager (e.g. Unit Price, Business Address). This process is called mapping.
Things to keep in mind when importing
Before you import your business data into Business Contact Manager for Outlook, consider the following:
-
Always back up your database before you import a file because this process cannot be reversed.
-
Before you import a file, we recommend that you compare its fields against the fields in an Account or Business Contact record, and then make changes to the fields in the file to match the fields in the Business Contact Manager for Outlook record. For example, you might separate address information in the file you're importing to match the Business Street, Business City, and Business State fields in Business Contact Manager for Outlook.
-
When Business Contact Manager for Outlook imports a large amount of data, the status window might inaccurately show the progress of the import process. Although the status window is blank or shows the message of Not Responding, Business Contact Manager for Outlook is still importing your data.
-
Business Contact Manager for Outlook supports only the Unicode file format. Other file formats such as ANSI are not supported.
Select the file type to import
You can import several different file types into Business Contact Manager for Outlook. Click a file type for instructions on how to import that type of file.
| File type | Description |
| All data in Business Contact Manager for Outlook, including all Accounts, Business Contacts, Opportunities, Business Projects, Project tasks and their communication history. It also includes customizations, marketing activities, and product and service item lists. | |
| Includes custom form layouts, pages, and views; custom reports; and project templates. Note: Only the database owner can import customizations. | |
| Product and service items lists are usually in the .csv file format. | Includes data in the Comma Separated Values (.csv) file format. Data from almost any program can be saved in the .csv file format, so even if the file format for an application isn't listed, you can save the data from the application into the .csv file format, and then import the data into Business Contact Manager for Outlook. |
| Includes data files in Microsoft Excel Workbook formats. | |
| Includes data in Microsoft Access file formats. | |
| Includes contacts in Microsoft Outlook file format (.pst). If your Business Contact Manager database is shared, each user may want to import his or her Outlook contacts. | |
| ACT! (.dbf, .pad) | Refers to data saved in the ACT! file format. Business Contact Manager for Outlook includes a Data Conversion Tool that enables you to convert ACT! data into the .bcm format before importing it. Notes: If you select ACT! (.dbf. .pad) or QuickBooks (.IIF) file formats, click Convert Data to convert your data to the Business Contact Manager file format (.bcm). This tool helps you import these types of files. Follow the instructions in the tool.
|
| QuickBooks (.IIF) | Any version of a QuickBooks file in the .iif forat can be imported. Business Contact Manager for Outlook includes a Data Conversion tool that enables you to convert QuickBooks data into the .bcm format before importing it. |
Tip: If your data is saved in a file format that is not listed in the Business Data Import wizard, save the data as a comma separated values file, and then import it into your Business Contact Manager database.
What is a customization?
A customization is a modification that you have made to Business Contact Manager for Outlook. Customizations can take many shapes. When you create a new tab in a workspace, that's a customization. When you create new forms, or add or remove fields and sections from existing forms, those are customizations. Customizations also include user-defined fields, custom reports, and Business Project templates. If it involves you taking Business Contact Manager for Outlook beyond its default forms and fields, it's probably a customization.
More about importing customizations
You have two ways of importing customizations into Business Contact Manager for Outlook. One is through the .bcm file type. This file type contains not just your business data records, but also the customizations you have made to your records, forms, and reports. The second way of importing customizations is through the .bcmx file type. This file type does not contain business data, but only the customizations you have made to Business Contact Manager for Outlook. This is useful when you want to apply customizations to the data you already have without overwriting or adding to the data.
When you import customizations, either from a .bcm or a .bcmx file, you overwrite the settings in the destination database with the customizations that are stored in the file. However, there are exceptions:
-
If the destination database contains customizations that don't exist in the .bcmx file, such as a new record type based on an Account, these customizations will be preserved.
-
If the .bcmx file contains a custom field type of Relationship, but the corresponding data type it refers to doesn't exist in the destination database, the field will not be added to the database.
Import a Business Contact Manager file (.bcm)
This file type contains your business data records and the customizations that have been made to records, forms, and reports.
-
Click the File tab.
-
Click the Business Contact Manager tab, and then click the Import and Export button.
-
Click Import from a File.
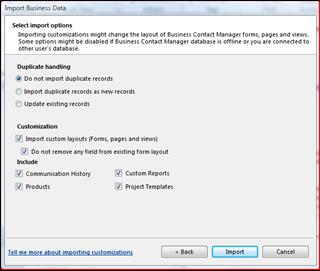
The Import Business Data wizard opens.
-
Type the location and name of the .bcm file, or click Browse to locate the file.
-
Click Next.
-
Select how you want to handle duplicate records. Your choices are:
-
Do not import duplicate records. The duplicate records of the imported file are not imported, leaving the existing records unchanged.
-
Import duplicate records as new records. The duplicate records of the imported file are imported and given a different, related name, leaving the existing records unchanged.
-
Update existing records. If there are duplicate records, and the record that you're importing contains different or additional information, the matching record is updated.
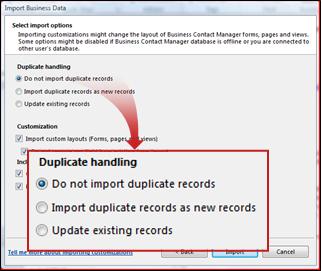
Duplicates occur when the name of a record that you're importing is identical to the name of an existing record.
-
-
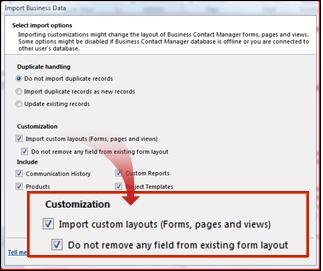
Select how you want to handle customizations. Your choices are:
-
Import custom layouts (forms, pages, and views). The layout of existing forms, pages, and views are replaced by the forms, pages, and views in the file being imported.
-
Do not remove any field from existing form layout. The forms, pages, and views in the file being imported will not remove any fields that are currently in use in the existing database. Any new fields from the imported file are appended to the forms, pages, or views.
-
-
Select any additional items you want to include in the import. Your choices are:
-
Communication History
-
Products (and Services)
-
Custom Reports
-
Project Templates
-
-
Click Import.
Import Business Contact Manager customizations (.bcmx)
A customization is a modification that you have made to Business Contact Manager for Outlook to adapt it to your needs. A file with a .bcmx extension contains only customizations; it does not contain business data such as Accounts, Business Contacts, and Leads.
-
Click the File tab.
-
Click the Business Contact Manager tab, and then click the Import and Export button.
-
Click Import from a File.
The Import Business Data wizard opens.
-
Type the location and name of the .bcmx file, or click Browse to locate the file.
The file name of the .bcmx file that you're importing appears in the File to Import box.
-
Click Import.
Business Contact Manager for Outlook imports your data. When it's finished, you are directed to review import messages and possible errors that are recorded in a log file. You can view the log file by clicking View Log.
Import from another application using the .csv file type; import from Microsoft Excel or Microsoft Access too
The .csv file format is a simple but powerful format for transferring data from one program to another. In fact, many programs read .csv files, including Excel.
You can also use the .csv file format to import a list of product and service items. Such a list has to be structured in a particular way to be imported. For more information about issues you must address before importing a product and service items list, see Import a product and service items list.
If you have data in an Excel or Access file, also use the following procedure to import the data.
In this section
Step 1: Select the .csv, Excel, or Access file you want to import
Step 1: Select the .csv, Excel, or Access file you want to import
-
Click the File tab.
-
Click the Business Contact Manager tab, and then click the Import and Export button.
-
Click Import from a File.
The Import Business Data wizard opens.
-
Type the location and name of the .csv, Excel, or Access file, or click Browse to locate the file.
The file is listed in the File to Import box.
-
Click Next.
-
Select how you want to handle duplicate records. Your choices are:
-
Do not import duplicate records. The duplicate records of the imported file are not imported, leaving the existing records unchanged.
-
Import duplicate records as new records. The duplicate records of the imported file are imported and given a different, related name, leaving the existing records unchanged. Duplicates occur when the name of a record that you're importing is identical to the name of an existing record.
-
-
Click Next.
Step 2: Map fields
You're now going to match the column headings (fields) of the file that you're importing with their corresponding fields in Business Contact Manager. This process is called mapping.
-
Map a .csv, Excel, or Access file.
-
.csv file
If necessary, select the check box of the .csv file that you want to import.
-
Excel file
Each Excel sheet that comprises the Excel workbook is listed. Select the check box of each sheet that you want to import.
If your Excel workbook has data on only one sheet (regardless of how many sheets exist in the file), select the check box of only that sheet.
-
Access file
The tables that comprise the Access database are listed. Select the check box of each table that you want to import.
If your Access database has data on only one sheet or table (regardless of how many tables exist in the file), select the check box of only that table.
-
-
In the Import As column, click the type of record, for example Account or Business Contact, that you're importing.
-
Click Map.

-
Do any of the following to map fields:
-
To manually map the fields, in the Import Fields list (1), drag the field you want to map to a field in the Available Fields list.
-
To have Business Contact Manager for Outlook map the fields for you, click Auto Map (2). Then scroll through the Available Fields list to check the mapping.
-
To map fields as you did in an earlier mapping, click Use Previous Map (3).
-
To create a new field and map a field from the imported file to it, click Map to New Field (4).
-
-
Repeat until the Import Fields list is empty.
-
If you want to change any of the mappings, do either of the following:
-
To change a mapping of an individual field, drag the mapped field from the Available Fields list back to the Import Fields list.
-
To clear all mappings, click Clear Map. Then try mapping the fields again.
-
-
When you have finished making your mapping choices, click OK, and then click Import.
Business Contact Manager for Outlook imports your data. When it's finished, you are directed to review import messages and possible errors that are recorded in a log file. You can view the log file by clicking View Log.
Tip: It may happen that, after importing an Excel file, some of the phone numbers do not appear. This is a known issue. Try opening the file in Excel 2010, and then saving it in the .csv file format by using the Save As command. Then from Business Contact Manager for Outlook, you can re-import the .csv file.
Import a product and service items list
To import a list of product and service items, the list must meet the following conditions:
-
It must be in the .csv file format. If you can open your product and service items list in Excel, you can save it as a .csv file by using the Save As command.
-
It must contain at least three columns arranged in a prescribed order.
Organizing a product and service items list with the right columns
To correctly import a .csv file composed of product and service items, the file must contain at least three columns, and up to five, arranged as follows:
Three-column arrangement
| Item Name | Description | Unit Price |
Four-column arrangement
| Item Name | Description | Unit Price | Quantity |
Five-column arrangement
| Item Name | Description | Unit Price | Quantity | Unit Cost |
Regardless of the arrangement you choose, the first row or line of your .csv file should be your list's column headings.
Example for Excel
Here's how a two-item list might appear in Excel. It consists of a heading row followed by a row for each item.
| Item Name | Description | Unit Price |
| Bicycle chain | Titanium 48" | 56.50 |
| Water bottle | Crystal clear blue | 11.75 |
Example for Notepad
If you're editing the file in a text editor such as Notepad (as opposed to Microsoft Excel), create a separate line in the file for each item you are importing and separate the items in each line by commas, with no spaces before or after the commas.
Item Name,Description,Unit Price
Bicycle chain,Titanium 48",56.50
Water bottle,Crystal clear blue,11.75
Tip: If you receive a message stating that there was an incorrect number of columns in the input file, you might have added too many commas to one or more rows. To avoid this, be sure to follow one of the column arrangements mentioned earlier in this article.
Remember that the first line of your .csv file must be the column headings.
Import the list
Once you have finished preparing your .csv file, you can import it, adding the items to your existing product and service items list, or replacing your existing list with the newly imported items.
-
In the Navigation Pane, under Business Contact Manager, click Sales.
-
On the Ribbon, on the Home tab, in the Customize group, click Products and Services.
-
In the Products and Services dialog box, click Import.
-
Type the location and name of the .csv file, or click Browse to locate the file.
-
Click one of the following options:
-
Replace existing list with items in this file. This removes your existing list of products and service items, and replaces it with the list of items that you are importing.
-
Add the items in this file to the existing list.
Important: You cannot undo imports. It is recommended that you back up your data before proceeding.
-
-
Click Import.
-
When your file has finished importing, click Close.
Fix .csv import errors
If you are in the process of importing product and service items, and the process is interrupted or reports errors, it's probably due to incorrectly formatted data in the .csv file, currency symbols, or duplicates of items in your existing list.
Check the formatting of the .csv file
The following formatting issues can generate error messages when you import a .csv file.
| Cause | Solution |
| Columns have no headings. | Add a column heading to each data type. Importing the data will be simpler if you use a column heading that currently exists in the Business Contact Manager database. |
| Column labels or headers are not unique. | Check for duplicate labels or headers and make them unique. For example, if there are two labels or headers called Phone Number, make one Phone Number 1, and the other Phone Number 2. |
| The .csv file contains non-printable characters. | Non-printable characters include line returns, and page or section breaks. Ensure all of these are deleted before you try importing the file again. |
| The file being imported has an incorrect number of columns. | The file must contain at least three columns arranged in the following order: Item Name, Description, Unit Price. |
Punctuation and monetary guidelines
The product prices and quantities cannot include currency symbols or internal punctuation such as periods or commas. However, you can use a decimal sign for currency. For example:
-
For any amount that is a whole number, including currency, type 10000, but not the amount with a comma or decimal point.
-
For prices that include change, type the decimal point, as in 10.50 when you are referring to a price of ten dollars and fifty cents.
Evaluate how you're handling duplicate records
You might get an import product and service items error message if you try to import items that are already in Business Contact Manager for Outlook, but you did not indicate that these duplicates should overwrite existing items. The error message in the error log file states that the item or items are already in Business Contact Manager for Outlook.
To correct the error, re- import the new products or service items. In the Import Product and Service Items dialog box, click Replace existing list with items in this file. The items in your current product and service items list are overwritten by items in the file that you're importing.

When you import the list again, you won't encounter the duplicate items error.
Import a Microsoft Outlook Contacts folder
With just a few clicks, you can populate Business Contact Manager for Outlook with a host of Business Contacts by importing your Outlook Contacts folder.
-
Click the File tab.
-
Click the Business Contact Manager tab, and then click the Import and Export button.
-
Click Import Outlook Contacts.
The Import Business Data wizard opens.
-
The wizard lists your default Contacts folder as the folder to import. To import a different Contacts folder, click Browse. Click the Contacts folder that you want to import, and then click OK.
-
Select how you want to handle duplicate records.
Your choices are:
-
Do not import duplicate records. The duplicate records of the imported file are not imported, leaving the existing records unchanged.
-
Import duplicate records as new records. The duplicate records of the imported file are imported and given a different, related name, leaving the existing records unchanged.
Duplicates occur when the name of a record that you're importing is identical to the name of an existing record.
-
-
Click Import.
Tip: To import your Windows Live Mail data into Business Contact Manager for Outlook, you must first add your Windows Live Mail account to Outlook.
Import an ACT! or QuickBooks file
If you have business data in ACT! or QuickBooks, you can import it into Business Contact Manager for Outlook with the Data Conversion Tool, and the Import Business Data wizard. The Data Conversion Tool converts your ACT! or QuickBooks data into a form that Business Contact Manager for Outlook can interpret.
-
Click the File tab.
-
Click the Business Contact Manager tab, and then click the Import and Export button.
-
Click Import from Other Applications.
-
In the Import Business Data wizard, click Convert Data. The Data Conversion Tool opens. Click Next.
-
Click a version of ACT! or QuickBooks, and then click Next.
-
Type the location and name of the file, or click Browse to locate the file, and then click Next.
-
Select the check boxes of the categories of data that you want to convert. In the Destination list, select the type of Business Contact Manager for Outlook record you want the data to be converted to, and then click Next
-
Select the user-defined fields that you want to include as a part of the data conversion, and then click Next.
-
Click Browse, to select a location for the converted file, type a name for the file, and then click Save. Click Next.
-
Click Next. When the conversion is complete, close the Convert Data Tool.
-
You can now import the converted data, following the procedure described in Import a Business Contact manager file (.bcm).
Tip: You can ignore the selections for customizations, because they do not apply to your converted data.
No comments:
Post a Comment