Create DNS records at East.net for Office 365
If east.net is your DNS hosting provider, follow the steps in this article to verify your domain and set up DNS records for email, Lync, and so on.
These are the main records to add.
After you add these records at east.net, your domain will be set up to work with Office 365 services.
If you have a SharePoint Online Public Website, you can set it up to use your custom domain for the website URL address, like www.your_domain.com.
Note: Typically it takes about 15 minutes for DNS changes to take effect. However, it can occasionally take longer for a change you've made to update across the Internet's DNS system.
Add a TXT record for verification
Before you use your domain with Office 365, we have to make sure that you own it. Your ability to log in to your account at your domain registrar and create the DNS record proves to Office 365 that you own the domain.
Note: This record is used only to verify that you own your domain; it doesn't affect anything else. You can delete it later, if you like.
-
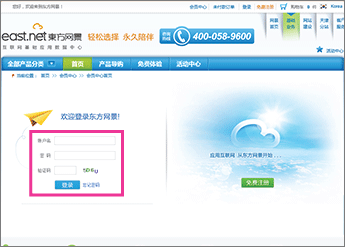
In your browser, go to your domains list at east.net and sign in.
-
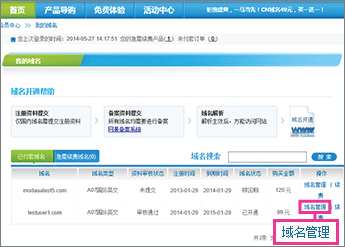
In the right pane, in the 操作 (actions) column for the domain that you want to update, click 域名管理 (domain management).
-
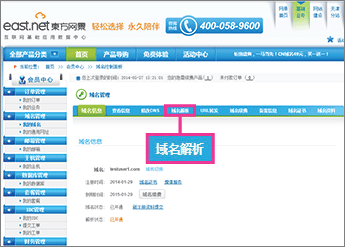
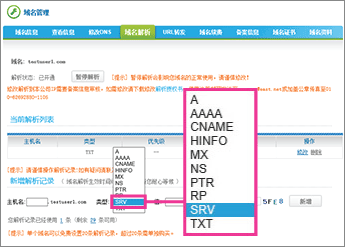
Click the 域名解析 (domain name resolution) tab.
The DNS records page for your domain opens.
-
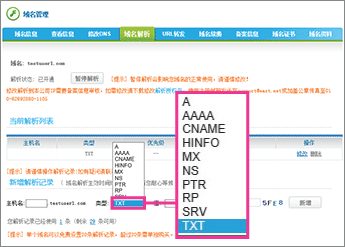
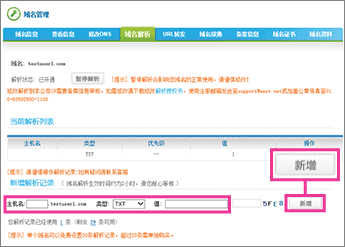
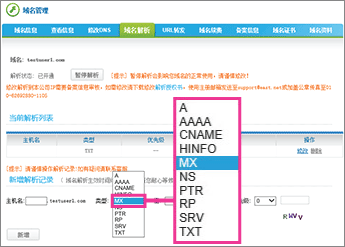
In the 新增解析记录 (add a DNS record) section, make sure that the fields are set to precisely the following values for the empty record:
-
主机名 (host name): Leave the box blank
-
类型 (type): TXT
-
值 (value): Paste the Destination or Points to Address value from the table in Office 365, for example MS=msXXXXXXX. How do I find this?
-
-
Click 新增 (add).
Now that you've added the record at your domain registrar's site, you'll go back to Office 365 and request Office 365 to look for the record.
When Office 365 finds the correct TXT record, your domain is verified.
-
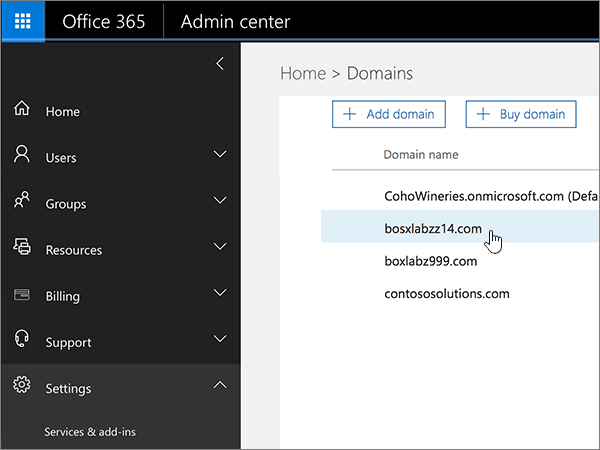
Choose Setup > Domains.
-
On the Domains page, choose the domain that you are verifying.
-
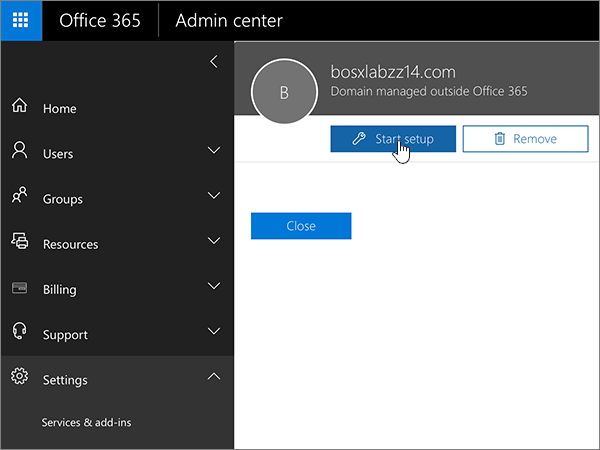
On the Setup page, choose Start setup.
-
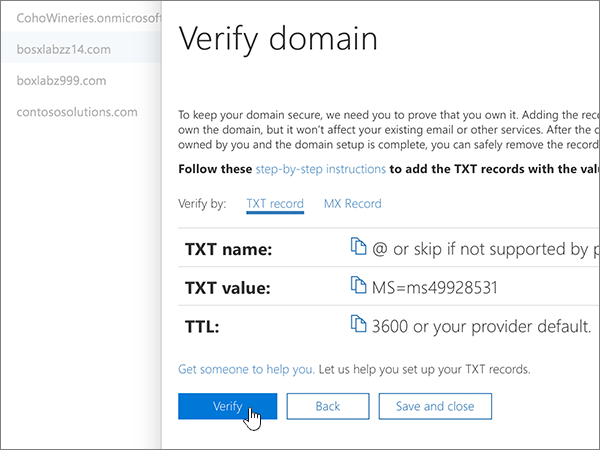
On the Verify domain page, choose Verify.
Add an MX record to route email
-
In your browser, go to your domains list at east.net and sign in.
-
In the right pane, in the 操作 (actions) column for the domain that you want to update, click 域名管理 (domain management).
-
Click the 域名解析 (domain name resolution) tab.
The DNS records page for your domain opens.
-
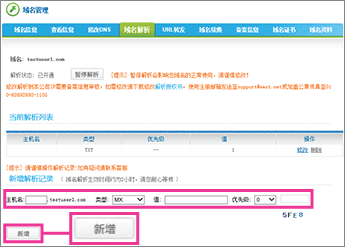
In the 新增解析记录 (add a DNS record) section, make sure that the fields are set to precisely the following values for the empty record:
-
主机名 (host name): Leave the box blank.
-
类型 (type): MX
-
值 (value): Paste the Points to address value from Office 365: <domain-key>.mail.protection.partner.outlook.cn
Note: Get your <domain-key> from your Office 365 portal account.
How do I find this? -
优先级 (priority): 0
-
-
Click 新增 (add).
-
If you have any MX records for this domain that send email to someplace other than Office 365, remove them:
-
In the 当前解析列表 (current DNS records) section, on the row of the obsolete record, click 删除 (remove).
-
In the confirmation dialog box, click OK.
-
Add CNAME records
-
Add the email (Exchange) Autodiscover CNAME record.
-
In your browser, go to your domains list at east.net and sign in.
-
In the right pane, in the 操作 (actions) column for the domain that you want to update, click 域名管理 (domain management).
-
Click the 域名解析 (domain name resolution) tab.
The DNS records page for your domain opens.
-
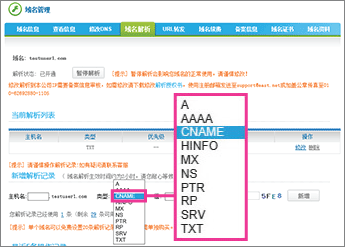
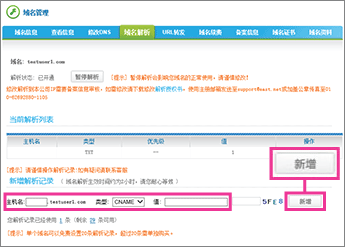
On the DNS records page for your domain, in the 新增解析记录 (add a DNS record) section, make sure that the fields are set to precisely the following values for the empty record:
-
主机名 (host name): autodiscover
-
类型 (type): CNAME
-
值 (value): autodiscover.partner.outlook.cn
-
-
Click 新增 (add).
-
-
Add the Lync Autodiscover CNAME record.
-
On the DNS records page for your domain, in the 新增解析记录 (add a DNS record) section, make sure that the fields are set to precisely the following values for the empty record:
-
主机名 (host name): lyncdiscover
-
类型 (type): CNAME
-
值 (value): webdir.online.partner.lync.cn
-
-
Click 新增 (add).
-
-
Add the Lync SIP CNAME record.
-
On the DNS records page for your domain, in the 新增解析记录 (add a DNS record) section, make sure that the fields are set to precisely the following values for the empty record:
-
主机名 (host name): sip
-
类型 (type): CNAME
-
值 (value): sipdir.online.partner.lync.cn
-
-
Click 新增 (add).
-
-
Add the Office 365 MSOID CNAME record. This is an additional record that is required for Office 365.
-
On the DNS records page for your domain, in the 新增解析记录 (add a DNS record) section, make sure that the fields are set to precisely the following values for the empty record:
-
主机名 (host name): msoid
-
类型 (type): CNAME
-
值 (value): clientconfig.partner.microsoftonline-p.net.cn
-
-
Click 新增 (add).
-
Add a TXT record to help prevent spam
-
In your browser, go to your domains list at east.net and sign in.
-
In the right pane, in the 操作 (actions) column for the domain that you want to update, click 域名管理 (domain management).
-
Click the 域名解析 (domain name resolution) tab.
The DNS records page for your domain opens.
-
In the 新增解析记录 (add a DNS record) section, make sure that the fields are set to precisely the following values for the empty record:
-
主机名 (host name): Leave the box blank.
-
类型 (type): TXT
-
值 (value): v=spf1 include:spf.protection.partner.outlook.cn -all
-
-
Click 新增 (add).
Add SRV records
-
Add the SIP SRV record for Lync federation.
-
In your browser, go to your domains list at east.net and sign in.
-
In the right pane, in the 操作 (actions) column for the domain that you want to update, click 域名管理 (domain management).
-
Click the 域名解析 (domain name resolution) tab.
The DNS records page for your domain opens.
-
On the DNS records page for your domain, in the 新增解析记录 (add a DNS record) section, make sure that the fields are set to precisely the following values for the empty record:
-
主机名 (host name): _sipfederationtls._tcp
-
类型 (type): SRV
-
值 (value): 1 5061 sipfed.online.partner.lync.cn
-
-
Click 新增 (add).
-
-
Add the SIP SRV record for Lync web conferencing.
-
On the DNS records page for your domain, in the 新增解析记录 (add a DNS record) section, make sure that the fields are set to precisely the following values for the empty record:
-
主机名 (host name): _sip._tls
-
类型 (type): SRV
-
值 (value): 1 443 sipdir.online.partner.lync.cn
-
-
Click 新增 (add).
-
Offshore Hosting By #1 Trusted Offshore Host Provider. visit us
ReplyDelete