Change nameservers to set up Office 365 with any domain registrar
Check the Domains FAQ if you don't find what you're looking for.
Check Set up your domain (host-specific instructions) first to see if we have instructions for your registrar.
Follow these instructions to add and set up your domain in Office 365 so your services like email and Skype for Business Online will use your own domain name. To do this, you'll verify your domain, and then change your domain's nameservers to Office 365 so the correct DNS records can be set up for you. Follow these steps if the following three statements describe your situation:
-
You have your own domain and want to set it up to work with Office 365.
-
You want Office 365 to manage your DNS records for you. (If you prefer, you can manage your own DNS records.)
Add a TXT or MX record for verification
Note: You will create only one or the other of these records. TXT is the preferred record type, but some DNS hosting providers don't support it, in which case you can create an MX record instead.
Before you use your domain with Office 365, we have to make sure that you own it. Your ability to log in to your account at your domain registrar and create the DNS record proves to Office 365 that you own the domain.
Note: This record is used only to verify that you own your domain; it doesn't affect anything else. You can delete it later, if you like.
Find the area on your DNS hosting provider's website where you can create a new record.
-
Sign in to your DNS hosting provider's website.
-
Choose your domain.
-
Find the page where you can edit DNS records for your domain.
Create the record.
-
Depending on whether you are creating a TXT record or an MX record, do one of the following:
-
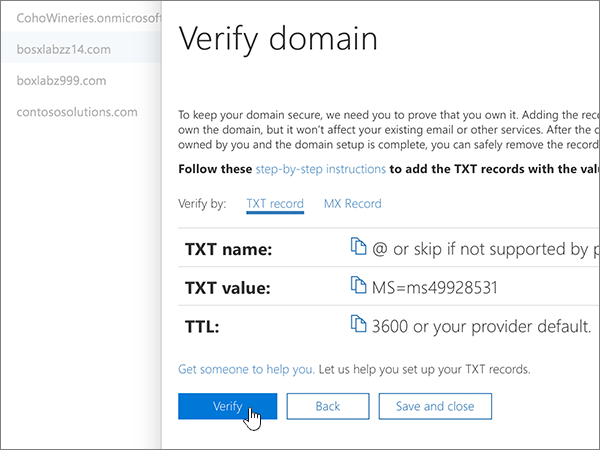
If you create a TXT record, use these values:
Record Type
Alias or Host Name
Value
TTL
TXT
Do one of the following: Type @ or leave the field empty or type your domain name.
Note: Different DNS hosts have different requirements for this field.
MS=msXXXXXXXX
Note: This is an example. Use your specific Destination or Points to Address value here, from the table in Office 365.
How do I find this?Set this value to 1 hour or to the equivalent in minutes (60), seconds (3600), etc.
-
If you create an MX record, use these values:
Record Type
Alias or Host Name
Value
Priority
TTL
MX
Type either @ or your domain name.
MS=msXXXXXXXX
Note: This is an example. Use your specific Destination or Points to Address value here, from the table in Office 365.
How do I find this?For Priority, to avoid conflicts with the MX record used for mail flow, use a lower priority than the priority for any existing MX records.
For more information about priority, see What is MX priority?
Set this value to 1 hour or to the equivalent in minutes (60), seconds (3600), etc.
-
-
Save the record.
Now that you've added the record at your domain registrar's site, you'll go back to Office 365 and request Office 365 to look for the record.
When Office 365 finds the correct TXT record, your domain is verified.
-
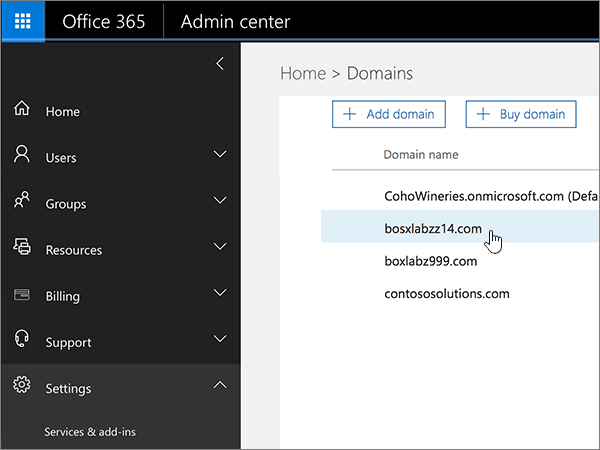
Choose Setup > Domains.
-
On the Domains page, choose the domain that you are verifying.
-
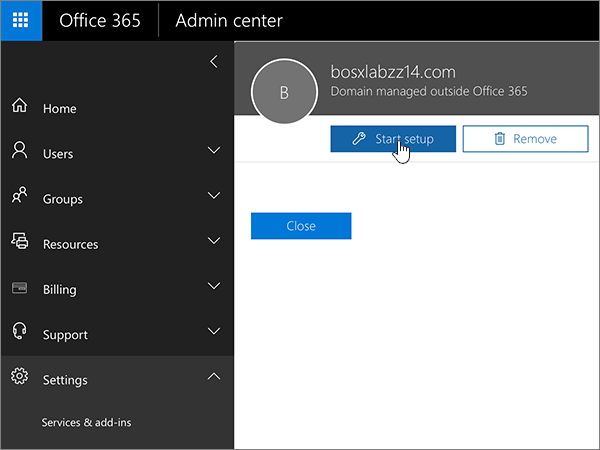
On the Setup page, choose Start setup.
-
On the Verify domain page, choose Verify.
Note: Typically it takes about 15 minutes for DNS changes to take effect. However, it can occasionally take longer for a change you've made to update across the Internet's DNS system. If you're having trouble with mail flow or other issues after adding DNS records, see Troubleshoot issues after changing your domain name or DNS records.
Change your domain's nameserver (NS) records
When you get to the last step of the domains setup wizard in Office 365, you have one task remaining. To set up your domain with Office 365 services, like email, you change your domain's nameserver (or NS) records at your domain registrar to point to the Office 365 primary and secondary nameservers. Then, because Office 365 hosts your DNS, the required DNS records for your services are set up automatically for you. You can update the nameserver records yourself by following the steps your domain registrar may provide in the help content at their website. If you're not familiar with DNS, contact support at the domain registrar.
To change your domain's nameservers at your domain registrar's website yourself, follow these steps:
-
Find the area on the domain registrar's website where you can edit the nameservers for your domain.
-
Create two nameserver records, or edit the existing nameserver records to match the following values:
First nameserver
ns1.bdm.microsoftonline.com
Second nameserver
ns2.bdm.microsoftonline.com
Tip: You should use at least two nameserver records. If there are any other nameservers listed, you can either delete them, or change them to ns3.bdm.microsoftonline.com and ns4.bdm.microsoftonline.com.
-
Save your changes.
Caution: When you change your domain's NS records to point to the Office 365 nameservers, all the services that are currently associated with your domain are affected. If you skipped any steps of the wizard, such as adding email addresses, or if you're using your domain for blogs, shopping carts, or other services, there are additional steps that are required. Otherwise this change could result in service downtime, such as lack of email access or your current website being inaccessible.
For example, here are some additional steps that might be required for email and website hosting:
-
Move all email addresses that use your domain to Office 365 before you change your NS records. Learn more: Why should I add users to Office 365 while I'm adding my domain?
-
Want to add a domain that's currently used with a website address, like www.fourthcoffee.com? You can take steps while you add the domain to keep its website hosted where the site is hosted now so people can still get to the website after you change the domain's NS records to point to Office 365.
Note: Your nameserver record updates may take up to several hours to update across the Internet's DNS system. Then your Office 365 email and other services will be all set to work with your domain.
| |
 New to Office 365?
Still need help?


No comments:
Post a Comment