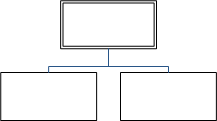
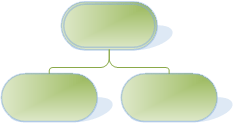
Apply a professional look to your drawings with themes
What do you want to do?
A theme in Microsoft Office Visio 2007 is a set of colors and effects that you can apply to a drawing with a single click. Themes are a quick and easy way to give your drawings a fresh and professionally designed look.
A theme has two parts:
-
Theme colors—a set of colors designed to work well together
-
Theme effects—a set of effects for font, fills, shadows, lines, and connectors
You can mix and match theme colors and effects in any combination.


Microsoft Office Visio comes with a set of built-in themes, but you can also create and edit custom themes. For example, you can create a custom theme to match your company's logo and branding.
The built-in theme colors match the theme colors available in other Microsoft Office applications, such as PowerPoint and Word.
Apply a theme
-
On the Format menu, click Theme. The Theme - Colors task pane opens by default. To open the Theme - Effects task pane, click Theme Effects.
Tip: You can also click the Theme tool on the Formatting toolbar.
-
Do one of the following:
-
To apply a theme to the current drawing page, right-click a thumbnail, and then click Apply to Current Page.
-
To apply a theme to all the pages in your drawing, right-click a thumbnail, and then click Apply to All Pages.
Tip: You can also click a thumbnail. Clicking a thumbnail applies the theme either to the current page or to all pages in your drawing, depending on what you did last.
Notes:
-
To remove the current theme colors or theme effects from all shapes, in the Theme task pane, click the None thumbnail.
-
Some themes apply a background color to your drawing. If you don't want the background color to appear when you print, select the No Background check box in the Print dialog box.
-
To enlarge the thumbnails, right-click a thumbnail, and click Show Large Previews.
-
After you apply a theme, that theme is applied to any shapes you add to the drawing. To temporarily disable this functionality, clear the Apply theme to new shapes check box at the bottom of the Themes task pane.
-
-
Create a custom theme
-
In the Theme task pane, click New theme colors or New theme effects.
-
In the New Theme Colors or New Theme Effects dialog box, choose the colors or effects you want, and click OK.
Tip: Before you create a custom theme, first apply a theme that is similar to the theme you want to create. Then, when you open the New Theme Colors or New Theme Effects dialog box, most of your choices will already have been made.
Duplicate a theme
-
In the Theme task pane, right-click the thumbnail for the theme you want to duplicate, and then click Duplicate. The duplicated theme is added to the Theme task pane under Custom.
Edit a custom theme
-
In the Theme task pane, right-click the thumbnail for the custom theme you want to edit, and then click Edit.
-
In the Edit Theme Colors or Edit Theme Effects dialog box, choose the options you want, and click OK.
Note: You can't edit the built-in themes that are included with Visio. If you want to make a change to one of the built-in themes, duplicate it and then edit the duplicate theme.
Copy a custom theme to another drawing
-
Open the drawing that has the custom theme you want to copy.
-
Select a shape with the custom theme applied.
-
On the Edit menu, click Copy.
-
Open the drawing that you want to copy the custom theme to.
-
On the Edit menu, click Paste. The custom theme is added to the Themes task pane.
-
You can now delete the shape that you pasted into your drawing.
Note: You cannot copy a theme from another Microsoft Office program, such as PowerPoint or Word, to Visio. You also cannot copy a theme from Visio to another Microsoft Office program.
Prevent themes from affecting a shape
You may not want a theme to apply to every shape in a drawing. For example, if you have a traffic sign in your drawing, you probably don't want its fill color or pattern to change when you apply a theme.
To prevent themes from applying to a specific shape you can either not allow themes for that shape, or you can protect the shape from theme colors or theme effects.
Not allow themes for a shape
-
Right-click the shape, point to Format, and uncheck the Allow Themes command.
Protect a shape from theme colors or theme effects
-
Select the shape.
-
On the Format menu, click Protection.
-
In the Protection dialog box, select the From theme colors or From theme effects check boxes.
Notes:
-
If you want to use a text, line, or fill color that doesn't change when you apply a theme, click the arrow next to the Text Color, Line Color, or Fill Color tool on the Formatting toolbar, and then select one of the colors under Standard Colors.
-
Some of the shapes that are included with Visio are not affected by themes by default. Allowing themes to affect these shapes can cause unexpected results.
-
Remove a theme from a shape
-
Right-click the shape, point to Format, and click Remove Theme.
Tip: To remove the current theme colors or theme effects from all shapes, in the Theme task pane, click the None thumbnail.
Delete a custom theme
-
In the Theme task pane, right-click the thumbnail for the custom theme you want to delete, and then click Delete.
Note: You can't delete the built-in themes that are included with Visio.
No comments:
Post a Comment