Add your Outlook.com account in Outlook for Windows
Using Outlook gives you the opportunity to access many different types of email accounts from one place. If you have a Microsoft email account that ends in @outlook.com, @live.com, @hotmail.com, or @msn.com, follow the steps given to add your account to Outlook 2016 and Outlook 2013 or to Outlook 2010 and Outlook 2007
Add your Outlook.com email account quickly

You can use Outlook's automatic setup option to add your Outlook.com account to Outlook for PC. You can use these instructions to add your first account or additional accounts.
Note: Your username is your full Outlook.com email address.
-
Open Outlook and select File > Add Account.
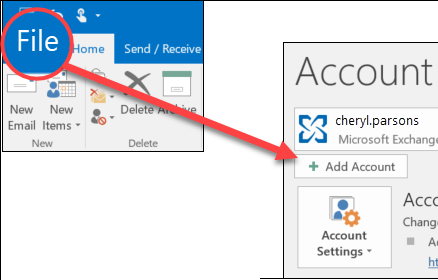
Note: Outlook 2007 users should select Tools > Account Settings. On the Email tab, select New.
-
For Outlook 2016, enter your email address, then select Connect.
For Outlook 2013 and Outlook 2010, select Email Account and then enter your name, email address, and password. Then select Next. -
If prompted, enter your password again, then select OK, and Finish to start using Outlook.
Note: You can use these steps to add your first account to Outlook or additional accounts.
What would you like to do?
You can use an Outlook.com account (formerly Hotmail) with an Outlook 2010 or an Outlook 2007 account.
Although Microsoft currently supports only Outlook 2007 versions 12.0.6680.5000 and later, you can use a supported or an unsupported version to access your email account. Using a supported version gives you full access to your Microsoft personal email account, which includes access to your email, calendar, and contacts. Using an unsupported version gives you access to the email in your account, but you won't be able to get to your calendar, contacts, or tasks.
Step 1: Find out what version of Outlook 2007 you're using
-
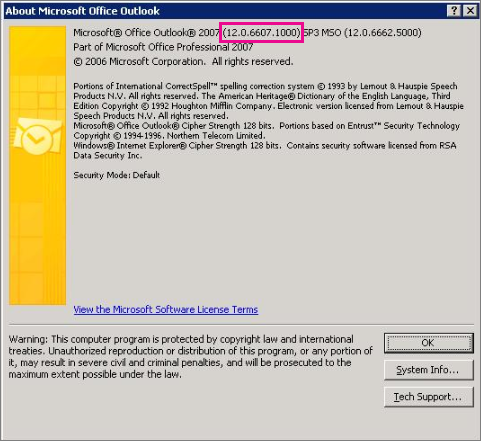
In Outlook 2007, select the Help menu, and then select About Microsoft Office Outlook.
-
In the About Microsoft Office Outlook dialog box, the Outlook 2007 version number that you're interested in is on the first line, directly after the words Microsoft Office Outlook 2007. If there's another version number at the end of the first line in your dialog box, disregard it.
The following screenshot shows the location of the Outlook 2007 version number on the first line in the dialog box.
-
Do one of the following, depending on whether your Outlook 2007 version is supported or unsupported:
-
If you have a supported version (12.0.6680.5000 or later), go to Step 3: Start the new-account setup process. This path will give you full access to your email account.
-
If you have an unsupported version (a version earlier than 12.0.6680.5000), do one of the following:
-
If possible, update Outlook 2007 to a supported version. To do this, go to Step 2: Update Outlook 2007 if your current version is unsupported. This is the best approach if your current version is unsupported, because it will give you full access to your email account.
-
If you can't update Outlook 2007 to a supported version, for example because a policy of your organization doesn't allow it, go to Step 3: Start the new-account setup process. This path will give you access to your email, but you won't be able to get to your calendar, contacts, and tasks.
-
-
Step 2: Update Outlook 2007 if your current version is unsupported
-
Start downloading the update for Outlook 2007 (KB2768023) by going to the Microsoft Download Center and clicking Download.
-
Select Save as when you're asked whether you want to run or save the file that you're downloading.
-
In the Save As dialog box, select the folder where you want to save the file, and then select Save.
-
When the download is complete, install the update by doing the following:
-
Go to the folder where you saved the file, and then open the file. An installation wizard appears.
-
Follow the wizard to complete the update.
-
Step 3: Start the new-account setup process
To start the new account setup process, add a new profile if you already have an email account in Outlook 2007 or continue without adding a new profile if you don't.
Add a new profile
-
Open Control Panel.
-
Select Mail. The Mail Setup - Outlook dialog box appears.
-
In the Profiles section, select Show Profiles. The Mail dialog box appears.
-
Under When starting Microsoft Outlook use this profile, select Prompt for a profile to be used.
-
Select Add, and then specify a name for the new profile.
-
Select OK. The Add New E-mail Account - Auto Account Setup dialog box appears.
-
Go to Step 4: Complete the new account setup process. (Don't perform the next procedure, Continue without adding a new profile.)
Continue without adding a new profile
-
In Outlook 2007, on the Tools menu, select Account Settings.
-
In the Account Settings - E-mail Accounts dialog box, on the Email tab, select New.

-
In the Add New E-Mail Account dialog box, select Microsoft Exchange, POP3, IMAP or HTTP, and then select Next.
The Add New E-mail Account - Auto Account Setup dialog box appears.
Step 4: Complete the new account setup process
To complete the new account setup process, perform one of the following two procedures in this section, depending on whether you're using a supported or an unsupported version of Outlook 2007.
Add the new account to your supported version of Outlook 2007
-
In the Add New E-mail Account - Auto Account Setup dialog box, in the Your Name box, enter your name or a friendly name or nickname. This is the sender name that recipients of your email messages will see.
-
In the E-mail Address text box, enter the email address of the email account that you want to add to Outlook 2007.
-
In the Password text box, enter the password for the account that you want to add to Outlook 2007.
-
In the Retype Password text box, enter the password again.
-
Select Next.
Outlook 2007 adds and then connects to the new email account.
Important: You're done! You've completed all of the necessary procedures for configuring Outlook 2007 to access your Microsoft personal email account. Don't perform the next procedure, Add the new account to your unsupported version of Outlook 2007.
Add the new account to your unsupported version of Outlook 2007
-
In the Add New E-mail Account - Auto Account Setup dialog box, select Manually configure server settings or additional server types, and then select Next.
-
In the Add New E-mail Account - Choose E-mail Service dialog box, select Internet E-mail, and then select Next.
-
In the Add New E-mail Account - Internet E-mail Settings dialog box, do the following:
-
In the User Information section, enter your name and the email address of the email account that you're adding to Outlook 2007.
-
In the Server Information section, do the following:
-
For Account Type, select IMAP.
-
For Incoming mail server, enter the text that is shown for "Server address" in IMAP4 settings for your Microsoft personal email account. The address that is shown there might be imap-mail.outlook.com.
-
For Outgoing mail server, enter smtp-mail.outlook.com.
-
-
In the Logon Information section, do the following:
-
In the User Name text box, enter the email address of the email account that you want to add to Outlook 2007.
-
In the Password text box, enter the password for the account that you want to add to Outlook 2007.
-
-
Near the lower-right corner of the dialog box, select More Settings.
-
-
In the Internet E-mail Settings dialog box, in the Outgoing Server tab, select My outgoing server (SMTP) requires authentication, and then select Use same settings as my incoming mail server.
-
In the Internet E-mail Settings dialog box, choose the Advanced tab.

-
On the Advanced tab, do the following:
-
For Incoming server (IMAP), in the text box, enter the port number that is shown in IMAP4 settings for your Microsoft personal email account, which might be 993, and select This server requires an encrypted connection (SSL).
-
For Outgoing server (SMTP), enter the number 25 in the text box for the port, and for Use the following type of encrypted connection, select TLS.
Tips:
-
Before you enter 25 in the text box for Outgoing server (SMTP), it's a good idea to check your firewall software to see if port 25 is available. If you check and port 25 isn't available, enter 587 in the text box for Outgoing server (SMTP).
-
If the port number that you enter in this case isn't available, you might get an error message when Outlook 2007 tries to connect to your email account. If you get an error message about this, come back to the Advanced tab in the Internet E-mail Settings dialog box and enter the other port number (25 or 587).
-
-
-
Choose OK to close the Internet E-mail Settings dialog box.
-
In the In the Add New E-mail Account - Internet E-mail Settings dialog box, choose Next.
Outlook 2007 adds and then connects to the new email account.
Important: You're done! You've configured Outlook 2007 to access your Microsoft personal email account.
Remove an Outlook.com account
-
On the File tab, click Account Settings > Account Settings.
-
Select the email account that you want to remove, and then click Remove.
-
To confirm removal of the account, click Yes.
You also can uninstall the Outlook Connector in Control Panel. For more information about how to remove programs, see Windows Help and Support.
Update an Outlook.com account password
If you change your Outlook.com account password, you must also update the information in Outlook. After you change your password on the Outlook.com website, update the password that is saved in Outlook.
-
On the File tab. click Account Settings > Account Settings.

-
On the E-mail tab, click the Outlook.com account, and then click Change.
-
In the Password box, type your new password.
-
Click OK, and then in the Account Settings dialog box, click Close.
Synchronize calendars from Outlook.com
With the Outlook Connector, you can view your Outlook.com calendar in Outlook. This includes other people's calendars that have been shared with you. By managing your calendars in Outlook, you can take advantage of the time-management features that Outlook offers such as viewing multiple calendars at the same time. With your Outlook 2010 or Outlook 2007 account and the Outlook Connector, you can also:
-
View tasks and flagged messages under your appointments on the days they're due
-
Categorize your appointments with custom color categories
-
Overlay multiple calendars
Additionally, any changes that you make to your Outlook.com calendar in Outlook are synchronized automatically with the Web version in your Outlook.com account.
This comment has been removed by the author.
ReplyDelete