Manage Your Calendar with the Calendar Insights template for Excel 2016
With Excel 2016, you can use the Calendar Insights template to gain extensive, insightful, and customizable information about your calendar. The template surfaces how much time you spend in meetings, whom you meet with the most (and whom you ignore), which part of the day you usually meet with people, and much more.
With the Calendar Insights template you can see your calendar as a dashboard, and interact with it to drill into specific time periods, or types of meetings, you're interested in. You can use the Calendar Insights template to get a better handle on your meetings, your free time, and your life. Let's get started.
Using the Calendar Insights template
To use the Calendar Insights template you need Excel 2016 or later, or a subscription to Office 365. To access your calendar using the template, you need an active account on an Exchange Server, or on Exchange Online as part of your Office 365 subscription.
Open the Calendar Insights template
To open the Calendar Insights template, in Excel select New > Calendar Insights.
If you can't see the template, use the search box and type calendar insights, and then select the magnifying glass button to begin the search (or click the Enter key). The Calendar Insights template appears.
Once the template is open, you see the first workbook tab, titled Start. Select the Let's Get Started button to begin.

The Import Your Calendar tab is selected, providing steps about how to connect to the Exchange Server and import your calendar.
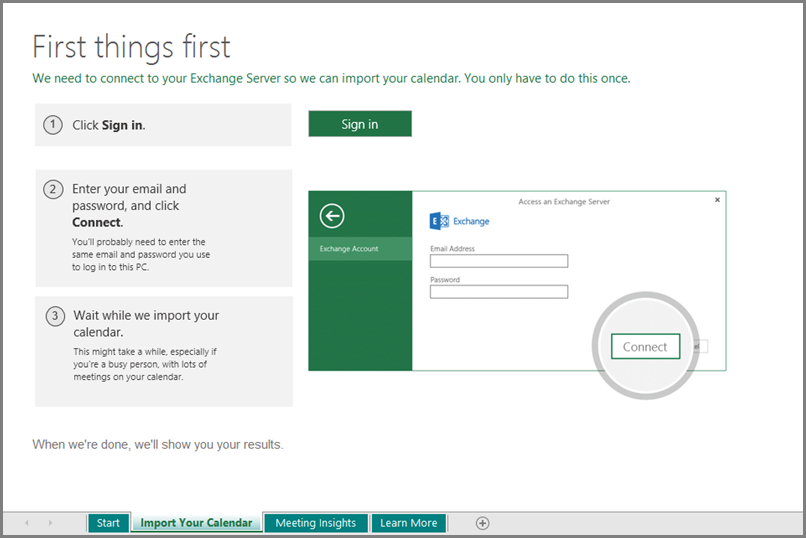
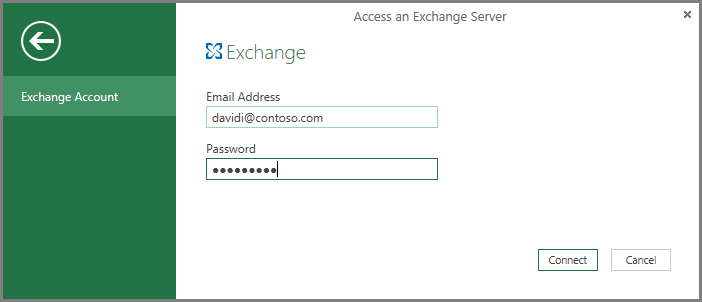
When you select the Sign in button, Excel displays a dialog that lets you enter your email address and password, so Excel can connect to your Exchange Server and load your calendar information into the workbook. The process can take a few minutes, depending on how many meetings Excel has to download.
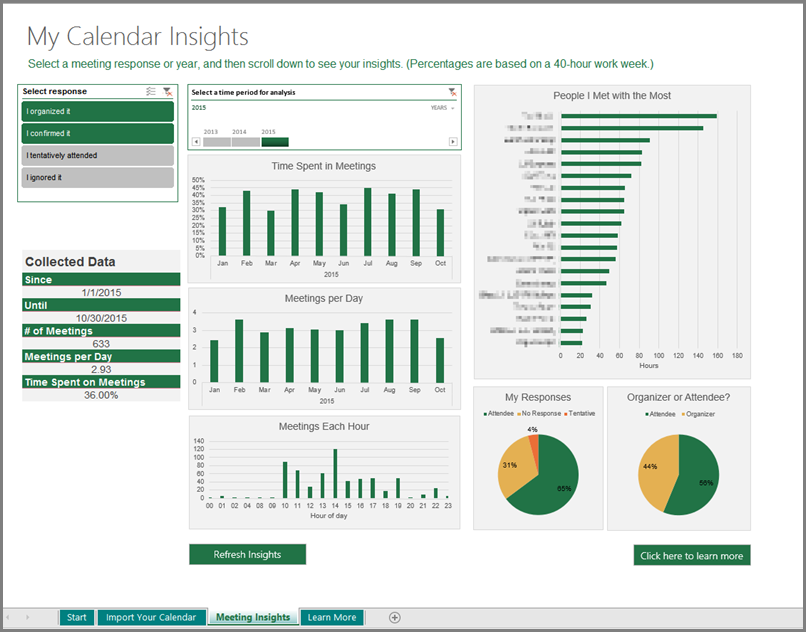
Once complete, the Meeting Insights worksheet appears and displays a populated dashboard that contains a collection of detailed analytics based on your calendar.
Save the Calendar Insights workbook with your data
Now you're ready to save this as a macro-enabled workbook, so that you can update the data whenever you want. To save the workbook, do the following:
-
Select File > Save As, then select a destination and choose Excel Macro-Enabled Workbook in the Save as type drop-down menu.

Saving the workbook as a macro-enabled workbook ensures that all charts will be automatically updated each time you select the Refresh Insights button on the Meeting Insights worksheet.
-
When you want the latest data from your calendar, open the workbook and select the Refresh Insights button at the bottom of the Meeting Insights worksheet.
Gain Insights about your Calendar using the Meeting Insights sheet
When you select the Meeting Insights worksheet, you see a dashboard that contains all sorts of interesting insights about your calendar data. The following image shows the worksheet, and below the image is a description of each numbered section.

-
Meeting Response slicer
-
Timeline to select the time period for analysis; all charts reflect the selected timeline
-
Summary of your collected data
-
Column Chart (PivotChart) of your Time spent in Meetings by month and year
-
Column Chart (PivotChart) of the Meetings per Day by month and year
-
Column Chart (PivotChart) of the Meetings Each Hour by hour of the day
-
Bar Chart (PivotChart) of the People I (you) Met with the Most
-
Pie Chart (PivotChart) of your meeting invite Responses, showing the number of meetings you attended, didn't respond to, or were tentative
-
Pie Chart (PivotChart) of the number of meetings you Organized or Attended
Filtering Controls
There are two filtering controls on the Meeting Insights worksheet, which correspond to numbers 1 and 2 in the previous image:
-
The Select Response slicer lets you select any combination of the meeting responses (use CTRL+Click or Shift+Click to select multiple items), which filters all charts on the worksheet:
-
I organized it
-
I confirmed it
-
I tentatively attended
-
I ignored
The slicer has the responses I confirmed it and I organized it as the selected options when you load the sheet.
Tip: You can select the slicer's I ignored it button, then see in Chart 6 which period of the day you usually ignore meeting invites, and then in Chart 7 see who attends the meetings that you ignore.
You can learn more about slicers in Excel.
-
-
The Timeline slicer (it's titled Select a time period for analysis) lets you filter charts in the worksheet based on time period. In the upper right corner of the slicer is a drop-down menu that lets you select whether the time period selection should be years, quarters, months, or days.

You can learn more about Timelines in Excel.
Customize the Calendar Insights template
The Calendar Insights template uses Data Analysis Expressions (DAX) to measure the percentage of time spent in meetings (compared to the total working time). The results are shown in the Meeting Insights worksheet, in the charts identified as 3 and 4.
The assumptions used in the calculations are an 8-hour workday, and a 5-day week. Also, meetings longer than 4 hours are excluded, to reduce the calculation bias that results from long events on the calendar.
You can customize the template to meet your specific working habits, and affect the calculation of the time spent on meetings, by taking the following steps:
-
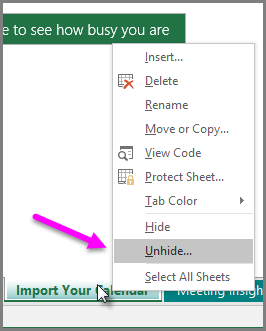
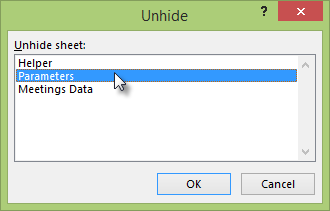
Right-click a worksheet tab, and select Unhide... for the menu that appears.
-
Select the Parameters sheet from the Unhide window that appears, and select OK.
-
Only hidden worksheets are shown in the Unhide window. Select the Parameters worksheet, and customize the values in the table to reflect your work pattern.

The following values can be changed:
-
Hours of work per day
You can change this parameter to any value between 1 to 24. For example, if you have a part time job and work every day you can set this parameter to 4.
-
Days of work per week
You can change this parameter to any value between 1 to 7. For example, if you have a part time job and work only two days a week, you can set this parameter to 2. And if it seems you work every day of the week, just set this parameter to 7 to better reflect all the meetings you have on weekends.
-
Ignore long meetings (hours)
If you have meetings longer than 4 hours that you want to include in calculations, you can increase this parameter. For example, if you often participate in 8-hour trainings and want them included in your data, set this parameter to 8 to only filter meetings that are longer than 8 hours.
-
-
If you edit any of the values on the Parameters worksheet, you need to refresh the workbook by selecting Data > Refresh All, after which the new values take effect.
Doing More with the Calendar Insights template
The previous sections provide great opportunity to visualize how you spend your meeting time, and to learn interesting facts about how you run your meetings (or how your meetings run your schedule). But there are more things you can do with the Calendar Insights workbook, as the following sections describe.
Can I drill down to see specific meetings?
To get more specifics about your meetings, you can see the data associated with each meeting. Right-click any worksheet tab and select Unhide... then select the Meetings Data worksheet.
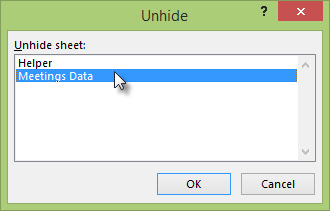
In the Meetings Data worksheet you can view all your meetings, and filter the data to drill down to specific meetings. An example where this is useful is to start in the Meeting Insights worksheet and find outliers (meetings that seem unusual or outside your normal routine, such as a surge of meetings on February 2015), then to find the relevant meetings in the Meeting Data worksheet.
Can I share this workbook?
Once Excel loads calendar data in your Calendar Insights workbook, your meeting data is stored in the workbook's Data Model, and also in the hidden worksheet called Meetings Data.
Your credentials are not stored in the workbook, so if you share the workbook with a coworker and she selects the Refresh Insights button to update the workbook, she will be prompted to enter her credentials, and your meeting data is removed as part of the process of refreshing the workbook (your data is replaced by your coworker's data).
If you want to return the workbook to its initial state, and remove your meeting data, press CTRL+R, and save the workbook as .xlsm or .xltm file.
How do I learn more?
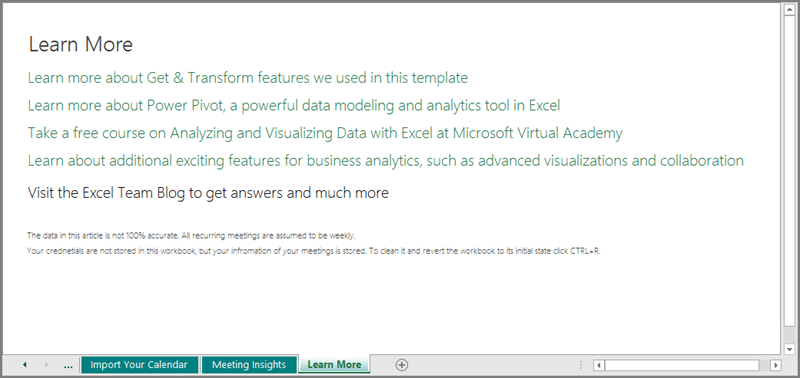
The goal of this workbook, in addition to helping you gain insights into your calendar, is to help you learn the capabilities of Excel and its Data Analytics features. There's a list of helpful links on the Learn More worksheet, each of which is a link to technical resources that help you get started with the features used in this template.
How can I create a similar workbook on my own?
You can create workbooks like this using the built-in Data Analysis features in Excel 2016.
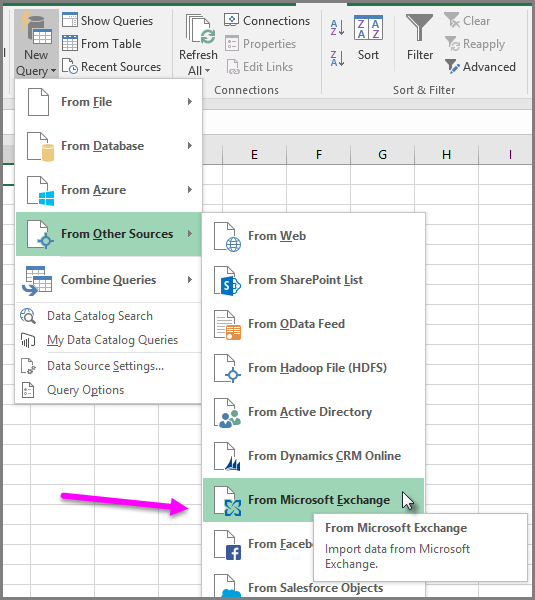
To connect to Exchange Server, extract your calendar, and shape the data for analysis, this template uses Power Query technology which was integrated into Excel 2016, and is available through the Data ribbon in the Get & Transform section. You can learn more about Get & Transform.
To start importing your calendar from a new workbook, from the ribbon select Data > New Query > From Other Sources > From Microsoft Exchange.
Microsoft Office Tutorials: Manage Your Calendar With The Calendar Insights Template For Excel 2016 >>>>> Download Now
ReplyDelete>>>>> Download Full
Microsoft Office Tutorials: Manage Your Calendar With The Calendar Insights Template For Excel 2016 >>>>> Download LINK
>>>>> Download Now
Microsoft Office Tutorials: Manage Your Calendar With The Calendar Insights Template For Excel 2016 >>>>> Download Full
>>>>> Download LINK V5