Insert pictures
Pictures can be inserted into Office documents from your computer, from OneDrive, from online (in Office 2013 and Office 2016), or from a scanner.
Click a section heading below to open it and see the details.
Insert a picture from your computer
-
Click the location in your document or email message where you want to insert a picture.
-
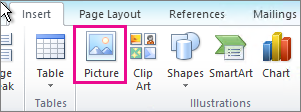
On the Insert tab, click Pictures.

Note: In Outlook, you won't see the Insert tab and Pictures icon until you've opened and clicked in the body of a new email message.
-
Browse to the picture you want to insert, select it, and then click Insert.
To add multiple pictures, press and hold Ctrl while you select pictures, and then click Insert.
Notes:
-
By default, the picture is embedded in your document. To reduce the size of your document, link to the picture instead of embedding it: In the bottom-right corner of the Insert Picture dialog box, click the arrow next to Insert, and then click Link to File.
-
In Outlook, you can also choose to attach a picture by clicking Insert > Attach File. With this option, the picture won't appear in the body of your email message. The recipient can then double-click the attached picture to open and view it.
-
Insert a picture from OneDrive
-
Click the location in your document or email message where you want to insert a picture.
-
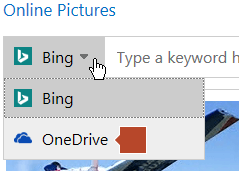
On the Insert tab, click Online Pictures.
The Online Pictures dialog box opens.
Note: In Outlook, you won't see the Insert tab and Pictures icon until you've opened and clicked in the body of a new email message.
-
In the drop-down list at the top left, switch from Bing to OneDrive.

-
Browse to the picture you want to insert, select it, and then click Insert.
You can select more than one picture. A check mark at the upper left corner of the thumbnail image shows whether that picture is selected.
Insert clip art
For instructions, see Add clip art to your file.
Insert an online picture
-
Click the location in your document or email message where you want to insert a picture.
-
On the Insert tab, click Online Pictures.

Note: In Outlook, you won't see the Insert tab and Online Pictures icon until you've opened and clicked in the body of a new email message.
-
In the search box, type a word or phrase that describes the image you want, and then press Enter.

-
In the list of results, select the picture you want, and then click Insert.
Insert a picture into a cell in Excel
When you add a picture to an Excel workbook, the picture isn't inserted in a cell. It floats above the grid of cells. You can make a picture look like it's in a cell as follows:
-
Use Insert > Picture, as described above.
-
If you want, change the size of the picture by dragging a sizing handle on the border of the picture. (See Change the size of a picture for more information.)
-
Manually adjust the column width and/or row height of the cell you want the picture to be "in".
-
Drag the picture into place so that it aligns with the cell borders.
Insert a scanned image
There are a few scanning options:
-
If you have a scanner connected to your PC, you can use the Windows Fax and Scan utility (which can be found by using the search bar on the Start menu) to scan a picture and then save it to a folder of your choosing on your PC.
-
In Office 2013, you can scan images into OneNote and then copy and paste them into other Office programs.
-
In Office 2016, see How can I Insert scanned images into OneNote? for scanning help.
-
In Office 365, subscribers who have Office Mobile for Windows 10 or have Office for Android with camera-enabled devices can easily take photos and insert them directly into their files. See Insert a picture from the camera for details.
Once you have the picture saved to your PC, do the following:
-
On the Insert tab of the Ribbon, in the Illustrations group, click Picture.
-
Locate the scanned picture that you want to add to your document, and then click Insert.
Replace a picture
(This option is not available for older Office files saved in the older .doc, .xls, .ppt, etc. file format. For this option to be active, your file must have the .docx, .xlsx, or .pptx extension.)
Replace a picture in Office 2016
-
Right-click the picture, point to Change Picture, and then select where you want to get the new picture from:
-
From a File helps you locate a picture on your computer.
-
From Online Sources helps you search online for a new picture.
-
Icons lets you choose an image from the Icons dialog box.
-
-
Locate a new picture, select it, and then click Insert.
Replace a picture in Office 2013
-
Right-click the picture and then select Change Picture
-
The Insert Pictures dialog box opens.
-
From a File helps you locate a picture on your computer.
-
Bing Image Search helps you search online for a new picture.
-
-
Locate a new picture, select it, and then click Insert.
The first picture is removed from your document, replaced by the new picture.
Click a section heading below to open it and see the details.
Insert a picture from your computer or OneDrive
-
Click the location in your document or email message where you want to insert a picture.
-
On the Insert tab, click Picture.

Note: In Outlook, you won't see the Insert tab and Picture icon until you've opened and clicked in the body of a new email message.
-
Browse to the picture you want to insert, select it, and then click Insert.
To add multiple pictures, press and hold Ctrl while you select pictures, and then click Insert.
Notes:
-
By default, the picture is embedded in your document. To reduce the size of your document, link to the picture instead of embedding it: In the bottom-right corner of the Insert Picture dialog box, click the arrow next to Insert, and then click Link to File.
-
In Outlook, you can also choose to attach a picture by clicking Insert > Attach File. With this option, the picture won't appear in the body of your email message. The recipient can then double-click the attached picture to open and view it.
-
Insert a picture into a cell in Excel
When you add a picture to an Excel workbook, the picture isn't inserted in a cell. It floats above the grid of cells. You can make a picture look like it's in a cell as follows:
-
Use Insert > Picture, as described above.
-
If you want, change the size of the picture by dragging a sizing handle on the border of the picture. (See Change the size of a picture for more information.)
-
Manually adjust the column width and/or row height of the cell you want the picture to be "in".
-
Drag the picture into place so that it aligns with the cell borders.
Insert clip art
For details on this process, see Add clip art to your file.
Insert a scanned image
If the scanner is connected to your PC, it'll allow you to import the scanned image to a folder on your computer, typically the Pictures folder.
You can use the Windows Fax and Scan utility (which can be found by using the search bar on the Start menu) to scan a picture and then save it to a folder of your choosing on your PC.
Once you have the picture saved to your PC, do the following:
-
On the Insert tab, in the Illustrations group, click Picture.
-
Locate the picture that you want to add to your document, and then click Insert.
Replace a picture
(This option is not available for older Office files saved in the .doc, .xls, .ppt, etc. file format. For this option to be active, your file must have the .docx, .xlsx, or .pptx extension.)
-
Right-click the picture, and then click Change Picture.
-
In the Insert Picture dialog box, locate a new picture, and then click Insert.
The first picture is removed from your document, replaced by the new picture.
In Office 2007, you can insert pictures from your computer, or clip art in an Office document in Word, Excel, PowerPoint, or Outlook.
Insert a picture from your computer
-
Click where you want to insert a picture in your document.
-
On the Insert tab, in the Illustrations group, click Picture.

-
In the Insert Picture box, browse to the location of the picture on your computer, select the picture, and then click Insert.
Note: To add multiple pictures, press and hold Ctrl while you select the pictures, and then click Insert.
By default, the picture is embedded in your document. If your picture makes your document too large, you can reduce the size of your document by linking to the picture instead of embedding it. In the bottom-right corner of the Insert Picture dialog box, click the arrow next to Insert, and then click Link to File.
Insert clip art
For details on this process, see Add clip art to your file.
What happened to the From Scanner option for adding pictures in Word?
The From Scanner or Camera option for adding pictures to a document is not available in Word 2007. Instead, you can add pictures from your camera or scanner by downloading the pictures to your computer first and then copying them from your computer into Word.
After you download a picture to your computer, do the following:
-
On the Insert tab, in the Illustrations group, click Picture.
-
Locate the picture that you want to add to your document, and then click Insert.
EPS files
Because of a security vulnerability in EPS files, Office 2016, Office 2013, Office 2010, and Office 365 have turned off the ability to insert EPS files into Office documents. For more information, including a workaround and a substitute for EPS, see Support for EPS images has been turned off in Office.
Format a picture
Now that you've added a picture to your Office document, you might want to explore the ways you can format pictures.
Watch Doug's video for several quick tips about the picture tools in Office, and see the other Help articles listed below.
(After you start playing the video, you can click the sizing arrow  at the bottom right of the video frame to enlarge the video.)

Send feedback
Have feedback or product requests? Please submit your comments here to help us improve Office.
Related Topics
Picture and drawing tools in Office
Insert pictures in Office for Mac
Add online pictures or clip art to your file
Change my photo
Change the brightness, contrast, or sharpness of a picture
Change the color of a picture
Add, change, or delete borders on pictures
No comments:
Post a Comment