Display business data on a SharePoint site
You can add and connect business data Web Parts on a Microsoft Office SharePoint Server 2007 site to display business data from an external database such as Microsoft SQL Server, SAP, or Siebel. The procedures in this article refer to specific data from two AdventureWorks sample databases that are available from the Microsoft Download Center.
Note: Before you can use a business data Web Part to display business application data on a SharePoint site, your administrator must first register your external business application with Office SharePoint Server 2007.
In this article
Overview
Microsoft Office SharePoint Server 2007 provides you with a set of four default business data Web Parts. These Web Parts rely on the Business Data Catalog (BDC) to display a Web-based view of business data that resides in a database that is external to Office SharePoint Server 2007, such as Microsoft SQL Server 2005, Siebel, or SAP.
You can connect business data Web Parts to configure and perform actions that are related to your business application. Business Data Actions Web Parts are used to automate or create actions that open Web pages, display the user interfaces of business applications, open Microsoft Office InfoPath 2007 forms, and perform other frequently used tasks.
Important: Before you can display business application data on a SharePoint site, your administrator must first register your external business application with Office SharePoint Server 2007. The type of business application information that you can display on a SharePoint site depends on the data fields that your administrator registers with Office SharePoint Server 2007.
The procedures in this article refer to specific data from two required databases that are freely available from the Microsoft Download Center. The two sample databases that are used to help you learn about working with business data Web Parts are:
-
AdventureWorksDW SQL Server 2005 Sample
-
AdventureWorks SQL Server 2000 Sample
You may need to consult with your administrator to ensure that these databases are installed and registered on your Office SharePoint Server 2007 system.
Display a summary of business data in a list
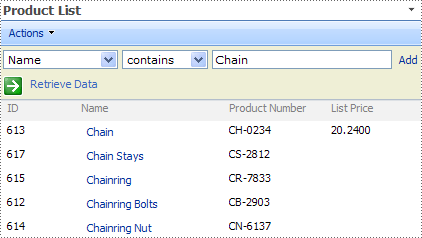
You can display business data from an external database in a simple list form by using the Business Data List Web Part. For example, you can display a list of products and their list prices.

After the data appears, you can edit the view properties of a Business Data List Web Part, just as you can edit the view of any SharePoint list. You can also filter by property or limit the number of items shown in the Web Part.
-
Go to the page on the SharePoint site where you want to display a list of business data.
-
On the Site Actions menu
 , click Edit Page.
 -
In the Web Part zone where you want to add the Web Part, click Add a Web Part.
-
In the Add Web Parts dialog box, select the Business Data List check box, and then click Add.
-
From the business data Web Part that you just created, click the Web Part menu
 , and then click Modify Shared Web Part to open the tool pane.
 -
In the tool pane, next to the Type box, click Browse
 .
. -
In the Business Data Type dialog box, select a business data type for the business application that you are working with, and then click OK.
For example, select Product. In this example, the Application is AdventureWorksDWInstance.
-
In the tool pane, expand the Appearance section.
-
In the Title box, replace Business Data List with your own title for the Web Part, and then click OK.
For example, type Product List in the Title box.
-
From the newly added Web Part, click Edit View, and then do the following:
-
In the Items to Retrieve section, select Retrieve all items.
-
In the Columns section, select the names of the columns that you want to display in the Web Part.
-
-
Click OK.
The new Business Data List Web Part now displays a list of products from your business application database.
Display details about a single item of business data
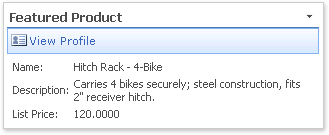
You can display the details about a business item from an external database by using the Business Data Item Web Part. For example, you can display the details about a particular product from the business application database.

-
Go to the page on the SharePoint site where you want to display the details about a particular business item.
-
On the Site Actions menu
 , click Edit Page.
 -
In the Web Part zone where you want to add the Web Part, click Add a Web Part.
-
In the Add Web Parts dialog box, select the Business Data Item check box, and then click Add.
-
From the business data Web Part that you just created, click the Web Part menu
 , and then click Modify Shared Web Part to open the tool pane.
 -
In the tool pane, next to the Type box, click Browse
 .
. -
In the Business Data Type dialog box, select a business data type for the business application that you are working with, and then click OK.
For example, select Product for the Business Data Type. In this example, the Application is AdventureWorksDWInstance.
-
Next to the Item box, click Browse
 to choose the product that you want to display.
 -
In the dialog box that appears, the first drop-down list displays the filters that are defined for this entity in the BDC. Click the Name filter. In the adjacent field, type a product category, such as Bike, that you want to find. Click Search
 to search for product names that contain the category that you entered.
 -
Select one item from the list of products that appears, and then click OK. The ID of the item that you selected is now displayed in the Item box in the tool pane.
-
Under Fields, click the Choose button.
-
In the Select Fields dialog box, select the item information that you want to display, and then click OK.
-
In the tool pane, expand the Appearance section.
-
In the Title box, replace Business Data Item with your own title for the Web Part, and then click OK.
For example, type Featured Product in the Title box.
The new Business Data Item Web Part displays the product details from your business application database.
Connect Web Parts to configure business application actions
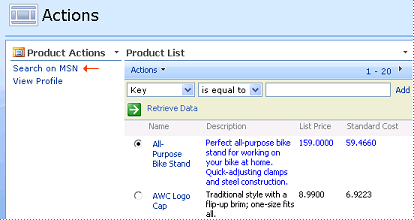
By using a Business Data Actions Web Part on your SharePoint site, you can add an action to a product profile that enables you to perform a search for that item on MSN without leaving Office SharePoint Server 2007. The Business Data Actions Web Part displays a list of actions, in the form of links or on a toolbar, that are associated with a business item in the BDC.

Step 1: Add and connect a Business Data Actions Web Part
In this procedure, you add an action to a Business Data Actions Web Part and connect the Web Part to the Product List Web Part that you created earlier in Display a summary of business data in a list.
Important: Before you begin, your administrator must download the AdventureWorksDW SQL Server 2005 Sample database and register it with the BDC. Additionally, your administrator must define the Search on MSN business data action and add it to Office SharePoint Server 2007. Find more information about the AdventureWorksDW SQL Server 2005 Sample database in the See Also section.
Note: You must first have the Full Control or Design permission level before you can modify the Web Parts on your SharePoint site. Find links to more information about permission levels and permissions in the See Also section.
-
Go to the page on the SharePoint site where you created the Product List Web Part.
-
On the Site Actions menu
 , click Edit Page.
 -
In the Web Part zone where you want to add the Web Part, click Add a Web Part.
-
In the Add Web Parts dialog box, select the Business Data Actions check box, and then click Add.
-
From the business data Web Part that you just created, click the Web Part menu
 , and then click Modify Shared Web Part to open the tool pane.
 -
In the tool pane, next to the Type box, click Browse
 .
. -
In the Business Data Type dialog box, select a business data type for the business application that you are working with, and then click OK.
For example, select Product for the Business Data Type. In this example, the Application is AdventureWorksDWInstance.
-
Under Actions, click Choose.
-
In the Select Actions dialog box, select the Display check box for the Search on MSN action, and then click OK.
Note: The View Profile check box should be selected by default. The View Profile action is automatically created for each entity (or business item) that is defined in the BDC. This action enables you to view details about the entity. Because actions are associated with entities, the actions appear wherever the entity is displayed on a SharePoint site.
-
In the tool pane, configure the Web Part as needed in the Appearance, Layout, and Advanced sections, and then click OK to close the tool pane.
-
For the Business Data Actions Web Part that you just created, click the Web Part menu
 , point to Connections, point to Get Item From, and then click Product List.
Note: If a message appears under the Product Actions Web Part that notifies you of a conflict in connecting the Product Actions Web Part to the Product List Web Part, verify that the Web Parts are both using the AdventureWorksDWInstance sample database.
Step 2: Verify that the Web Parts are properly connected and configured
-
If no data appears in the Product List Web Part, click Retrieve Data
 .
. -
Select an item from the list by clicking the option button next to the product key.
-
In the Product Actions section of the site, click Search on MSN. A new window appears displaying search results for the item selected.
Connect Web Parts to display related business items
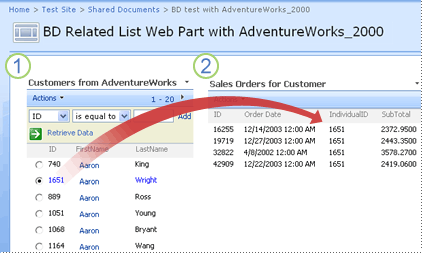
You can use the Business Data Related List Web Part along with a Business Data List Web Part to display two lists of related business items from a business application. For example, you can connect the two Web Parts to display all the sales orders for a specific customer.

1. Business Data List Web Part
2. Business Data Related List Web Part
Important: The following procedure uses fictitious customer data from the AdventureWorks SQL Server 2000 Sample database, which must first be downloaded and registered with the BDC. Find more information about the AdventureWorks SQL Server 2000 Sample database in the See Also section.
Step 1: Create a Web Part to display a summary list
The first step in displaying related data from an external database is to create a Business Data List Web Part to display a summary list of customers.
-
Go to the page on the SharePoint site where you want to display orders for a specific customer in the database.
-
On the Site Actions menu
 , click Edit Page.
 -
In the Web Part zone where you want to add the Web Part, click Add a Web Part.
-
In the Add Web Parts dialog box, select the Business Data List check box, and then click Add.
-
From the business data Web Part that you just created, click the Web Part menu
 , and then click Modify Shared Web Part to open the tool pane.
 -
In the tool pane, next to the Type box, click Browse
 .
. -
In the Business Data Type dialog box, select a business data type for the business application that you are working with, and then click OK.
For example, select Customer for the Business Data Type. In this example, the Application is AdventureWorksDWInstance.
-
In the tool pane, expand the Appearance section.
-
In Title box, replace Business Data List with Customers from AdventureWorks, and then click OK.
Step 2: Create and connect a Web Part to display related items
After you create a Business Data List Web Part that can display customers from the AdventureWorks SQL Server 2000 Sample database, you can create a Business Data Related List Web Part that connects to the first list. The end result will allow you to select an item from the customer list and view a list of sales orders for that customer in the Business Data Related List Web Part.
-
On the same page where you created the Business Data List Web Part, click Add a Web Part to create a new Web Part on the page.
-
In the Add Web Parts dialog box, select the Business Data Related List check box, and then click Add.
-
From the business data Web Part that you just created, click the Web Part menu
 , and then click Modify Shared Web Part to open the tool pane.
 -
In the tool pane, next to the Type box, click Browse
 .
. -
In the Business Data Type dialog box, select a business data type for the business application that you are working with, and then click OK.
For example, select SalesOrder for the Business Data Type. In this example, the Application is AdventureWorksDWInstance.
-
From the Relationship drop-down list, select CustomerToSalesOrder.
-
In the tool pane, expand the Appearance section.
-
In Title box, replace Business Data Related List with Sales Orders for Customer, and then click OK.
-
For the Web Part that you just created, click the Web Part menu
 , point to Connections, point to Get Related Item From, and then click Customers from AdventureWorks.
Step 3: Verify that the Web Parts are properly connected and configured
-
On the same page that contains the List Web Part and the Related List Web Part that you just created, if no data appears in the Customers from AdventureWorks Related List Web Part, click Retrieve Data
 .
. -
Select a customer from the list by clicking the option button next to the customer name. All sales orders related to the selected customer appear in the Sales Orders for Customer Web Part.
No comments:
Post a Comment