Create single and recurring tasks
With Project 2010, you can create tasks to break the project work into smaller pieces. Some project managers refer to tasks as "activities" or "work packages."
What do you want to do?
Create a new task
Add a task to a task list
-
On the View tab, in the Task Views group, click Gantt Chart.

-
In an empty Task Name field, type a task name and then press ENTER.
Insert a task between existing tasks
-
Select the row below where you want a new task to appear.
-
On the Task tab, in the Insert group, click the top part of the Task button.

-
Type the task name in the inserted row. The task IDs are automatically renumbered after you insert a task.
Add a task in the Network Diagram view
-
To switch to the Network Diagram view, on the View tab, in the Task Views group, click Network Diagram.

-
On the Task tab, in the Insert group, click the top part of the Task button.

-
Type the task name in the new task box.
You can use an outline to organize your schedule as you enter tasks, or you can wait until you enter all of your project tasks. When you outline a schedule for your project, you simplify its organization so that your project is easier to create, manage, and maintain.
Create multiple tasks
If you are adding several tasks with resource assignments and task dependencies at one time, you may find it helpful to enter this information into your project by using the Task Form view.
-
On the View tab, in the Task Views group, click Gantt Chart.

-
On the View tab, in the Split View group, select Details.

The window is split to display the Gantt Chart view on the top and Task Form view on the bottom. You cannot view the timeline while viewing this split view.
-
In the Gantt Chart view (top), click the first empty row at the end of the task list.
-
In the Task Form view (bottom), type information about the new task:
-
In the Name box, type the new task's name.
-
In the Duration box, type the task duration.
-
If you want the task duration to remain fixed regardless of resource assignments, select the Effort driven check box.
-
In the form columns, type detailed information about the task (such as the assigned resources and predecessor tasks).
-
-
Click OK to save the new task, and then click Next to move to the next row in the Gantt Chart view.
Note: You cannot use the Task Form view to enter subtasks into your project. To create subtasks, indent and outdent tasks in the Gantt Chart view.
Create a recurring task
If a task repeats at set intervals, enter it as a recurring task. If it does not repeat at set intervals, enter it as a regular task every time that it occurs.
-
On the View tab, in the Task Views group, click Gantt Chart.

-
Select the row below where you want the recurring task to appear.
-
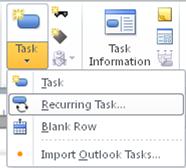
On the Task tab, in the Insert group, click the bottom part of theTask button and then click Recurring Task.

-
In the Task Name box, type the task name.
-
In the Duration box, type the duration of a single occurrence of the task.
-
In the Recurrence pattern section, click Daily, Weekly, Monthly, or Yearly.
-
Select the check box next to each day of the week that the task should occur.
-
In the Start box, enter a start date and do one of the following:
-
Select End after, and then type the number of occurrences for the task.
-
Select End by, and then enter the date you want the recurring task to end.
Note: If you don't enter a date in the Start box, Project uses the project start date.
-
-
In the Calendar for scheduling this task section, select a resource calendar from the Calendar list to apply to the task. If you do not want to apply a calendar, select None.
Tip: If you want to apply a calendar, but not tie that calendar to scheduling for the task, select the Scheduling ignores resource calendars check box.
When you insert a recurring task, the task IDs are automatically renumbered and a recurring task indicator  appears in the Indicators
  column.
If you assign resources to a recurring summary task by typing resource names in the Resource Names field, the resource will be assigned to the total work on the recurring task and not to the individual recurring tasks as they occur.
Learn tips for working with tasks
To define your tasks most effectively, consider the following guidelines:
-
Break down tasks to the level of detail that you want to track. You should break them down in more detail for riskier areas.
-
Make sure that tasks have clear criteria for completion.
-
Define the tasks that are short compared with the overall project duration. Shorter tasks allow you to more easily estimate time and resources.
-
Avoid defining such things as vacation or training as tasks. Instead, you can set resource calendars to account for nonworking (administrative) time.
No comments:
Post a Comment