Save a file
When you save a file, you can save it in a folder on your hard disk drive, a network location, disk, DVD, CD, the desktop, flash drive, or save as another file format.
Important: You should save the file frequently while you are working on it to avoid losing data because of an unexpected power failure or other problem.
What do you want to do?
Save a file
By default, the Microsoft Office programs save a file in a default working folder. To save the copy in a different location, click a different folder in the folder list. See Save as a copy, or to a different location to learn more.
-
Click the Microsoft Office Button
 , and then click Save, or press CTRL+S.
Important: If you don't see the Microsoft Office Button
 , click Save on the File menu.
 -
If you are saving the file for the first time, you are asked to give it a name.
Save as a copy, or to a different location
You can also use the Save As command to rename a file or change the location of where you save the file.
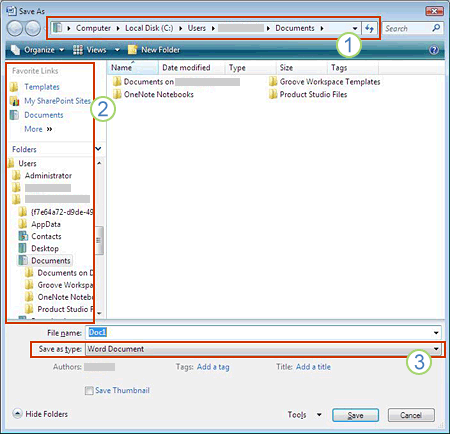
Save As dialog box in Windows 7 and Windows Vista
You can also save the file to a new location by using the Navigation pane. 
1. To choose a folder or type a path to the folder, use the Address bar.
2. To quickly see locations you use a lot, use the Navigation pane.
3. To see more file types, click the arrow.
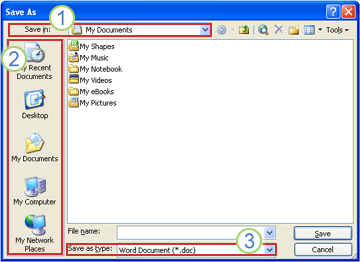
Save As dialog box in Microsoft Windows XP
You can also save the file to a new location by using the Save in list or locations saved in your My Places bar. 
1. To choose a folder, use the Save in list.
2. To quickly see locations you use a lot, use the My Places bar.
3. To see more file types, click the arrow.
To save a copy of your file, do the following:
-
Click the Microsoft Office Button
 , and then click Save As, or press CTRL+S.
Important: If you don't see the Microsoft Office Button
 , click Save As on the File menu.
 -
In the File name box, enter a new name for the file.
-
Click Save.
To save the copy in a different folder, follow the steps above, but click a different drive in the Save in list or a different folder in the folder list. To save the file in a new folder, click Create New Folder  .
.
Save as an earlier version of Office
If you are using the 2007 Office release, you can share your files with people using an earlier version of Microsoft Office by saving your file in the 97-2003 file format. For example, you can save your Microsoft Office Word 2007 document (.docx) as a 97-2003 document (.doc).
Save as a different format
-
Click the Microsoft Office Button
 , and then click Save As.
Important: If you don't see the Microsoft Office Button
 , click Save As on the File menu.
Keyboard shortcut To open the Save As dialog box, press ALT, F, A.
-
In the File name box, enter a new name for the file.
-
In the Save as type list, click the file format that you want to save the file in. For example, click Rich Text Format (.rtf), Web Page (.htm or .html), or Comma Delimited (.csv).
-
Click Save.
To learn more about saving your files as a PDF, see Save as PDF; to learn about saving your files as XPS, see Save a file in XPS format.
Save AutoRecover information automatically
AutoRecover does not replace regularly saving your files. If you choose not to save the recovery file after you open it, the file is deleted, and your unsaved changes are lost. If you save the recovery file, it replaces the original file (unless you specify a new file name). The more frequently your files are saved, the more information is recovered if there is a power failure or other problem while a file is open.
Which 2007 Microsoft Office system program are you using?
Word
-
Click the Microsoft Office Button
 , and then click Word Options.
 -
Click Save.
-
Select the Save AutoRecover information every check box.
-
In the minutes box, type or select a number to determine how often you want to save files.
Excel
-
Click the Microsoft Office Button
 , and then click Excel Options.
 -
Click Save.
-
Select the Save AutoRecover information every check box.
-
In the minutes box, type or select a number to determine how often you want to save files.
InfoPath
-
On the Tools menu, click Options, and then click the Advanced tab.
-
Select the When filling out forms, save AutoRecover information every check box.
-
In the minutes box, type or select a number to determine how often you want to save files.
PowerPoint
-
Click the Microsoft Office Button
 , and then click PowerPoint Options.
 -
Click Save.
-
Select the Save AutoRecover information every check box.
-
In the minutes box, type or select a number to determine how often you want to save files.
Project
-
On the Tools menu, click Options, and then click the Advanced tab.
-
Select the Save every check box.
-
In the minutes box, type or select a number to determine how often you want to save files.
Publisher
-
On the Tools menu, click Options, and then click the Advanced tab.
-
Select the Save AutoRecover info every check box.
-
In the minutes box, type or select a number to determine how often you want to save files.
Visio
-
On the Tools menu, click Options, and then click the Save/Open tab.
-
Select the Save AutoRecover info every check box.
-
In the minutes box, type or select a number to determine how often you want to save files.
No comments:
Post a Comment