Use mail merge to personalize letters for bulk mailings
When you have bulk mail to send to people on your mailing list, you can use mail merge to create a batch of personalized letters. Each letter that is produced has identical layout, formatting, text, and graphics. Only specific sections of the letter vary and are personalized.
There are three files involved in creating and printing letters using the mail merge process:
-
Your main document
This document contains text and graphics (a logo or image, for example) that are identical for each version of the merged document. The body of the letter is an example of identical content. -
Your mailing list
This is the data source that is used to populate information in the letter. Your mailing list has names, for example, and your main document is the letter that will be addressed to the names in your list. -
Your merged document
This document is a combination of the main document and the mailing list. Mail merge pulls information from the mailing list and puts it in your main document, resulting in a personalized letter for each person.
You can learn more about how mail merge for letters works in the following video that is part of a training course.

Step 1: Prepare your main document
Before you begin the mail merge, prepare your letter. If you're letting people know about an upcoming event, for example, include the name, date, time, and location of the event. It's those details that would be important to all recipients of your letter.
-
On the Mailings tab, in the Start Mail Merge group, choose Start Mail Merge > Letters.

-
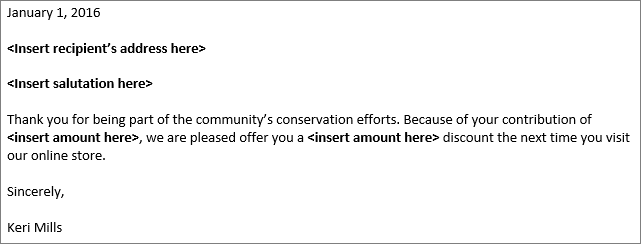
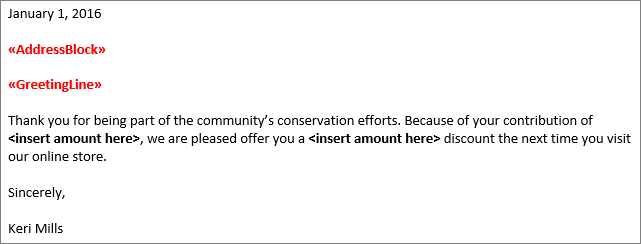
In Word, type the body of the letter (example follows) you want to send to everyone.
Step 2: Set up your mailing list
The mailing list is your data source. It can be an Excel spreadsheet, a directory of Outlook contacts, an Access database, or an Office address list. It contains the records that Word uses to pull information from to build your letter.
Tips
-
If you don't have a mailing list, you can create one during mail merge. Before you start the mail merge process, collect all of your data records, and add them to your data source.
-
If you're using an Excel spreadsheet, make sure the column for ZIP Codes or postal codes is formatted as text so that you don't lose any zeros.
-
If you want to use your Outlook contacts, make sure Outlook is your default email program.
Step 3: Link your mailing list to your main document
Now you're ready to open the data source for your mailing list and link it to your letter.
-
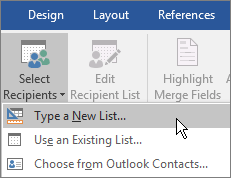
On the Mailings tab, in the Start Mail Merge group, choose Select Recipients, and then choose an option.
-
Do one of the following:
-
If you don't have a mailing list, choose Type a New List and create one.
or
-
If your mailing list is in an Excel spreadsheet, an Access database, or another type of data file, choose Use an Existing List. Then browse to your list and choose Open.
or
-
If you're using your Outlook contacts, choose Choose from Outlook Contacts.
-
-
Choose File > Save as.
-
In the File name box, type a file name, and then choose Save.
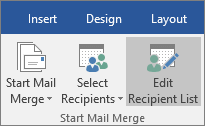
Edit recipient list
If you're creating and printing letters for everyone on your list, go to "Step 4: Add personalized content to your letter." If you want to send letters to people who live, for example, within 20 miles of an event you're hosting, then use a filter like a ZIP Code or a postal code to narrow the list.
-
Choose Edit Recipient List.
-
In the Mail Merge Recipients dialog box, select the check box next to the name of each person who you want to receive your email message.
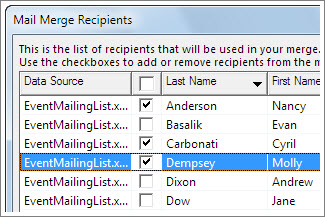
In the Mail Merge Recipients dialog box, there are options to refine the recipient list. The two most frequently used options are to sort and to filter the list to make it easier to find names and addresses.

For more detailed information, see Sort and filter the data for a mail merge.
Step 4: Add personalized content to your letter
Add content to your letter that's different for each person who receives it—for example, their name and address. The best practice for adding these details is to insert merge fields in your main document.
-
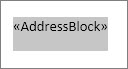
On the Mailings tab, in the Write & Insert Fields group, choose Address Block.

-
In the Insert Address Block dialog box, choose a format for the recipient's name as it will appear in the letter.

-
Choose OK.
Note: To view how an address will appear in the letter, under Preview, choose Preview Results. Choose the Next
 or Previous
  record button to move through records in your data source.
 -
In the Write & Insert group, choose Greeting Line.
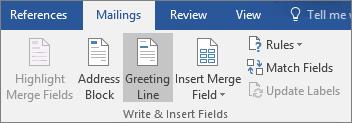
-
In the Insert Greeting Line dialog box, choose the format you want to use.
-
Choose OK to insert the merge field in the letter.
-
Choose File > Save to preserve the letter (example follows) you're creating for the mail merge.
To insert other custom information in the letter from your mailing list, see add mail merge fields one at a time.
Verify merge field names
Make sure Word finds the names and addresses in your mailing list.
-
On the Mailings tab, in the Write & Insert Fields group, choose Match Fields.
Tip: Merge Fields also can be opened from the Insert Address Block dialog box you used to add an address block to the main document.
-
In the Match Fields dialog box, verify that the record fields that appear in the list match the names of column headings for records in your mailing list data source.
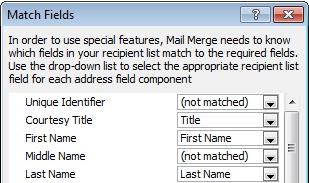
Note: There are two columns in the dialog box. The left column is a list of common names in a business record for example. The right column is the field name for the common name that is mapped to a column heading in your data source file.
-
Do one of the following:
-
If the field names shown match column headings you used for records in your mailing list data source, do nothing.
or
-
If (not matched) appears in a field name that you expected to match a column heading in your data source, choose the drop-down arrow, and then choose the field name in your mailing list data source. Repeat as necessary.
-
-
Choose OK.
Format mail merge fields
To change the font, size, or spacing of the merged content, select the merge field name and make the changes you want.
-
On the Mailings tab, in the Preview Results group, choose Preview Results to switch from the merged results back to the mail merge fields in your letter.
-
Choose the merge field name.
-
On the Home tab, choose the font and the font size you want to use.

-
On the Page Layout tab (Word 2013) or Layout tab (Word 2016), choose the paragraph spacing you want.

Note: Because Word treats each line in an Address Block as a paragraph, you might want to reduce the spacing between the lines.
Step 5. Preview and print the letters
-
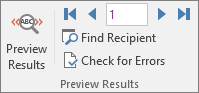
Choose Preview Results, and then choose the Next
or Previous record button to make sure the names and addresses in the body of your letter look right.Tip: To go to the start of the list, choose the First
 record button, and to go to the end of the list, choose the Last
  record button.
 -
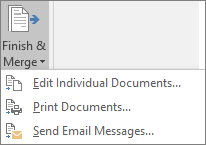
Choose Finish & Merge > Print Documents.
Step 6: Save your personalized letter
When you save the mail merge document, it stays connected to your mailing list so that you can use it for your next bulk mailing.
To reuse your mail merge document
-
Open the mail merge document and choose Yes when Word prompts you to keep the connection.
To change addresses in mail merge document
-
Open the mail merge document and choose Edit Recipient List to sort, filter, and choose specific addresses.
More information
-
Excel 2016: Prepare your Excel 2016 data source for Word mail merge
-
Excel 2013 and Excel 2010: Prepare your Excel data source for a Word mail merge
Step 1: Prepare the main document
Before you begin the mail merge, prepare your letter. If you're letting people know about an upcoming event, for example, include the name, date, time, and location of the event. It's those details that would be important to all recipients of your letter.
-
On the Mailings tab, in the Start Mail Merge group, choose Start Mail Merge > Letters.

-
In Word, type the body of the letter you want to send to everyone.
Step 2: Set up your mailing list
The mailing list is your data source. It can be an Excel spreadsheet, a directory of Outlook contacts, an Access database, or an Office address list. It contains the records that Word uses to pull information from to build your letter.
Tips
-
If you don't have a mailing list, you can create one during mail merge. Before you start the mail merge process, collect all of your data records, and add them to your data source.
-
If you're using an Excel spreadsheet, make sure the column for ZIP Codes or postal codes is formatted as textso that you don't lose any zeros.
-
If you want to use your Outlook contacts, make sure Outlook is your default email program. To do this, open Apple Mail, and on the Mail menu, choose Preferences. On the General tab, next to Default email reader, select Microsoft Outlook
-
You can also use your Apple contacts, make sure Apple mail is your default mail program.
-
Use FileMake pro database as your datasource for mail merge.
Step 3. Link your mailing list to your main document
-
On the Mailings tab, choose Select Recipients, and then choose an option.
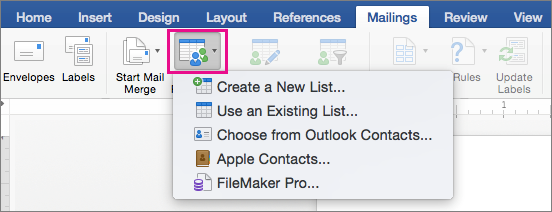
Choose
To
Create a New List
Start a new address list while you're setting up the mail merge
Use an Existing List
Use an Excel spreadsheet, or another type of data file, as your address list
Choose from Outlook Contacts
Select names directly from your Outlook contacts for your address list
Apple Contacts
Select names directly from your Apple Address Book for your address list
FileMaker Pro
Import data from a FileMaker Pro database
-
If you selected Create a New List, follow these steps:
-
In the Edit List Fields dialog box, Word automatically creates fields for some basic information, such as first name, last name, and address. If you want to add a new field—for example, a message field—add it now, so you can fill it in when you type the entries. Under New field name, type the name of the field you want to add and then choose the plus sign (+).
Tip: To change the order of the fields, select the field you want to move, and then use the up or down arrows to move the field where you want in the list.
-
When all of the fields are set up the way you want them, choose Create to create the list.
-
-
If you selected Use an Existing List, follow these steps:
-
Browse to the file you want to use and choose Open.
-
If you chose to open an Excel spreadsheet, In the Open Workbook dialog box, select the sheet you want to use, and leave Cell Range blank to use the entire worksheet or enter a cell range for the data you want to use, and then choose OK.
-
-
If you selected Choose from Outlook Contacts or Apple Contacts, follow these steps:
-
Choose Filter Recipients to select the recipients you want to include.
-
For Outlook contacts, in the Query Options dialog box, next to List mail merge recipients by, select Complete record. In the list of contacts, select the contacts you want to send bulk mail, and then choose OK.
-
For Apple contacts, in the Query Options dialog box, under Apple Group Contacts, choose the group you want send bulk mail and then choose OK.
-
For FileMaker Pro Database, choose the database file in theChoose a FileMaker Pro Database to use as a Data Source dialog box and choose Open
-
Step 4: Add personalized content to your letter
-
On the Mailings tab, choose Insert Merge Field and select the field you want to add.

Continue adding fields until you've added all the information you want on your letter.
-
Format the fields in the letter so it looks the way you want the rest of your envelopes to look. For example, include a space between First and Last name fields and press Return to start a new line for the Address field.
Tip: To sort your recipient list or remove recipients, on the Mailings tab, choose Filter Recipients, and then choose Sort Records or Filter Records. When you're done, choose OK.
Step 5: Preview and print the letters
-
On the Mailings tab, choose Preview Results to see how your letter look. Use the left and right arrows on the Mailings tab, to scroll through each letter.

-
To make additional formatting changes, choose Preview Results again, which lets you add or remove merge fields.
-
When the letters look how you want, on the Mailings tab, choose Finish & Merge > Print Documents to complete the mail merge.
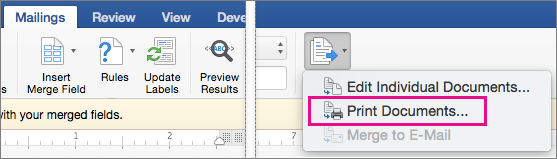
Tip: If you want to review and update each letter individually before printing, on the Mailings tab, choose Finish & Merge > Edit Individual Documents. When you're finished, click File > Print to print the envelopes.
Step 6: Save your personalized letter
When you save the mail merge document, it stays connected to your mailing list so that you can use it for your next bulk mailing.
To reuse your mail merge document
-
Open the mail merge document and choose Yes when Word prompts you to keep the connection.
To change addresses in mail merge document
-
Open the mail merge document and choose Edit Recipient List to sort, filter, and choose specific addresses.
Microsoft Office Tutorials: Use Mail Merge To Personalize Letters For Bulk Mailings >>>>> Download Now
ReplyDelete>>>>> Download Full
Microsoft Office Tutorials: Use Mail Merge To Personalize Letters For Bulk Mailings >>>>> Download LINK
>>>>> Download Now
Microsoft Office Tutorials: Use Mail Merge To Personalize Letters For Bulk Mailings >>>>> Download Full
>>>>> Download LINK lN