Make a checklist in Word
With Word, you can create two kinds of checklists:
-
Lists with check boxes or check marks instead of bullets or numbers. Use boxes if you plan to print the list, for example, and check off each item you complete.
-
Lists you can check off in Word. This involves adding a content control from the Developer tab, but you don't need to be a developer to do it.
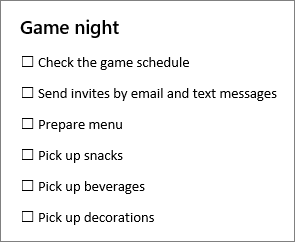
This sample checklist serves a dual purpose—it can be printed or used online.
Replace bullets or numbers with check marks or check boxes
-
Select the entire list; the bullets or numbers won't look selected.
-
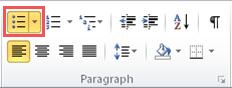
Choose Home, and then choose the Bullets list.
-
Do one of the following:
-
If you see the check mark or check box you want in the Bullet Library, select it.
-
If you don't see the check mark or check box you want, go to the next step.
-
-
Choose Define New Bullet, and the Define New Bullet dialog box opens.
-
Choose Symbol, and then choose a symbol from the table of symbols.
Tip: For more choices, in the Font box, choose a symbol font, such as Wingdings.
-
Scroll through the list of symbols and choose the symbol—such as an open box (
 ) or a three-dimensional box (
  )—you want to use.
 -
Choose OK, and then choose OK again in the Define New Bullet dialog box.
The symbol you chose will be added to the Bullet Library so it'll be handy if you want to use it again.
Make a checklist you can check off in Word
There are four steps involved in creating a list with check boxes that you can check off in Word. This type of list requires a Check Box Content Control, found in the Developer tab.
Step 1: Show the Developer tab
-
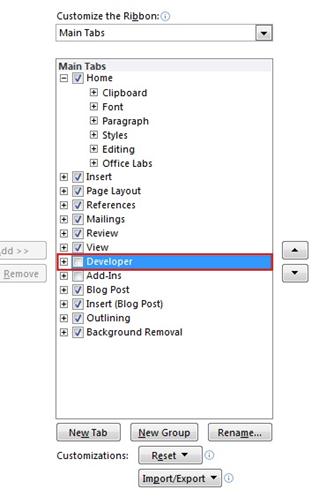
On the File tab, choose Options > Customize Ribbon.
-
In the Customize the Ribbon list, choose Main Tabs.
-
In the Main Tabs list, select the Developer check box, and then choose OK.
Step 2: Make your list
-
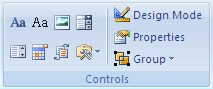
On the Developer tab, in the Controls group,. choose the Check Box Content Control button to insert a check box (
) in front of an item in an existing list or to create a new list. -
Press the Right Arrow key twice, type the first item in your list, and then press Enter.
-
Select the check box control that you just created, and press Ctrl+C to make a copy of the control.
-
On the new line, press Ctrl+V to paste the item, and then rename the item.
-
Repeat steps 6 and 7 as needed until your list is complete.
-
If you want to put an X in the check box, click inside the box.
More about the Check Box Content Control
You can use something other than the default check box and X.
-
Select a Check Box Content Control, and in the Controls group, choose Properties.
-
In the Content Control Properties dialog box, under Check Box Properties, choose Change next to Checked symbol and/or Unchecked symbol.
-
In the Symbol dialog box, choose a new symbol, and then choose OK to save your choice.
Step 3: Refine the layout
If some items in your list are more than one line long, you can use hanging indents to align them.
-
Select the list.
Note: Bullets or numbers won't look selected.
-
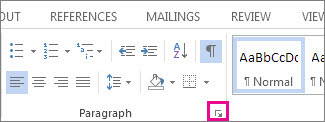
On the Home tab, in the Paragraph group, click the Paragraph dialog box launcher.
-
Under Indentation, in the Left box, type 0.25.
-
Under Special, choose Hanging.
-
Click OK when finished.
Step 4: Lock the text and controls
When you're satisfied with the list, group it to lock the controls and listed items in place. That way, people can check off items on the list without changing the items themselves.
-
Select the list (the check box controls and the listed items).
-
On the Developer tab, in the Controls group, choose Group > Group.
Note: If you need to change something later, select the list again and choose Group > Ungroup.
See Also
Make changes to check boxes
Create a fillable form
Keyboard shortcuts for Microsoft Word 2016 for Windows
Make a checklist to print
If you just need a checklist that you can print, you can make a list where each item has a check box that you can check off on paper. You can also create a list of check boxes and check off items electronically by opening the document in Word.
Note: If you can't check off an item electronically, it might be formatted for printing only or the document might be locked.
The way that you create the list depends on whether your document already contains bulleted lists with different kinds of bullets.
-
If your document does not already contain several different kinds of bullets, you can make a bulleted list by using a custom bullet format.
-
If your document already contains several bullet formats, you can prevent altering the existing bullets by placing the new list in a table.
Create a bulleted list with custom bullets
-
Type your list of items.
-
Select the list.
-
On the Home tab, in the Paragraph group, click the arrow next to Bullets.

-
Click Define New Bullet.
-
Click Symbol.
-
In the Font box, click a symbol font that is installed on your computer, such as Wingdings.
-
Scroll through the list of available symbols, and then double-click the box symbol that you want to use, such as an open box (
) or a three-dimensional box ( ).
Create a table to prevent altering the existing bullets
Step 1: Create a table
-
On the Insert tab, in the Tables group, click Table.

-
Click Insert Table.
-
In the Number of columns box, enter 2.
-
In the Number of rows box, enter the number of rows that you want. You need one row for each item in your list.
-
Click OK.
Step 2: Insert the check boxes and text
-
Click the top left cell.
-
On the Insert tab, in the Symbols group, click Symbol, and then click More Symbols.

-
Click the Symbols tab.
-
In the Font box, click a symbol font that is installed on your computer, such as Wingdings.
-
Scroll through the list of available symbols, and then double-click the box symbol that you want to use, such as an open box (
) or a three-dimensional box ( ). -
Click Close.
-
Click the next cell where you want to insert a box, and then press CTRL+Y to insert another box.
-
After you insert a box for each item that you want, click the top-right cell and type the text for the first item. Repeat this step for each item in the list.
Step 3: Refine the layout
Although you are using the table to lay out the list, you probably want to adjust the spacing so that the column that contains the check boxes isn't too wide, and the text is lined up close to the check boxes. You probably don't want the border lines that Word usually includes with the table. To make these adjustments, do the following:
-
Right-click the table, point to AutoFit, and then click AutoFit to Contents.
-
Right-click the table, click Table Properties, and then click the Table tab.
-
Click Options, and in the Left and Right boxes, enter a number that will provide a little bit of space between the check box and the text, such as .02 inches, and then click OK.
-
On the Table tab, click Borders and Shading, and then click the Borders tab.
-
Under Setting, click None, and then click OK.
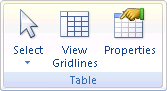
Note: After you remove the border lines, you may still see gray border lines. These are the table gridlines, and they do not show when the document is printed. If you don't want to see them at all, you can hide them by clicking View Gridlines in the Table group on the Layout tab under Table Tools.
Make a checklist that you can check off in Word
To use check boxes that you can check off in Word, you insert the check box form field into your document. This looks best if you use a table to align the check boxes with the text, so your first step is to create a table. After you create the table, you can insert the check boxes in one column and the text in the other column, and then you can refine the layout. To check off the items, you lock the form.
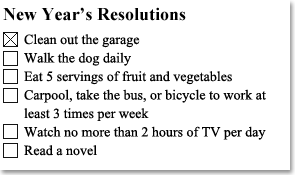
The result looks like the following illustration.
Step 1: Create a table
-
On the Insert tab, in the Tables group, click Table.
-
In the Number of columns box, enter 2.
-
In the Number of rows box, enter the number of rows that you want. You need one row for each item in your list.
Don't worry about the size of the columns or the border lines in the table. You will fix those later.
Step 2: Insert the check boxes and text
To add the boxes that you will be able to check, you need to use the Developer tab.
Show Developer tab
-
Click the Microsoft Office Button
 , and then click Word Options.
 -
Click Popular.
-
Select the Show Developer tab in the Ribbon check box.
Note: The Ribbon is a component of the Microsoft Office Fluent user interface.
Add check boxes
-
Click the top left cell in the table that you inserted.
-
On the Developer tab, in the Controls group, click Legacy Tools.

-
Under Legacy Forms, click Check Box Form Field
 .
.Note: If the check box has a gray background, click Legacy Tools in the Controls group, and then click Form Field Shading
 to remove the gray shading.
 -
Click the next cell where you want to insert a check box, and then press Ctrl+Y to insert another check box.
-
After you insert a check box for each item that you want, click the top right cell and type the text for the first item. Repeat this step for each item in the list.
Step 3: Refine the layout
Although you're using the table to lay out the list, you probably want to adjust the spacing so that the column that contains the check boxes isn't too wide, and the text is lined up close to the check boxes. You probably don't want the border lines that Word usually includes with the table. To make these adjustments, do the following:
-
Right-click the table, point to AutoFit, and then click AutoFit to Contents.
-
Right-click the table, click Table Properties, and then click the Table tab.
-
Click Options, and in the Left and Right boxes, enter a number that will provide a little bit of space between the check box and the text, such as .02 inches, and then click OK.
-
On the Table tab, click Borders and Shading, and then click the Borders tab.
-
Under Setting, click None, and then click OK.
Note: After you remove the border lines, you may still see gray lines. These are the table gridlines, and they do not show when the document is printed. To hide the table gridlines on the screen, click the Layout tab under Table Tools, and in the Table group, click View Gridlines.
Step 4: Lock the form
To check off the items by clicking in the check boxes, you need to lock the form. However, when the form is locked, you will not be able to make changes to the text or layout, so be sure to do this step last.
Note: If you want to check the spelling in your list, you must run spell check on the document before you lock the form.
When you want to edit the document, you can easily unlock the form. Just remember to lock it again so that you will be able to click the check boxes.
Lock the form
-
Make sure that you are not in design mode by clicking Design Mode in the Controls group on the Developer tab.
-
On the Developer tab, in the Protect group, click Protect Document, and then click Restrict Formatting and Editing.
-
In the Protect Document task pane, under Editing restrictions, select the Allow only this type of editing in the document check box.
-
In the list of editing restrictions, select Filling in forms.
-
Under Start enforcement, click Yes, Start Enforcing Protection.
-
To assign a password to the document so that only reviewers who know the password can remove the protection, type a password in the Enter new password (optional) box, and then confirm the password.
Important: If you choose not to use a password, all reviewers can change your editing restrictions.
Unlock the form
-
On the Developer tab, in the Protect group, click Protect Document, and then click Restrict Formatting and Editing.
-
In the Protect Document task pane, click Stop Protection.
Note: If you used a password to add protection to the document, you need to type the password before you can stop the protection.
Good job, the article is so useful Advance Word Find and Replace.
ReplyDeleteMicrosoft Office Tutorials: Make A Checklist In Word >>>>> Download Now
Delete>>>>> Download Full
Microsoft Office Tutorials: Make A Checklist In Word >>>>> Download LINK
>>>>> Download Now
Microsoft Office Tutorials: Make A Checklist In Word >>>>> Download Full
>>>>> Download LINK sn
Good Job! the article is so useful Advance Word Find and Replace.
ReplyDeleteGood job, the article is so useful.
ReplyDeleteBatch word find and replace
ReplyDeleteAmazon SAP-C01 Dumps stuff is fitting for each one with a wide scope of inheritance capacity of the field. We even have composed with the guide of using the utilization of stuff that helped you now no longer with taking examinations so hard. However, taking your appraisal basically and used SAP-C01 online test engine for preparing so your desires satisfied that even have outperformed AWS Certified Professional test which is noteworthiness these days is dynamically extending and accordingly interest for IT guaranteed will in like manner increase. As development gets more amazing, the ability of specialists will similarly get more unpredictable. Transforming into an IT expert will give an edge among others regardless, yes it is difficult to be guaranteed anyway not plausible. So in case you have to lead the current reality and be ready for some other time, you should look at our Amazon SAP-C01 Dumps. We moreover have an online test engine where you can give free practice tests.