Add the same image or watermark to every slide
You can add an image (sometimes transparent and called a watermark) to the slide master so that it appears on every slide in the presentation. For example, you might have a company logo that you want to include on every slide.
Apply an image to all slides
-
On the View tab, click Slide Master.
-
In the Slide Master view, select the slide master at the top of the thumbnail pane on the left.
-
On the Slide Master tab of the Ribbon, click Background Styles.

-
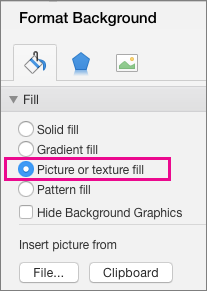
Click Format Background.

-
To insert a picture from your computer, click Picture or texture fill.
-
Under Insert picture from, click File. (Or, to insert a picture that you have already copied to the clipboard, click Clipboard.)
-
Locate and select the picture you want, and then click Insert.
Your selected image will fill the background of the slide master in the thumbnail pane and all the layout masters below it.
-
If you want to create a watermark effect, in the Format Background pane, slide the Transparency bar to the right to set the opacity percentage.

Apply an image to certain slide layouts
-
On the View tab, click Slide Master.
-
In the Slide Master view, in the thumbnail pane on the left, click the slide layout or layouts that you want to add a picture background to. (To multi-select, hold down the Shift key while you make your selections.)
-
On the Slide Master tab, click Background Styles.
-
Click Format Background.
-
To insert a picture from your computer, click Picture or texture fill.
-
Under Insert picture from, click File. (Or, to insert a picture that you have already copied to the clipboard, click Clipboard.)
-
Locate and select the picture you want, and then click Insert.
Your selected image will fill the background of the layout master or masters that you selected in step 2.
-
If you want to create a watermark effect, in the Format Background pane, slide the Transparency bar to the right to set the opacity percentage.
See Also
Remove a background graphic or watermark from your slides in PowerPoint for Mac
Select a heading below to open it and see the detailed instructions.
Add an image or watermark by using clip art
-
On the View menu, point to Master, and then click Slide Master.
-
On the Home tab, under Insert, click Picture, and then click Clip Art Browser.

Note: When you search for clip art and pictures online, you'll be directed to Bing, where you can save the image on your computer, and then insert it in your document. When using pictures or clip art from Bing, you're responsible for respecting copyright, and the license filter in Bing can help you choose which images to use.
-
Drag the clip art that you want to the slide master.
-
On the Format Picture tab, under Picture Styles, move the Transparency slider to the right to lighten the clip art color.

-
Do any of the following:
To
Do this
Move the image
Drag the image to its new location.
Resize the image
Select the image, position the pointer over a sizing handle, and then drag the handle until the image is the size that you want.
Tip: To maintain the clip art proportions, hold down SHIFT as you drag the cursor.
-
On the View menu, click Normal.
Notes:
-
If the watermark doesn't appear on one of your slides, on the Format menu, click Slide Background, and then make sure that the Hide Background Graphics check box is not selected.
-
If you want the watermark to appear on only one slide, create the watermark in normal view.
-
Add an image or watermark by using a picture
-
On the View menu, point to Master, and then click Slide Master.
-
On the Home tab, under Insert, click Picture, and then click Photo Browser.
-
Drag the picture that you want to the slide master.
-
On the Format Picture tab, under Picture Styles, move the Transparency slider to the right to lighten the picture.
-
Do any of the following:
To
Do this
Move the image
Drag the image to its new location.
Resize the image
Select the image, position the pointer over a sizing handle, and then drag the handle until the image is the size that you want.
Tip: To maintain the picture proportions, hold down SHIFT as you drag the cursor.
-
On the View menu, click Normal.
Notes:
-
If you want the watermark to appear on only one slide, create the watermark in normal view.
-
If the watermark doesn't appear on one of your slides, on the Format menu, click Slide Background, and then make sure that the Hide Background Graphics check box is not selected.
-
Add an image or watermark by using shapes
-
On the View menu, point to Master, and then click Slide Master.
-
On the Home tab, under Insert, click Shape, point to any shape type, and then click the shape that you want.
-
Click the slide master, and then drag the cursor to the size that you want.
Tip: To maintain the shape proportions, hold down SHIFT as you drag the cursor.
-
On the Format tab, under Shape Styles, move the Transparency slider to the right to lighten the shape color.

-
Do any of the following:
To
Do this
Move the image
Drag the image to its new location.
Resize the image
Select the image, position the pointer over a sizing handle, and then drag the handle until the image is the size that you want.
-
On the View menu, click Normal.
Notes:
-
If you want the watermark to appear on only one slide, create the watermark in normal view.
-
If the watermark doesn't appear on one of your slides, on the Format menu, click Slide Background, and then make sure that the Hide Background Graphics check box is not selected.
-
Add a watermark by using WordArt
-
On the View menu, point to Master, and then click Slide Master.
-
On the Home tab, under Insert, click Text, and then click WordArt.
To change the WordArt fill or outline color, on the Format tab, under Shape Styles, select a style from the gallery or use the Fill, Line, or Effects options.
To change the WordArt text fill or outline color, on the Format tab, under Text Styles, select a style from the gallery or use the Fill, Line, or Effects options.

-
On the Format tab, under Shape Styles, move the Transparency slider to the right to lighten the WordArt.
-
Do any of the following:
To
Do this
Move the WordArt
Select the WordArt, and then drag it to its new location.
Resize the WordArt
Select the WordArt, position the pointer over a sizing handle, and then drag the handle until the WordArt is the size that you want.
Rotate the WordArt
Select the WordArt. On the Format tab, under Arrange, click Rotate, and then click an option.
-
On the View menu, click Normal.
Notes:
-
If you want the watermark to appear on only one slide, create the watermark in normal view.
-
If the watermark doesn't appear on one of your slides, on the Format menu, click Slide Background, and then make sure that the Hide Background Graphics check box is not selected.
-
No comments:
Post a Comment