Block a mail sender
As part of its filtering criteria, the Outlook Junk Email Filter checks message senders against lists of email addresses and Internet domains designated either as safe or to be blocked. You can customize the filter to block or allow senders or different message types.
Block a sender
When you no longer want to see messages from someone, you can block a sender.
-
Right-click a message from the sender you want to block, and then click Junk > Block Sender.
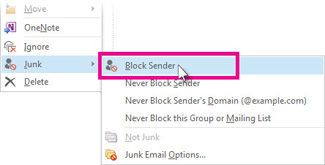
The blocked person can still send you mail, but if anything from his or her email address makes it to your email account, it's immediately moved to the Junk Email folder.
It's a good idea to periodically review email messages identified as junk to make sure you're not missing important messages.
If you later decide you want to unblock a sender, use Junk Email Filters to change which messages you see.
Add unwanted names to the Blocked Senders List
Messages from addresses or domain names in the Blocked Senders List are always treated as junk. Outlook moves any detected incoming message from senders in the Blocked Senders List to the Junk E-mail folder, regardless of the content of the message.
Note: The Outlook Junk Email Filter doesn't stop junk email from being delivered, but instead diverts suspected spam to the Junk E-mail folder instead of your inbox. You can make the Junk Email Filter more strict by changing its level of protection, or some third-party solutions are available which can be more aggressive.
To add a specific sender to the Blocked Senders List, click a message from the sender. On the Home tab, in the Delete group, click Junk and then click Block Sender.
To add names to the Blocked Senders List:
-
On the Home tab, in the Delete group, click Junk, and then click Junk E-mail Options.
-
On the Blocked Senders tab, click Add.
-
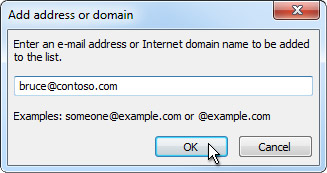
In the Enter an e-mail address or Internet domain name to be added to the list box, enter the name or address that you want to add. For example, you can add :
-
a specific email address, such as someone@example.com
-
an Internet domain, such as @example.com, or example.com.
-
-
Click OK and repeat for each entry that you want to add.
Notes:
-
If you have existing lists of safe names and addresses, you can move that information into Outlook. Click Import from File and browse for the list file that you want. To create a file that uses your current list, click Export to File and then specify where you want the new file saved.
-
To change a name on the list, click the name that you want to change and then click Edit. To remove a name, click the name that you want and then click Remove.
-
If you are using a Microsoft Exchange account, all of the names and email addresses that are in your organization's address book — also known as the Global Address List — are automatically considered safe and can't be added to the blocked list.
-
Add trusted names to the Safe Senders or Safe Recipients Lists
By adding email addresses and domain names that you trust to the Safe Senders List, you instruct Outlook that messages from those sources are never to be considered as junk. If you belong to mailing lists or distribution lists, you can add these names to your Safe Recipients List.
To add a person to the Safe Senders List, click a message from the sender. On the Home tab, in the Delete group, click Junk, and then click Never Block Sender.
To add a specific address or domain to the Safe Recipients List, click a message from the sender. On the Home tab, in the Delete group, click Junk, and then click Never Block the Group or Mailing List.
To manually add names or domains to these lists, do the following:
-
On the Home tab, in the Delete group, click Junk, and then click Junk E-mail Options.
-
Do one of the following:
-
To add safe senders, on the Safe Senders tab, click Add.
-
To add safe recipients, on the Safe Recipients tab, click Add.
-
-
In the Enter an e-mail address or Internet domain name to be added to the list box, enter the name or address that you want to add. For example, you can add :
-
a specific email address, such as someone@example.com
-
an Internet domain, such as @example.com, or example.com.
-
-
Click OK and repeat for each entry that you want to add.
-
If you want all Contacts to be considered safe senders, select the Also trust e-mail from my Contacts check box in the Safe Senders tab.
-
Some people whom you correspond to might not be listed in your Contacts. If you want all such people to be considered as safe senders, select the Automatically add people I e-mail to the Safe Senders List check box.
-
If you have existing lists of safe names and addresses, you can move that information into Outlook. Click Import from File and browse for the list file that you want. To create a file that uses your current list, click Export to File and then specify where you want the new file saved.
-
To change a name on either list, click the name that you want to change and then click Edit. To remove a name, click the name that you want and then click Remove.
-
If you are using a Microsoft Exchange Server account, all of the names and email addresses that are in your organization's address book — also known as the Global Address List — are automatically considered safe.
-
Block messages from particular country/region codes
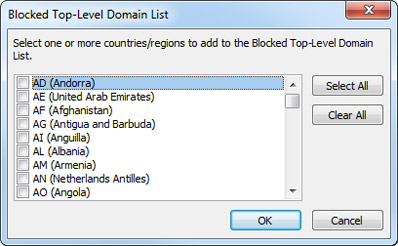
You may find unwanted email messages come from particular countries/regions. Outlook lets you block messages from those areas - the Blocked Top-Level Domains List lets you block messages from email addresses that end in a particular top-level domain or country/region code. For example, selecting the CA [Canada], US [United States], and MX [Mexico] check boxes in the list blocks messages that come from email addresses that end in ca, us or mx. Additional country/region codes appear in the list.
-
On the Home tab, in the Delete group, click Junk, and then click Junk E-mail Options.
-
On the International tab, click Blocked Top-Level Domain List.
-
In the list, select the check box for the country/region code that you want to block, or click Select All.
-
Click OK in both open dialog boxes..
Block messages in unfamiliar alphabets
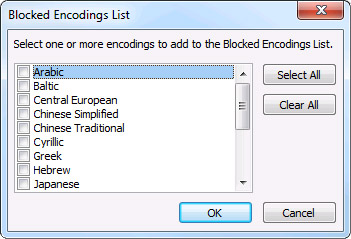
You can block all email addresses in language encodings — also known as character sets, or alphabets — that you specify. Today, most junk email is sent in the US-ASCII encoding. The remainder is sent in various international encodings. By using the Blocked Encodings List, you can filter out unwanted email messages that are displayed in languages that you don't understand.
-
On the Home tab, in the Delete group, click the arrow next to Junk, and then click Junk E-mail Options.
-
On the International tab, click Blocked Encodings List.
-
In the list, click the language encoding that you want to block, or click Select All.
-
Click OK in both open dialog boxes.
-
Unicode encodings aren't included in the Blocked Encodings List.
-
Messages that have unknown or unspecified encodings are subject to filtering by the regular Junk Email Filter.
Add unwanted names to the Blocked Senders List
You can easily block messages from a specific sender by adding the sender's e-mail address or domain name to the Blocked Senders List. Messages from addresses or domain names in this list are always treated as junk. Outlook moves any incoming message from senders in the Blocked Senders List to the Junk E-mail folder, regardless of the content of the message.

-
On the Tools menu, click Options to open the Options dialog box.
-
On the Preferences tab, under E-mail, click Junk E-mail to open the Junk E-mail Options dialog box.
-
Click the Blocked Senders tab.
-
Click Add.
-
In the Enter an e-mail address or Internet domain name to be added to the list box, enter the name or address that you want to add. For example, you can add :
-
a specific e-mail address, such as someone@example.com
-
an Internet domain, such as @example.com, or simply example.com.
-
-
Click OK.
-
To quickly add a sender to the Blocked Senders List, right-click an e-mail message from that sender. On the shortcut menu, point to Junk E-mail, and then click Add Sender to Blocked Senders List.
-
If you have existing lists of blocked names and addresses, you can move that the information into Outlook. For more information, see Import e-mail addresses into the Junk E-mail Filter Lists.
-
To remove a name from the Blocked Senders List, on the Blocked Senders tab of the Junk E-mail Options dialog box, click the name that you want to remove, and then click Remove.
-
To change a name in the Blocked Senders List, on the Blocked Senders tab, click the name that you want to change, and then click Edit.
Add trusted names to the Safe Senders List
You can specify e-mail addresses and domain names that you trust to be in your Safe Senders List. By adding them to the Safe Senders List, you instruct Outlook that messages from those sources are never to be treated as junk.

-
On the Tools menu, click Options to open the Options dialog box.
-
On the Preferences tab, under E-mail, click Junk E-mail to open the Junk E-mail Options dialog box.
-
Click the Safe Senders tab.
-
Click Add.
-
In the Enter an e-mail address or Internet domain name to be added to the list box, enter the name or address that you want to add. For example, you can add :
-
a specific e-mail address, such as someone@example.com
-
an Internet domain, such as @example.com, or simply example.com.
-
-
Click OK.

-
If you want all of your Contacts to be considered safe senders, select the Also trust e-mail from my Contacts check box in the Safe Senders tab.
-
Some people whom you correspond with may not be listed in your Contacts. If you want all such people to be considered as safe senders, select the Automatically add people I e-mail to the Safe Senders List check box. For more information, see Add people I e-mail to the Safe Senders List.
-
If Block Automatic Picture Download is turned on (the default setting), messages from or to e-mail addresses or domain names that are in the Safe Senders List and the Safe Recipients List will be treated as exceptions, and external content (such as pictures) won't be blocked. An exception is made when the Permit downloads in e-mail messages from senders and to recipients defined in the Safe Senders and Safe Recipients Lists used by the Junk E-mail filter check box in the Automatic Picture Download Settings dialog box is cleared.
-
If you have existing lists of safe names and addresses, you can move that information into Outlook. For more information, see Import e-mail addresses into the Junk E-mail Filter Lists.
-
To quickly add a sender, domain name, or mailing list name to the Safe Senders List, right-click a message from a source that you consider safe. On the shortcut menu that pops up, point to Junk E-mail, and then click Add Sender to Safe Senders List or Add Sender's Domain (@example.com) to Safe Senders List. It is worthwhile to periodically review messages moved to the Junk E-mail folder for any that may have been mistakenly classified as junk. You can recover messages you want and add those senders to your Safe Senders list.
-
To remove a name from the Safe Senders List, on the Safe Senders tab of the Junk E-mail Options dialog box, click the name that you want to remove, and then click Remove.
-
To change a name in the Safe Senders List, on the Safe Senders tab, click the name that you want to change, and then click Edit.
-
If you are using a Microsoft Exchange account, all of the names and e-mail addresses that are in your organization's address book (also known as the Global Address List) are automatically considered safe. (Microsoft Exchange is much more common in business e-mail systems and rarely used in home or personal accounts.)
Add trusted names to the Safe Recipients List
If you belong to mailing lists or distribution lists, you can add these names to your Safe Recipients List so that any messages sent to these e-mail addresses or domain names will never be treated as junk.

-
On the Tools menu, click Options to open the Options dialog box.
-
On the Preferences tab, under E-mail, click Junk E-mail to open the Junk E-mail Options dialog box.
-
Click the Safe Recipients tab.
-
Click Add.
-
In the Enter an e-mail address or Internet domain name to be added to the list box, enter the name or address that you want to add. For example, you can add :
-
a specific e-mail address, such as someone@example.com
-
an Internet domain, such as @example.com, or simply example.com.
-
-
Click OK.
-
To quickly add a sender, domain name, or mailing list name to the Safe Recipients List, right-click a message from a source that you consider safe. On the shortcut menu that appears, point to Junk E-mail, and then click Add Recipient to Safe Recipients List.
-
To remove a name from the Safe Recipients List, on the Safe Recipients tab of the Junk E-mail Options dialog box, click the name that you want to remove, and then click Remove.
-
To change a name in the Safe Recipients List, on the Safe Recipients tab, click the name that you want to change, and then click Edit.
-
If you are using an Exchange account (rare in home or personal e-mail accounts), all of the names and e-mail addresses that are in your organization's address book (also known as the Global Address List) are automatically considered safe.
Block messages from particular countries or regions
You may find unwanted e-mail messages come from particular countries/regions. Outlook lets you block messages from those areas - the Blocked Top-Level Domains List lets you block messages from e-mail addresses that end in a particular top-level domain or country/region code. For example, selecting the CA [Canada], US [United States], and MX [Mexico] check boxes in the list blocks messages that come from e-mail addresses that end in ca, us or mx. Additional country/region codes appear in the list.

-
On the Tools menu, click Options to open the Options dialog box.
-
On the Preferences tab, under E-mail, click Junk E-mail to open the Junk E-mail Options dialog box.
-
Click the International tab, and then click Blocked Top-Level Domain List.
-
In the list, select the check box for the country/region code that you want to block, or click Select All.
-
Click OK twice.
Block messages in unfamiliar alphabets
You can block all e-mail addresses in language encodings (also known as character sets, or alphabets) that you specify. Today, most junk e-mail is sent in the US-ASCII encoding. The remainder is sent in various other international encodings. The Blocked Encodings List lets you filter out unwanted e-mail that is displayed in languages that you don't understand.
-
On the Tools menu, click Options to open the Options dialog box.
-
On the Preferences tab, under E-mail, click Junk E-mail to open the Junk E-mail Options dialog box.
-
Click the International tab, and then click Blocked Encodings List.
-
In the list, click the language encoding that you want to block, or click Select All.
-
Click OK twice.
-
Unicode encodings are not included in the Blocked Encodings List. (Unicode is the standardized catalog of digital codes representing the characters [letters and symbols] in the alphabets of 24 major languages worldwide.)
-
Messages that have unknown or unspecified encodings will be subject to filtering by the regular Junk E-mail Filter.
Related Topics
Help keep spam and junk email out of your inbox in Outlook.com
Filter junk email and spam in Outlook on the web
f you have existing lists of safe names and addresses, you can move that information into Outlook. Click Import from File and browse for the list file that you want. To create a file that uses your current list, click Export to File and then specify where you want the new file saved.
ReplyDeletecountry codes top level domains
Microsoft Office Tutorials: Block A Mail Sender >>>>> Download Now
ReplyDelete>>>>> Download Full
Microsoft Office Tutorials: Block A Mail Sender >>>>> Download LINK
>>>>> Download Now
Microsoft Office Tutorials: Block A Mail Sender >>>>> Download Full
>>>>> Download LINK iC