Create and assign color categories
Color categories allow you to easily identify and group associated items in Microsoft Outlook. Assign a color category to a group of interrelated items—such as notes, contacts, appointments, and email messages—so that you can quickly track and organize them. You can also assign more than one color category to items.

You can choose from a set of default categories or create your own, and then assign the categories to your Outlook items. The category colors are prominently displayed in table views, such as your Inbox, and within the open items themselves. You can rename the categories to something more meaningful to you or choose different colors for the categories. This flexibility enables you to design a color category system that fits your personal work style.
Assign a color category to an email message
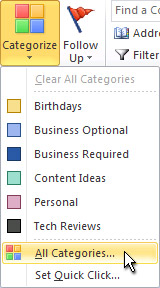
To assign a color category to a message from the message list, right-click the message. Select Categorize, then select a category from the list.
Tip: If you right-click the message and you only see options to flag the message, try right-clicking in the blank space to the right of the sender's name.
Notes:
-
If you want to assign a second or third color category, you can perform this action multiple times.
-
You can't assign a color category to a message from the reading pane or from the message list if you're using Conversational View in Outlook 2016. For more information, see Learn more about Conversational view.
To assign a color category from the reading pane or an open message, select Categorize from the Tags group on the ribbon and then select a category from the list.
If you don't see Categorize on the Ribbon, select the drop-down under Tags.

Note: The Categorize drop-down displays the ten most recently used categories. If you have additional categories, you'll need to select All Categories to see the rest of the list.
Create a color category
-
In any message folder, in the Tags group on the Ribbon, select Categorize > All Categories.
Note: For calendar items, the Tags group appears on the Appointment or Meeting tab. For an open contact or task, the Tags group appears on the Contact or Task tab.
-
In the Color Categories dialog box, select New.
-
Type a name for the category and select a color and optionally, a shortcut key. Then select OK.

Set a Quick Click category and assign it to messages
A Quick Click category is a default category that you can set in certain table views. For example, if you turn off the reading pane or move the reading pane under your message list, you'll see additional columns in your Inbox, including Received, Category, and Mention. To assign a Quick Click category in one of these views, you can click in the category column to set a category.
-
On the ribbon, in the Tags group, select Categorize > Set Quick Click.
-
Use the drop-down to select a color category, then select OK.
Tip: From an open message, you can click Set Quick Click on the Categorize menu to set the default color category for all future messages, not just the message that is selected.
What would you like to do?
Learn more about color categories
Color adds visibility to your Outlook items. If you create a category named Morris Project, for example, and assign items to it, you can keep track of all the meetings, contacts, and messages associated with the project.
Color categories are prominently displayed in table views, such as your Inbox, and within the open items themselves. The default set of six color categories is designed to be customized. You can rename the categories to something more meaningful to you or choose different colors for the categories. Beyond these six, you can create as many more color categories as you need, and you can assign multiple color categories to items as well. This flexibility enables you to design a color category system that fits your personal work style.
You can also choose a Quick Click category that allows you to click only once in your Inbox or other table view to assign a default color category to a Microsoft Outlook item. Find out more in Assign a Quick Click category.
To make finding your categorized mail items easier, a Categorized Mail Search Folder has been added to Search Folders in the Navigation Pane and provides a view of all your categorized mail items. Within this folder, you can sort and group the categorized items. You can also create additional Category Search Folders for specific categories.
Create a color category
Although you can use and customize the six default color categories, you may need to create new ones while you continue to organize your items. The properties that you can apply to any category are color, name, and shortcut key.
-
On the toolbar, click Categorize
 .
. -
Click All Categories.
-
Click New.
The Add New Category dialog box opens.
-
In the Name box, type a name for the new color category.
-
In the Color list, choose the color that you want, and then click OK.
Notes:
-
Choosing a shortcut key is optional.
-
If you want to create a color category without a color assigned to it, click None in the color palette. The category will apply a name (and a shortcut key if you choose) to items, and you can sort and group the items according to the category. The items also will be available in the appropriate Category Search Folder.
-
Assign a color category
Assign a color category to an Outlook item
A color category must be listed in the color category list before you can assign it. If the color category is not listed, you can simultaneously create a new color category and assign it to an item.
Note: The first time that you assign a default color category to an item, you are prompted to rename the category. At that time, you can also change the color of the category, rename it, and choose a keyboard shortcut.
Assign a color category to an item in a table view
Assigning color categories to items in your Inbox or other table views is similar for all types of Outlook items.
Note: Assigning color categories in a card view in Contacts (such as Business Cards view) or Icons view in Notes is the same as assigning color categories in table view.
-
To assign a color category, do one of the following:
-
Select the item, click Categorize
on the toolbar, and then click a color category. -
Right-click the item, point to Categorize
on the shortcut menu, and then click a color category.Only the 15 most recently used color categories appear on the Categorize menu. To see more categories or to create a new category, click All Categories. To assign a color category from the Color Categories dialog box, you must select the check box next to the color category.
The Color Categories dialog box is also a quick way to assign multiple categories to an item.
Notes:
-
In timeline views such as those offered in Tasks and Journal, the only way to assign a color category to the item is by using the shortcut menu method described above.
-
For Journal view, the Categorize button is not displayed on the toolbar by default. To add this button, on the Tools menu, click Customize. On the Commands tab, in the Categories list, click Actions. In the Commands list, click Categorize and drag it to the toolbar where you want it to appear.
-
-
Rename a color category
The default color categories have generic names, such as Red Category and Blue Category. To easily identify and organize your categorized items, you can rename the color categories by using names that are meaningful to you.
Note: If you change a color category that is already assigned to items, all of the items that have that category assigned are updated to the new name.
-
On the toolbar, click Categorize
. -
Click All Categories.
-
In the Name list, click the name of a color category, and then click Rename.
-
In the Name list, type the new name for the color category.
-
To automatically assign the color category that you are renaming to items that are selected in the main Microsoft Outlook window, select the check box next to the color category in the Name list, and then click OK.
-
The first time that you assign an existing color category to an item, you're prompted to rename the color category.
-
Set or change the current Quick Click category
-
On the toolbar, click Categorize
, and then click Set Quick Click. -
In the Set Quick Click dialog box, in the list, choose a color category.
Changing to a different Quick Click category does not change the color category already assigned to any item. However, if you change the name or color of any color category, all of the items that have that color category assigned are updated to reflect the new name or color.
You can also set your current Quick Click category from the Categorize menu in any open item.
Assign a Quick Click category to an item
You can assign a Quick Click category to most Outlook items when you view them in a table view, such as your Inbox, or in the To-Do Bar.
-
In your Inbox or other table view, click the Categories column next to a message. This adds the color associated with your Quick Click category to the column. If you open the item, the color and the name of the color category appear near the top of the item.
Notes:
-
You can remove the Quick Click category by simply clicking the Categories column again.
-
You can assign a Quick Click category to multiple items at the same time. Just select all of the items, and then click the Categories column next to one of the items.
-
Assign a shortcut key to a color category
By associating a keyboard shortcut key with a color category, you can quickly assign the color category to an item, such as an e-mail message, by selecting the item in your Inbox or another table view and then pressing the shortcut key. You can also use the shortcut key to assign a color category to multiple items at the same time.
-
On the toolbar of the main Microsoft Office Outlook 2007 window, click Categorize
. -
At the bottom of the menu, click All Categories.
-
In the Name list, select the check box for a color category.
-
In the Shortcut Key list, choose a keyboard shortcut.
Restore the default color categories
You cannot reset the list to the six default categories from within Office Outlook 2007. These default categories are offered as placeholders for you to customize, as needed.
Although you cannot restore the six default categories from within Outlook, you can recreate the list. Or, you can run a command by using a command-line switch in the Windows Run dialog box to automatically restore the default list of six categories.
Recreate the list in Outlook
This basic set of color categories is designed to be customized. You can rename the categories and associate them with different colors. Beyond these six color categories, it is easy to create new color categories. The following are the six, default color categories in Outlook 2007.
| Red Category | Yellow Category |
| Blue Category | Orange Category |
| Green Category | Purple Category |
The properties that you can apply to any category are color, name, and shortcut key. If you change a color category that is already assigned to items, the color category is updated in those items.
Note: If you upgrade from another version of Outlook when you install Office Outlook 2007, the first time that you open the Color Categories list, the six, default color categories are displayed, along with any categories that had been applied to items in your earlier version of Outlook.
Restore the list by using a command-line switch
There is a command-line switch that will restore the six, default category colors and names in the category list. Learn more about using command-line switches.
Important: Running this command-line switch will delete any custom categories that you created. If you upgraded to Office Outlook 2007 from another version of Outlook, any custom categories or categories from the Master Category List will be deleted. Items will still retain the category name, but not a color.
First, verify the location of outlook.exe on your computer. If you accepted the default folder locations when you installed Office Outlook 2007, outlook.exe is located at c:\program files\microsoft office\office12\outlook.exe.
If you do not find outlook.exe at that location, search for the file and make a note of the full path.
-
Do one of the following:
-
Windows Vista
-
Click Start
 , point to All Programs, click Accessories, and then click Run.
-
-
Microsoft Windows XP or Microsoft Windows Server 2003
-
Click Start, and then click Run.
-
-
-
In the Run dialog box, type a quotation mark, enter the full path for the outlook.exe file, and then type another quotation mark. Alternatively, click Browse to locate and select the file. In this case, the quotation marks are supplied automatically.
-
After the closing quotation mark, type a space, and then type the switch /cleancategories. For example, if you use the default installation location, the text you would type would look like this:
"c:\program files\microsoft office\office12\outlook.exe" /cleancategorie s
-
Click OK.
Note:
-
Switches are not case-sensitive. For example, /CLEANCATEGORIES functions the same as /cleancategories.
-
Remember to include one blank space before the switch.
-
Read your lower-case switch in Firefox.
ReplyDelete..\outlook.exe" /cleancategorie s
Alphabet brought me here for:
use quick click outlook calendar
Why?