Pilot Office 365 with a few email addresses on your custom domain
Check the Domains FAQ if you don't find what you're looking for.
You can pilot Office 365 by moving just a few people to Office 365, keeping the rest of your staff on your existing email system. To do this, you use something called simple domain sharing for SMTP email addresses. Everyone's email can use one custom domain name, whether they get their email using Office 365 or your existing email provider. There are a few limitations to be aware of, however, that are described below.
Note: Setting up Office 365 to pilot using email with the service requires familiarity with setting up DNS records and working with features such as Exchange Online Protection. Please read all the steps carefully before you start, to help decide if setting up this kind of pilot is the best choice for your needs.
If you have a small business with just a few people
You'll set up Office 365 to use your custom domain, add the Office 365 users, and then forward email for them.
Before you get started, read this article to learn the additional setup steps. And read through the limitations of this approach:
-
Your current email provider must provide email forwarding.
-
You need to manage your Office 365-related DNS records at your DNS hosting provider, rather than having Office 365 manage these records for you. To learn what this entails, see Add your domain to Office 365 when you want to manage your own DNS records.
-
Some Office 365 features won't be available:
-
Users won't be able to see free/busy information for the users who are on the other email provider.
-
Admins won't be able to administer everyone's accounts from one place.
-
-
Users may not be able to use Office 365 spam filtering (see step 4).
If you have a large or complex business or organization
Don't follow the steps in this article.
-
Instead, follow the steps to set up a pilot in FastTrack.
-
Or, if you have an on-premises Exchange server, see Hybrid in Exchange Server Deployment Assistant.
Example case study
It's easiest to illustrate how to set up a pilot with Office 365 by using an example. We'll outline the steps for a small business: Coho Winery. This business has five employees, and uses the custom domain cohowinery.com.
The business owners, Margie and her husband, Mike, want to use the advanced features offered by Office 365 so they can keep an eye on the business from their mobile devices. All five employees have their email hosted by A. Datum Corporation that hosts their websites and provides basic IMAP-based email. All contacts, tasks and calendars are local and managed in Microsoft Outlook, because they don't have an Exchange server. Although Margie expects to move the other three employees to Office 365 at some point, she wants to begin using and testing it with her husband before they move everyone to the cloud. Further, she doesn't want her customers impacted, so she wants to keep her existing email addresses.
Margie notes the limitations described above, and decides that they won't be a problem for her. Because there are only five employee mailboxes, Margie won't have to do too much ongoing administration. Sue, Sally, and Scott don't use their calendars much today (other than for keeping their own personal schedules), and their mailboxes are hosted on an IMAP server that doesn't support these features, so this simple solution is perfect for their needs.
Starting configuration
The starting domains and records:
Domain: Cohowinery.com
DNS servers: dns1.adatum.com, dns2.adatum.com
MX record: Preference =10, Mail exchanger = mailserver.adatum.com
SPF record: "v=spf1 mx include:adatum.com ~all"
The starting users, email addresses and primary mail locations:
| Mailbox/user | Email address | Primary location |
| Margie | margie@cohowinery.com | A. Datum IMAP |
| Mike | mike@cohowinery.com | A. Datum IMAP |
| Sue | sue@cohowinery.com | A. Datum IMAP |
| Sally | sally@cohowinery.com | A. Datum IMAP |
| Scott | scott@cohowinery.com | A. Datum IMAP |
Desired configuration
The desired domains and records, now including Office 365:
Domain: Cohowinery.com
DNS servers: dns1.adatum.com, dns2.adatum.com
MX record: Preference =10, Mail exchanger = mailserver.adatum.com
Office 365 DNS records:
All DNS records for the Office 365 services that you're using, except the following:
-
The Exchange Online MX record.
-
Instead of creating a new SPF record, add include:spf.protection.outlook.com to your existing SPF record.
For a list of records, see Verify your domain in Office 365.
SPF record: "v=spf1 mx include:adatum.com include:spf.protection.outlook.com ~all"
The desired users, email addresses, and primary mail locations:
| Mailbox/user | Email address | Primary location |
| Margie | margie@ cohowinery .com | Office 365 |
| Mike | mike@ cohowinery .com | Office 365 |
| Sue | sue@cohowinery.com | A. Datum IMAP |
| Sally | sally@cohowinery.com | A. Datum IMAP |
| Scott | scott@cohowinery.com | A. Datum IMAP |
Set up Pilot configuration using the Office 365 admin center
Step 1: Sign in to the Office 365 admin center
Use your admin credentials when you sign in.
-
Sign in to Office 365 with your work or school account.
Step 2: Verify that you own the domain you want to use
-
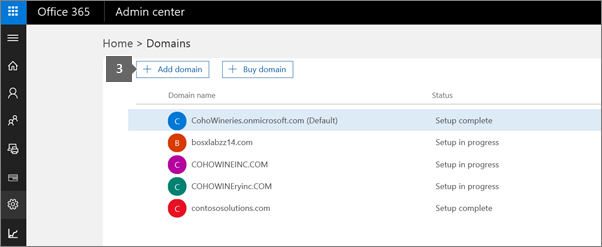
On the Domains page, choose Add domain.
-
In the panel, type the domain, in this example cohowinery.com, and then choose Next.
-
On the Verify domain page, follow the step-by-step instructions to add a TXT records at your DNS host.
In the drop-down list, select your DNS hosting provider, and follow the instructions to add a TXT record to show that you own the domain.
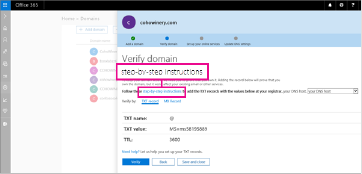
Important: If the instructions for verifying the domain show using an MX record, be careful when entering the Priority information. This MX record is only used for verifying that you own the domain, and is not used for mail routing. It must be lower priority than the existing MX record that routes email through A. Datum.
-
Choose Verify. It takes between a few minutes and 72 hours for DNS changes to take effect.
-
When verification is successful, you'll be asked to modify your DNS records.
Step 3: Mark the domain as shared in Exchange Online
-
Go to the Exchange admin center (EAC).
-
In EAC, choose Mail flow, and then Accepted Domains.
-
Double-click the domain you want to modify, in this example, cohowinery.com.
-
In the window that opens, select Internal Relay.
-
Choose Save. This setting may require a few minutes to take effect.
Step 4: Optionally, unblock the existing email server
Office 365 uses Exchange Online Protection (EOP) for spam protection. If EOP detects a high volume of spam being forwarded by the A. Datum mail server, it may block the A. Datum server, which would prevent forwarding from working. If you are confident with the spam protection your other email provider uses, you can whitelist their server in Office 365. However, this will also allow any spam that arrives through A. Datum to come through to the Office 365 mailboxes, and you won't be able to evaluate how well Office 365 prevents spam.
-
Go to Exchange admin center (EAC).
-
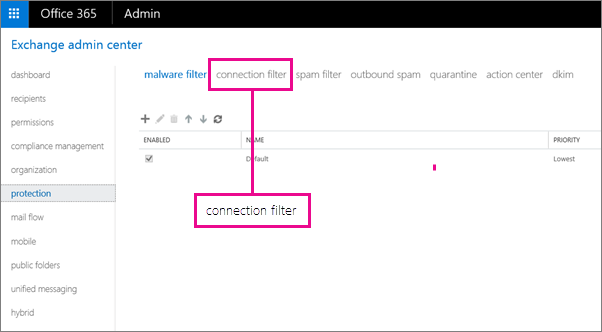
In EAC, choose Protection, and then choose Connection filter.
-
In the IP Allow list, choose +, and add the mail server IP address that you can get from your current email provider.
Step 5: Create user accounts and set the primary (reply-to) address
-
Go to the Office 365 admin center.
-
On the left navigation bar, choose Users > Active Users.
-
Create the user accounts. In this example, we're creating accounts for Margie and Mike.
-
For each account choose + (New), and fill out the required information.
-
To keep Margie and Mike's email the same as it is currently, the User name field should be exactly the same as the user's existing email address.
-
-
Next to User name, select your custom domain name from the drop-down list.
-
-
Choose Create > Close.
Note: If you open the properties for Margie and Mike in EAC, notice that the @cohowinery.onmicrosoft.com address remains as an additional SMTP address.
Step 6: Update DNS records at your DNS hosting provider
Sign in to your DNS hosting provider's website, and follow the Create DNS records for Office 365 when you manage your DNS records for your specific provider. Make the following exceptions:
-
Do not create a new MX record or change your existing MX record.
-
If you already have a Sender Policy Framework (SPF) record for your previous email provider, instead of creating a new SPF (TXT) record for Exchange Online, just add "include:outlook.com" to the current TXT record. For example, "v=spf1 mx include:adatum.com include:spf.protection.outlook.com ~all".
If you don't have an SPF record yet, modify the one recommended by Office 365 to include the domain for your current email provider, plus protection.outlook.com. This authorizes outgoing messages from both email systems.
Step 7: Set up email forwarding at your current provider
At your current email provider, set up forwarding for Margie and Mike's email accounts to your onmicrosoft.com domain:
-
Margie's A. Datum mailbox should forward to margie@cohowinery.onmicrosoft.com
-
Mike's A. Datum mailbox should forward to mike@cohowinery.onmicrosoft.com
When you complete this step:
-
All mail sent to margie@cohowinery.com and mike@cohowinery.com will be available in Office 365.
-
When Margie and Mike reply to mail they receive, the Reply-to address will be margie@cohowinery.com and mike@cohowinery.com.
Notes:
-
Contact your current email provider for the exact steps for setting up forwarding.
-
You don't need to keep a copy of messages at the current email provider.
-
Most providers forward email leaving the Reply-to address of the sender intact, so that replies go to the original sender.
Step 8: Test mail flow
-
Sign in to Outlook Web App using Margie's credentials.
-
Perform the following tests:
-
Test local Office 365 email. For example, send an email to Mike (mike@cohowinery.com). This email should be delivered immediately. In this scenario, the message will not be routed to Mike's mailbox on A. Datum because Office 365 sees the mailbox as being local.
-
Test email to someone who's on the other email system. For example, send an email to Sue. This email should be delivered to Sue's mailbox on the A. Datum server.
-
From an outside account, or from an employee's email account on the other email system, verify that forwarding is set up properly on the other email system. For example, from Sue's A. Datum account or a Hotmail account, send Margie an email and verify that it arrives in Margie's Office 365 mailbox.
-
Step 9: Move mailbox contents
Since there are only two users to move, and since Margie and Mike are both using Outlook already, the email can be moved by opening the old .PST file in the new Outlook profile and copying the messages, calendar items, contacts, etc. as shown in Import Outlook items from an Outlook Data File (.pst). Once organized in the proper locations in the Office 365 mailbox, the items can all be accessed from any device, anywhere.
When more mailboxes are involved, or if the employees are not already using Outlook, you can use the migration tools available in the Exchange admin center. To get started, go to Exchange admin center and follow the directions in Migrate Email from an IMAP Server to Exchange Online Mailboxes.
Set up Pilot configuration using the old Office 365 admin center
If you're still using the old Office 365 admin center, follow these steps.
Step 1: Sign in to O365 admin center
Use your admin credentials when you sign in.
-
Sign in to Office 365 with your work or school account.
Step 2: Verify that you own the domain you want to use
-
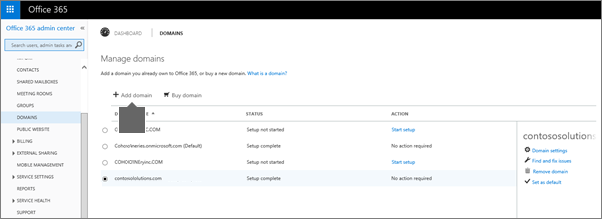
On the Manage domains page, choose Add domain.
-
Click Let's get started, and then on the next page, type the domain, in this example cohowinery.com. ClickNext.
-
In the drop-down list, select your DNS hosting provider, and follow the instructions to add a TXT record to show that you own the domain.
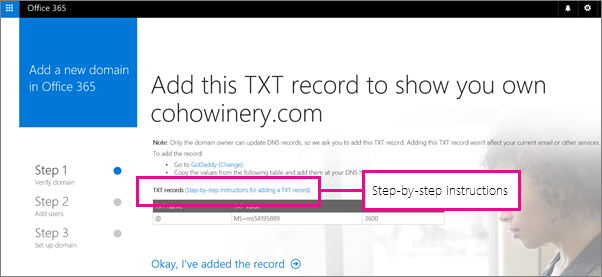
Important: If the instructions for verifying the domain show using an MX record, be careful when entering the Priority information. This MX record is only used for verifying that you own the domain, and is not used for mail routing. It must be lower priority than the existing MX record that routes email through A. Datum.
-
Choose Okay, I've added the record.
It takes between a few minutes and 72 hours for DNS changes to take effect.
-
When verification is successful, you'll be asked to modify your DNS records.
Step 3: Mark the domain as shared in Exchange Online
-
Go to the Exchange admin center (EAC).
-
In EAC, choose Mail flow, and then Accepted Domains.
-
Double-click the domain you want to modify, in this example, cohowinery.com.
-
In the window that opens, select Internal Relay.
-
Choose Save. This setting may require a few minutes to take effect.
Step 4: Optionally, unblock the existing email server
Office 365 uses Exchange Online Protection (EOP) for spam protection. If EOP detects a high volume of spam being forwarded by the A. Datum mail server, it may block the A. Datum server, which would prevent forwarding from working. If you are confident with the spam protection your other email provider uses, you can whitelist their server in Office 365. However, this will also allow any spam that arrives through A. Datum to come through to the Office 365 mailboxes, and you won't be able to evaluate how well Office 365 prevents spam.
-
Go to Exchange admin center (EAC).
-
In EAC, choose Protection, and then choose Connection filter.

-
In the IP Allow list, choose +, and add the mail server IP address that you can get from your current email provider.
Step 5: Create user accounts and set the primary (reply-to) address
-
Go to the Office 365 admin center.
-
On the left navigation bar, choose Users > Active Users.
-
Create the user accounts. In this example, we're creating accounts for Margie and Mike.
-
For each account choose + (New), and fill out the required information.
-
To keep Margie and Mike's email the same as it is currently, the User name field should be exactly the same as the user's existing email address.
-
-
Next to User name, select your custom domain name from the drop-down list.
-
-
Choose Create > Close.
Note: If you open the properties for Margie and Mike in EAC, notice that the @cohowinery.onmicrosoft.com address remains as an additional SMTP address.
Step 6: Update DNS records at your DNS hosting provider
Sign in to your DNS hosting provider's website, and follow the Create DNS records for Office 365 when you manage your DNS records for your specific provider. Make the following exceptions:
-
Do not create a new MX record or change your existing MX record.
-
If you already have a Sender Policy Framework (SPF) record for your previous email provider, instead of creating a new SPF (TXT) record for Exchange Online, just add "include:outlook.com" to the current TXT record. For example, "v=spf1 mx include:adatum.com include:spf.protection.outlook.com ~all".
If you don't have an SPF record yet, modify the one recommended by Office 365 to include the domain for your current email provider, plus protection.outlook.com. This authorizes outgoing messages from both email systems.
Step 7: Set up email forwarding at your current provider
At your current email provider, set up forwarding for Margie and Mike's email accounts to your onmicrosoft.com domain:
-
Margie's A. Datum mailbox should forward to margie@cohowinery.onmicrosoft.com
-
Mike's A. Datum mailbox should forward to mike@cohowinery.onmicrosoft.com
When you complete this step:
-
All mail sent to margie@cohowinery.com and mike@cohowinery.com will be available in Office 365.
-
When Margie and Mike reply to mail they receive, the Reply-to address will be margie@cohowinery.com and mike@cohowinery.com.
Notes:
-
Contact your current email provider for the exact steps for setting up forwarding.
-
You don't need to keep a copy of messages at the current email provider.
-
Most providers forward email leaving the Reply-to address of the sender intact, so that replies go to the original sender.
Step 8: Test mail flow
-
Sign in to Outlook Web App using Margie's credentials.
-
Perform the following tests:
-
Test local Office 365 email. For example, send an email to Mike (mike@cohowinery.com). This email should be delivered immediately. In this scenario, the message will not be routed to Mike's mailbox on A. Datum because Office 365 sees the mailbox as being local.
-
Test email to someone who's on the other email system. For example, send an email to Sue. This email should be delivered to Sue's mailbox on the A. Datum server.
-
From an outside account, or from an employee's email account on the other email system, verify that forwarding is set up properly on the other email system. For example, from Sue's A. Datum account or a Hotmail account, send Margie an email and verify that it arrives in Margie's Office 365 mailbox.
-
Step 9: Move mailbox contents
Since there are only two users to move, and since Margie and Mike are both using Outlook already, the email can be moved by opening the old .PST file in the new Outlook profile and copying the messages, calendar items, contacts, etc. as shown in Import Outlook items from an Outlook Data File (.pst). Once organized in the proper locations in the Office 365 mailbox, the items can all be accessed from any device, anywhere.
When more mailboxes are involved, or if the employees are not already using Outlook, you can use the migration tools available in the Exchange admin center. To get started, go to Exchange admin center and follow the directions in Migrate Email from an IMAP Server to Exchange Online Mailboxes.

I have followed the steps to the letter. It used to work, but now, emails are arriving at my main IMAP account but they are not being forwarded to my Office365 account. The forward to is the correct email, but not working at all. Any ideas?
ReplyDeleteMicrosoft Office Tutorials: Pilot Office 365 With A Few Email Addresses On Your Custom Domain >>>>> Download Now
ReplyDelete>>>>> Download Full
Microsoft Office Tutorials: Pilot Office 365 With A Few Email Addresses On Your Custom Domain >>>>> Download LINK
>>>>> Download Now
Microsoft Office Tutorials: Pilot Office 365 With A Few Email Addresses On Your Custom Domain >>>>> Download Full
>>>>> Download LINK Al