Insert a check mark
You can insert a check mark into your document in Word 2013 in several ways.
Insert a check mark using the Symbol command
-
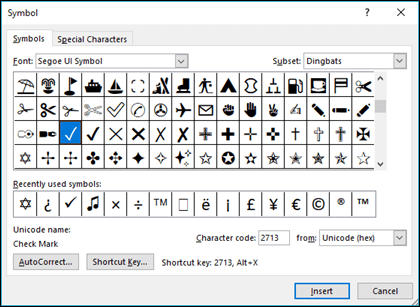
On the INSERT tab, in the Symbols group, click Symbol > More Symbols.
-
On the Symbols tab, in the Font drop-down menu, click Wingdings.
-
Scroll to the bottom of the list, and double-click the check mark symbol. The symbol is added to the symbol shortcut cloud.

-
Click INSERT > Symbol to insert a recently used symbol.
Note: There are several common check mark symbols in the list above. You can use any of them in your document by following the same steps.
Insert a check mark using character code
You can also use the character code of the symbol as a keyboard shortcut.
Note: You need to use the numeric keypad on your keyboard to type the numbers. Make sure that Num Lock is on when you type the numbers.
-
On the HOME tab, in the Font group, change the font to Wingdings.
-
Press and hold the Alt key, and type the character code.
The following table lists the character codes for the most common check marks:

Insert a check mark using AutoCorrect
To insert a symbol quickly without accessing any menus, assign a keystroke or text to the symbol.
-
On the INSERT tab, click Symbol > More Symbols.
-
On the Symbols tab, in the Font drop-down menu, select Wingdings.
-
Scroll to the bottom of the list, and click the symbol you want to use.
-
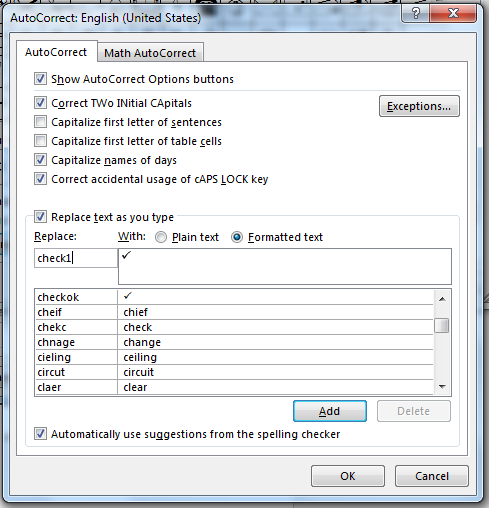
Click AutoCorrect.
The symbol you select will automatically appear in the With box.
-
In the Replace box, type a word or phrase that you want to associate with the check mark symbol, for example, type check1.

-
Click Add > OK.
-
Whenever you want to use the check mark symbol that you just defined, type the word that you used in step 4 to add the symbol.
Thanks for sharing this knowledge with us, I have a list of wingding translator tool websites
ReplyDelete