Find, hide, or eliminate duplicate data
This article explains how to find and hide or eliminate duplicate data by using Microsoft Office Access 2007. As a rule, you should delete duplicate values whenever possible to reduce costs and increase the accuracy of your data. Office Access 2007 provides a number of ways to find and hide or delete duplicate values, and this article explains how to use the most common methods.
What do you want to do?
Understand duplicate data
One of the primary reasons for using a relational database is to avoid duplicate data. However, as databases age, they often acquire duplicate values, especially when multiple users enter data. Typically, eliminating duplicate data saves money on storage and keeps your data more accurate. In turn, that accuracy can help you make better business decisions. For example, if you enter a sales order more than once, the customer might receive unneeded goods, and the redundancy can cost you money in increased shipping and accounting costs.
What duplication really means
Before you take action to identify and delete duplicate records, remember that you need to rely on your knowledge of the data. Unlike the process of designing a database, you cannot follow a set of specific rules or procedures to find and delete duplicate records accurately. Remember one fact as you proceed: database queries can return what seem to be duplicate records, but in reality, those results are valid data. The apparent duplication usually happens when you do not include fields in the query that uniquely identify each record. For more information about including the necessary fields in a query and avoiding false duplicates, see the section Understand when records are not duplicates, later in this article.
Also, you must remember that you can't delete all duplicate data, because some duplication is necessary for your database to work properly. Put another way, databases can contain both necessary and unnecessary redundancies, and you want to eliminate only the unnecessary redundancies.
Necessary redundancies usually fall into two categories. The first type of redundancy enables the database to function. For example, you duplicate the data in a primary key field whenever you need to establish a one-to-many or a many-to-many relationship between tables.
The second type of necessary redundancy arises as you use your database. For example, you might enter the name of a city, a supplier, or a common name, such as John Smith, many times. When that happens, you are not in danger of duplicating data because other fields in your database (such as primary key values, addresses, and postal codes) will contain enough unique information to keep the records from being considered duplicates.
Unnecessary redundancies can occur in a number of ways:
-
Two or more records can contain duplicate fields. Two records might be considered duplicates, even though not all fields of the records contain matching values. For example, in this figure, you see two records for Antonio Moreno Taquería.

Even though each record has a unique customer ID (the value in the left-most column), the values in the Name, Address, and City fields match. In such situations, even a partial match can be a good reason to use your knowledge of your business and review the records to see if they are duplicates.
-
Two or more tables can contain similar data. For example, you might find that a Customers table and a Clients table both contain records for the same customers.
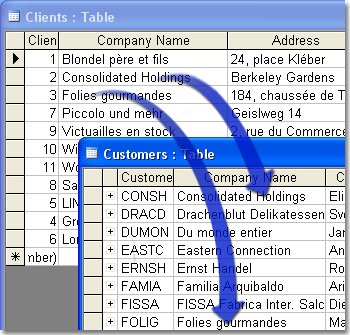
Even though the tables might have different structures, both tables contain the same kind of information — customer data — so you should consider merging any unique (non-duplicate) values into a single table and eliminating the extra table.
-
Two or more databases can contain similar data. If you find that two or more databases contain similar data, or you inherit a database that overlaps with your current database, you must compare the data and structure of the databases and then take necessary steps to consolidate them.
Manually comparing databases, even small ones, is not an easy task. If you need help with a comparison, several third-party vendors sell tools for comparing the contents and structure of Access databases.
Note: If you take steps to eliminate duplicate data from your tables and you still see duplicate data in a form or report, it might be due to incorrect design of a form or report. Make sure that the underlying tables and queries are joined properly, and that the form or report sections do not include more than one control that is bound to the same control source.
For more information about report design, see the article Modify, edit, or change a report.
Understand when records are not duplicates
In some situations, such as when you look at data returned by a query, you might see what appear to be duplicate records, even though the underlying tables seem to contain only unique records. Problems can arise when your view does not include fields that uniquely identify a record. For example, this figure shows data returned by a query.
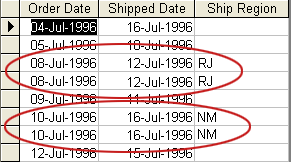
In this view, several records appear to be duplicates. If you add one or more additional fields to the query, such as the names of the customers or the primary key fields for each order (Order ID), you will see that each record is actually unique, like so:
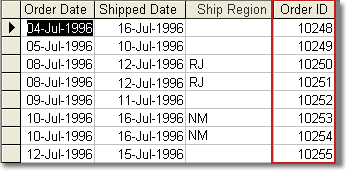
As a rule, when you create a query, you should include the field or fields that identify each record uniquely. Typically, a primary key field serves that function, but you can use combinations of other fields instead. For example, you have many instances of a common contact name and many instances of a city name, but if you include a phone number and an address, that combination of data should make each record unique.
Factors to consider when dealing with duplication
How you deal with duplicate records depends on several factors:
-
The nature and extent of duplication Do you see duplicate data within a single table, or do you see two similar tables (in the same database or in two different databases) with overlapping data? Or, do you see duplicate records in a view that is based on two or more related tables?
-
Your specific requirements What do you want to do with the duplicate data? Do you want to delete the records from the database, or only hide them from your view? Or, do you want to count, average, or sum the values in the duplicate records? Does it matter which of the duplicate records are deleted or hidden? If it does, do you want to manually review and delete the records, or delete those records based on a condition? Do you also want to update or consolidate one or more records before you start deleting records?
The answers to those questions (or those types of questions), plus your knowledge of the data, should enable you to create a plan for dealing with redundant data.
General preparations for removing duplicates
If you choose to delete your duplicate records, you must first deal with any existing table relationships. Typically, most databases use one-to-many relationships. For example, you might have a small number of customers, but each customer places many orders. As a result, the table of customer data resides on the "one" side of the relationship, and the order data resides on the "many" side of the relationship.
Remember this rule as you proceed: if the data that you want to delete resides on the "many" side of a relationship, you can delete data without taking additional steps. However, if the data resides on the "one" side, you must set a property in the relationship, or Access will prevent the deletion.
For more information about deleting data on the "one" side, see the article Use a delete query to delete one or more records from a database.
Before you start deleting redundant data, consider one or more of these ways to prepare your database:
-
Make sure that the database is not read-only.
-
Make sure that you have the necessary permissions to edit or delete records in the database.
-
Ask all other users of the database to close the objects that you want to work with. This helps avoid lock violations.
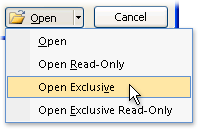
Tip: If a large number of users connect to the database, you might need to close the database and reopen it in exclusive mode. To do so, click the Microsoft Office Button
 in Access, and then click Open. Browse to and select the database, click the arrow next to the Open button, and then click Open Exclusive.
-
Back up your database before you delete records. You cannot reverse or undo a delete operation. The only way to recover deleted records is to restore them from a backup. A delete operation might also delete records in related tables, so it is best to back up the entire database before starting the operation.
Back up a database
-
Click the Microsoft Office Button
 , click the arrow next to Manage, and then click Back Up Database.
The Save As dialog box appears, and Access appends the current date to the file name. For example, if you have a database named Assets, Access creates the following type of file name: Assets_2006-10-29.
-
Accept the default name and location, or select another name or location, and then click Save.
Access closes the original file, creates a backup, and then reopens the original file.
To revert to a backup, close and rename the original file so that the backup copy can use the name of the original version. Assign the name of the original version to the backup copy, and open it in Access.
-
Prepare some sample data
The how-to sections in this article provide tables of sample data. The how-to steps use the sample tables to help you understand how the queries work. If you prefer, you can optionally enter or import the sample tables into a new or existing database.
Access provides several ways to add these sample tables to a database. You can enter the data manually, you can copy each table into a spreadsheet program ( such as Office Excel 2007) and then import the worksheets into Access, or you can paste the data into a text editor, such as Notepad, and then import the data from the resulting text files.
The steps in this section explain how to enter data manually in a blank datasheet, and also how to copy the sample tables to Excel and then import those tables into Access 2007. For more information about creating and importing text data, see the article Import or link to data in a text file.
The how-to steps in this article use the following tables:
The Customers table:
| Company Name | Contact Name | Address | City | Postal Code | Phone |
| Baldwin Museum of Science | Josh Barnhill | 1 Main St. | New York | 12345 | (505) 555-2122 |
| Blue Yonder Airlines | Waleed Heloo | 52 1st St. | Boston | 23456 | (104) 555-2123 |
| Coho Winery | Pica Guido | 3122 75th Ave. S.W. | Seattle | 34567 | (206) 555-2124 |
| Contoso Pharmaceuticals | Jean Philippe Bagel | 1 Contoso Blvd. | London | NS1 EW2 | (171) 555-2125 |
| Fourth Coffee | Julian Price | Calle Smith 2 | Mexico City | 56789 | (7) 555-2126 |
| Coho Winery | Christine Hughes | 3122 75th St. S. | Seattle | 34567 | (206) 555-2125 |
| Humongous Insurance | Steve Riley | 67 Big St. | Tampa | 01234 | (916) 555-2128 |
| Trey Research | Dana Birkby | 2 Nosey Pkwy | Portland | 43210 | (503) 555-2129 |
| Fourth Coffee | Reshma Patel | Calle Smith 2 | Mexico City | 56789 | (7) 555-2233 |
The Employees table:
| Last Name | First Name | Address | City | Birth Date | Hire Date |
| Barnhill | Josh | 1 Main St. | New York | 05-Feb-1968 | 10-Jun-1994 |
| Heloo | Waleed | 52 1st St. | Boston | 22-May-1957 | 22-Nov-1996 |
| Guido | Pica | 3122 75th Ave. S.W. | Seattle | 11-Nov-1960 | 11-Mar-2000 |
| Bagel | Jean Philippe | 1 Contoso Blvd. | London | 22-Mar-1964 | 22-Jun-1998 |
| Price | Julian | Calle Smith 2 | Mexico City | 05-Jun-1972 | 05-Jan-2002 |
| Hughes | Christine | 3122 75th St. S. | Seattle | 23-Jan-1970 | 23-Apr-1999 |
| Riley | Steve | 67 Big St. | Tampa | 14-Apr-1964 | 14-Oct-2004 |
| Birkby | Dana | 2 Nosey Pkwy | Portland | 29-Oct-1959 | 29-Mar-1997 |
| Bagel | Jean Philippe | 1 Contoso Blvd. | London | 22-Mar-1964 | 20-Jun-1998 |
The Amount Owed table:
| Company Name | Contact Name | Address | City | Postal Code | Phone | Amount Due |
| Baldwin Museum of Science | Josh Barnhill | 1 Main St. | New York | 12345 | (505) 555-2122 | $556.78 |
| Blue Yonder Airlines | Waleed Heloo | 52 1st St. | Boston | 23456 | (104) 555-2123 | $1,893.24 |
| Coho Winery | Pica Guido | 3122 75th Ave. S.W. | Seattle | 34567 | (206) 555-2124 | $321.79 |
| Contoso Pharmaceuticals | Jean Philippe Bagel | 1 Contoso Blvd. | London | NS1 EW2 | (171) 555-2125 | £457.68 |
| Fourth Coffee | Julian Price | Calle Smith 2 | Mexico City | 56789 | (7) 555-2126 | $98.75 |
| Coho Winery | Christine Hughes | 3122 75th St. S. | Seattle | 34567 | (206) 555-2125 | $321.79 |
| Humongous Insurance | Steve Riley | 67 Big St. | Tampa | 01234 | (916) 555-2128 | $297.45 |
| Trey Research | Dana Birkby | 2 Nosey Pkwy | Portland | 43210 | (503) 555-2129 | $509.09 |
| Fourth Coffee | Reshma Patel | 2 Calle Smith | Mexico City | 56789 | (7) 555-2233 | $98.75 |
The Clients table:
| Name | Address | City | Phone | Fax |
| Baldwin Museum of Science | 1 Main St. | New York | (505) 555-2122 | (505) 555-2122 |
| Blue Yonder Airlines | 52 1st St. | Boston | (104) 555-2123 | (104) 555-2123 |
| Coho Winery | 3122 75th Ave. S.W. | Seattle | (206) 555-2124 | (206) 555-2124 |
| Contoso Pharmaceuticals | 1 Contoso Blvd. | London | (171) 555-2125 | (171) 555-2125 |
| Fourth Coffee | Calle Smith 2 | Mexico City | (7) 555-2126 | (7) 555-2126 |
| Consolidated Messenger | 3122 75th St. S. | Seattle | (206) 555-2125 | (206) 555-2129 |
| Graphic Design Institute | 67 Big St. | Tampa | (916) 555-2128 | (916) 555-2128 |
| Litware, Inc. | 3 Microsoft Way | Portland | (503) 555-2129 | (503) 555-2110 |
| Tailspin Toys | 4 Microsoft Way | Portland | (503) 555-2233 | (503) 555-2239 |
Enter the sample data manually
-
On the Create tab, in the Tables group, click Table.

Access adds a new, blank table to your database.
Note: You do not need to follow this step if you open a new, blank database, but you will need to follow it whenever you need to add a table to the database.
-
Double-click the first cell in the header row and type the name of the field in the sample table.
By default, Access denotes blank fields in the header row with the text Add New Field, like so:

-
Use the arrow keys to move to the next blank header cell, and then type the second field name (you can also press TAB or double-click the new cell). Repeat this step until you enter all field names.
-
Enter the data in the sample table.
As you enter the data, Access infers a data type for each field. If you are new to relational databases, you should set a specific data type, such as Number, Text, or Date/Time, for each of the fields in your tables. Setting data types help ensure accurate data entry and also helps prevent mistakes, such as using a telephone number in a calculation. For these sample tables, you should let Access infer the data type.
-
When you finish entering the data, click Save.
Keyboard shortcut Press CTRL+S.
The Save As dialog box appears.
-
In the Table Name box, type the name of the sample table, and then click OK.
You use the name of each sample table because the queries in the how-to sections use those names.
Create the sample worksheets
-
Start your spreadsheet program and create a new, blank file. If you use Excel, a new, blank workbook is created by default.
-
Copy the first sample table from the preceding section and paste it into the first worksheet, starting at the first cell.
-
Using the technique provided by your spreadsheet program, give the worksheet the same name as the sample table. For example, if the sample table is named Categories, give your worksheet the same name.
-
Repeat steps 2 and 3, copying each sample table to a blank worksheet and renaming the worksheet.
Note: You might need to add worksheets to your spreadsheet file. For information on doing that task, see the help for your spreadsheet program.
-
Save the workbook to a convenient location on your computer or your network, and go to the next set of steps.
Create database tables from the worksheets
-
In a new or existing database:
On the External Data tab, in the Import group, click Excel.

-or-
Click More, and then select a spreadsheet program from the list.
The Get External Data - Program Name Spreadsheet dialog box appears.
-
Click Browse, open the spreadsheet file that you created in the previous steps, and then click OK.
The Import Spreadsheet Wizard starts.
-
By default, the wizard selects the first worksheet in the workbook (Customers, if you followed the steps in the previous section), and data from the worksheet appears in the lower section of the wizard page. Click Next.
-
On the next page of the wizard, click First row contains column headings, and then click Next.
-
Optionally, on the next page, use the text boxes and lists under Field Options to change field names and data types, or to omit fields from the import operation. Otherwise, click Next.
-
Leave the Let Access add primary key option selected, and then click Next.
-
By default, Access applies the name of the worksheet to your new table. Accept the name or enter another name, and then click Finish.
-
Repeats steps 1 through 7 until you create a table from each worksheet in the Excel workbook.
Find and edit, hide, or delete duplicate data in a single table
The steps in the following sections explain the most common ways to find and edit, hide, or delete duplicate values in a single table.
Find records where some fields wholly or partially match
The process of finding records that contain whole or partial matching values follows these broad steps:
-
Create a query by using the Find Duplicates Wizard. By default, the query returns matching records only when the values in each field match character for character. If you need to find partial matches, you can use an expression in your query, or you can alter the Structured Query Language (SQL) code.
-
Optionally, edit the field values or delete records when viewing the query results in Datasheet view.
-
Optionally, alter the Structured Query Language (SQL) code in the query to look for values that partially match. If you don't alter the SQL code, the query returns only those records where the values in the specified fields match character for character.
The steps in this section explain how to create a duplicates query, and how to alter the query to look for partial matches. The steps use the Customers table provided in the following table. To use the table in a database, see the section Prepare some sample data, earlier in this document. You can adapt the steps to fit your data.
| Company Name | Contact Name | Address | City | Postal Code | Phone |
| Baldwin Museum of Science | Josh Barnhill | 1 Main St. | New York | 12345 | (505) 555-2122 |
| Blue Yonder Airlines | Waleed Heloo | 52 1st St. | Boston | 23456 | (104) 555-2123 |
| Coho Winery | Pica Guido | 3122 75th Ave. S.W. | Seattle | 34567 | (206) 555-2124 |
| Contoso Pharmaceuticals | Jean Philippe Bagel | 1 Contoso Blvd. | London | NS1 EW2 | (171) 555-2125 |
| Fourth Coffee | Julian Price | Calle Smith 2 | Mexico City | 56789 | (7) 555-2126 |
| Coho Winery | Christine Hughes | 3122 75th St. S. | Seattle | 34567 | (206) 555-2125 |
| Humongous Insurance | Steve Riley | 67 Big St. | Tampa | 01234 | (916) 555-2128 |
| Trey Research | Dana Birkby | 2 Nosey Pkwy | Portland | 43210 | (503) 555-2129 |
| Fourth Coffee | Reshma Patel | Calle Smith 2 | Mexico City | 56789 | (7) 555-2233 |
Create the duplicates query
-
On the Create tab, in the Other group, click Query Wizard.

-
In the New Query dialog box, click Find Duplicates Query Wizard, and then click OK.
If an alert message appears and tells you that the feature is not installed, click Yes to install the wizard.
-
In the list of tables, select the table that contains your duplicate data, and then click Next.
-
In the list of available fields, select only the field or fields that contain duplicate information. If you use the Customers table, add only the Company Name, Address, and City fields, because those are the only fields that contain character-for-character matching values. Click Next.
Note: If the fields that you add in this step do not contain character-for-character matches, the query might not return any results.
-
In the next list of available fields, select the field or fields that contain the data that you want to inspect or update, or those that contain data that can help you distinguish duplicate from non-duplicate records. If you use the Customers table, you add the Contact Name and Phone fields, because the data in those fields can help you find the duplicate values and possibly identify why the values were entered. Click Next.
-
Accept the suggested name (Find duplicates for Customers) or enter your own name, and then click Finish to run the query. If you used the Customers table, you see this result:
| Company Name | Address | City | Contact Name | Phone |
| Fourth Coffee | Calle Smith 2 | Mexico City | Julian Price | (7) 555-2126 |
| Fourth Coffee | Calle Smith 2 | Mexico City | Reshma Patel | (7) 555-2233 |
-
When you created the Customers table, you might have noticed more than two duplicate records (the table contains four). You don't see the other duplicates because the values in the Address field don't match character-for-character. You can modify the query to return values that partially match — the next set of steps explains how.
Customize the query to find partial matches
-
Switch the query to SQL view. To do so, you can:
-
Right-click the document tab for the query, and then click SQL View.
-
In the Navigation Pane, right-click the query, and then click SQL View.
-
-
Modify the SQL code to find and compare partial values.
If you used the Customers table in the previous steps, you see the following SQL statement:
SELECT Customers.[Company Name], Customers.[Address], Customers.[City], Customers.[Contact Name], Customers.[Phone]
FROM Customers
WHERE (((Customers.[Company Name]) In (SELECT [Company Name] FROM [Customers] As Tmp GROUP BY [Company Name],[Address],[City] HAVING Count(*)>1 And [Address] = [Customers].[Address] And [City] = [Customers].[City])))
ORDER BY Customers.[Company Name], Customers.[Address], Customers.[City];In this case, the WHERE clause uses a second SELECT statement to compare each record against all the other records in the table to identify sets of duplicates.
Suppose that you need to modify the Address field to return partial matches. The following table shows how to modify the statement so that only the first seven characters of the field must match. The modifications appear in bold type:
| SQL statement | Description |
| SELECT Customers.[Company Name], Customers.[Address], Customers.[City], Customers.[Contact Name], Customers.[Phone] | No changes. You want to see the same fields, including the entire Address field for each set of duplicate records. |
| FROM Customers | No change. |
| WHERE (((Customers.Company Name) In (SELECT [Company Name] FROM [Customers] As Tmp GROUP BY [Company Name],Left([Address],7) ,[City] HAVING | Replace the field ([Address]) with a function call that operates on the Address field (Left([Address],7)) to determine duplication. This tests the first seven characters in the Address field instead of the entire field value. To match fewer characters, enter a smaller number. To match more characters, enter a larger number. |
| Count(*)>1 And Left([Address],7) =Left([Customers].[Address],7) And [City] = [Customers].[City]))) | To compare the first seven characters in the Address field of one record with that of another record, replace [Address] with the Left([Address],7) function call, and replace [Customers].[Address] with the Left([Customers].[Address],7) function call. |
| ORDER BY Customers.Company Name, Customers.Address, Customers.City; | No change. |
-
After you finish modifying the statement, click Run
 to run the query and display the results in Datasheet view.
The query now returns all four duplicate records, because now it matches only the first 7 characters (starting from the left) in the Address field:
| Company Name | Address | City | Contact Name | Phone |
| Coho Winery | 3122 75th Ave. S.W. | Seattle | Pica Guido | (206) 555-2124 |
| Coho Winery | 3122 75th St. S.W | Seattle | Christine Hughes | (206) 555-2125 |
| Fourth Coffee | Calle Smith 2 | Mexico City | Julian Price | (7) 555-2126 |
| Fourth Coffee | Calle Smith 2 | Mexico City | Reshma Patel | (7) 555-2233 |
Manually edit records
-
Open, in Datasheet view, the query that you created in the previous sets of steps.
-
Do one of the following:
-
To edit the value in a field, select the field and enter a new value.
-
To delete an entire record (a row), click the row selector (the empty box next to the row) and press DELETE.
Note: If you find a large number of duplicate records (more than you care to delete by hand), you can delete those records by creating and running a delete query. For the basic steps involved in creating and running a delete query, see the section Use a delete query to delete duplicate records, later in this topic.
For more complete information about using delete queries, including information on how to plan a deletion and how to change table relationships and delete related data, see the article Use a delete query to delete one or more records from a database.
-
Show unique records by hiding any duplicates
Most database tables have a field that uniquely identifies each record, usually a primary key field. When you design a query and you hide or omit those types of fields, you might see what appear to be duplicate records because the values in all of the returned fields match.
For example, this figure shows a query result in which two orders (in the red box) appear to be duplicates.
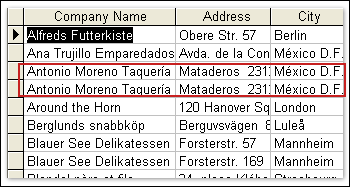
However, if the query included a primary key field, such as an order ID, or some other field that uniquely identified each record, such as a ship date, you would see that the records are not duplicates. The steps in this section explain how to hide duplicate records where the values in all fields returned by the query match. For example, you can hide one of the records for Antonio Moreno Taqueria, but you cannot hide the records for Blauer See Delikatessen because the Address fields contain different values.
Remember this rule as you proceed: Two or more records are considered duplicates only when all the fields in your query results contain the same values. If the values in even a single field differ, each record is unique, and you cannot hide those records by using the techniques shown here. If you want to hide those kinds of duplicate records, you can do so by using a totals query with an aggregate function, such as FIRST, MIN, MAX, and so on. For information on doing so, see the section, Show distinct records by specifying which duplicate appears in your results, later in this article.
Access provides two ways to display only unique values in a query result set:
-
If you hid the primary key field (or some other field that makes a record unique), unhide that column.
-
Create a select query, and then set the Unique Values property of the query to Yes. When the query finds duplicate values, it displays only one of those duplicates (the first one it finds) and hides the rest.
The steps in this section explain how to use both techniques.
Show hidden fields
-
With your query open in Datasheet view, right-click anywhere on the header row (the row that contains your column headers), and click Unhide Columns.
-
In the Unhide Columns dialog box, select the check box next to each of the fields that you want to add to your datasheet, and then click OK.
Set the Unique Values property
Note: After you set the Unique Values property of a query to Yes, you cannot edit field values or delete data when the query is in Datasheet view. To edit or delete data, open the underlying table in Datasheet view.
-
On the Create tab, in the Other group, click Query Wizard.

-
In the New Query dialog box, click Simple Query Wizard, and then click OK.
If an alert message appears and tells you the feature is not installed, click Yes to install the wizard.
-
In the list of tables, select the table that contains duplicate records, and then click Next.
-
In the list of available fields, select only the field or fields that contain the duplicate information, and then click Next.
-
Click Next again without selecting any additional fields. Adding any other fields can cause Access to treat some duplicate records as unique records.
-
Accept the suggested name for the query, or enter a name of your own, click Modify the query design, and then click Finish to open the query in Design view.
-
Right-click the empty area in the top half of the query designer, and then click Properties.
-
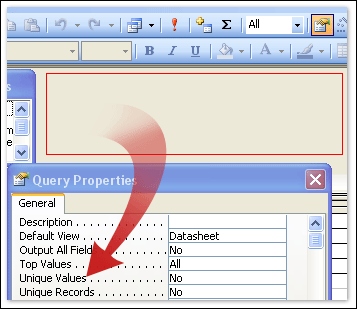
In the property sheet, locate the Unique Values property and change it to Yes.
-
Click Run
 to run the query and display the results in Datasheet view. If your data contains duplicate records, only one of those records appears.
Show distinct records by specifying which duplicate appears in your results
When you have duplicate records, you might want to see only distinct values — one record out of each set of duplicates. To query for a specific duplicate record, you use a type of query called a totals query. When you add fields to a totals query, the query treats each field as a group, and you can run a type of function called an aggregate function on the data in a group. In turn, those functions can return one record from a set of duplicates.
You can use a totals query and an aggregate function with that data in several ways:
-
Use the First function to show only the record that was entered first.
-
Use the Last function to show only the record that was entered last.
-
Use the Max or Min function to show only the record with the smallest or largest value in a specific field. For example, you can show the record with the most recent date by using the Max function, or show the record with the earliest date by using the Min function.
Note: You cannot edit the data that this type of query returns. To edit or delete data, open the underlying table in Datasheet view.
The steps in this section explain how to query for original, most recent, and oldest records. The steps use the Employees table.
| Last Name | First Name | Address | City | Birth Date | Hire Date |
| Barnhill | Josh | 1 Main St. | New York | 05-Feb-1968 | 10-Jun-1994 |
| Heloo | Waleed | 52 1st St. | Boston | 22-May-1957 | 22-Nov-1996 |
| Guido | Pica | 3122 75th Ave. S.W. | Seattle | 11-Nov-1960 | 11-Mar-2000 |
| Bagel | Jean Philippe | 1 Contoso Blvd. | London | 22-Mar-1964 | 22-Jun-1998 |
| Price | Julian | Calle Smith 2 | Mexico City | 05-Jun-1972 | 05-Jan-2002 |
| Hughes | Christine | 3122 75th St. S. | Seattle | 23-Jan-1970 | 23-Apr-1999 |
| Riley | Steve | 67 Big St. | Tampa | 14-Apr-1964 | 14-Oct-2004 |
| Birkby | Dana | 2 Nosey Pkwy | Portland | 29-Oct-1959 | 29-Mar-1997 |
| Bagel | Jean Philippe | 1 Contoso Blvd. | London | 22-Mar-1964 | 20-Jun-1998 |
If you want to use the table in a database, see the steps in Prepare some sample data, earlier in this article.
Use a totals query
-
On the Create tab, in the Other group, click Query Design.

-
In the Show Table dialog box, double-click the table that contains the duplicate data, and then click Close.
The table appears in the upper section of the query designer.
-
Add only the field or fields that contain the duplicate data. You can double-click a field, or drag it from the table window to the Field row in the design grid.
If you use the sample Employees table, add the Last Name, First Name, and Birth Date fields, because those fields determine duplication.
-
Add the field that specifies your selection criteria.
In the sample Employees table, you add the Hire Date field, because that field contains two different values for the employee.
Note: Do not add more fields to the grid. A totals query must include only the field or fields that contain duplicate data and one other field that contains the data for use in your test.
-
On the Design tab, in the Show/Hide group, click Totals
 . The Total row appears in the design grid, and Group By appears in the columns that contain your table field.
 -
Leave the Total row for all fields set to Group by, and then click Run
 to run the query and show the results in Datasheet view. If you used the data from the table above, the query returns "Jean Philippe Bagel" twice because his duplicate records have different hire dates.
 -
Change back to Design view, and specify a condition for selecting one record from among the duplicates. To use the sample data, change the value in the Hire Date column in the Total row as follows:
-
To view the original record, change the value to First.
-
To view the most recently entered record, change the value to Last.
-
To pick a record based on the value in a specific field, you need to use the Max or Min function. In this example, you want to view the record with the oldest hire date. To do this, change the value to Min.
-
-
Click Run
 to run the query and show the results in Datasheet view.
If your query produces the desired results, you can then change it to a delete query and run it to delete your duplicate records quickly and easily. For information about running a delete query, see the section Use a delete query to delete duplicate records, later in this article.
Use aggregate functions (Count, Sum, Average) on duplicate records
In addition to returning a specific record from among a group of duplicates, you can also use aggregate functions to count the number of duplicate records or summarize the data for a set of duplicates. Typically, you run these function before you take any steps to consolidate or delete your duplicate data.
You perform those tasks by creating a totals query that uses the aggregate functions, such as Count, Sum, and Average, to summarize the duplicate data in a table.
Note: You cannot edit the field values or delete records when viewing a totals query in Datasheet view. To edit or delete data, open the underlying table in Datasheet view.
The steps in this section use the Amount Owed table.
| Company Name | Contact Name | Address | City | Postal Code | Phone | Amount Due |
| Baldwin Museum of Science | Josh Barnhill | 1 Main St. | New York | 12345 | (505) 555-2122 | $556.78 |
| Blue Yonder Airlines | Waleed Heloo | 52 1st St. | Boston | 23456 | (104) 555-2123 | $1,893.24 |
| Coho Winery | Pica Guido | 3122 75th Ave. S.W. | Seattle | 34567 | (206) 555-2124 | $321.79 |
| Contoso Pharmaceuticals | Jean Philippe Bagel | 1 Contoso Blvd. | London | NS1 EW2 | (171) 555-2125 | £457.68 |
| Fourth Coffee | Julian Price | Calle Smith 2 | Mexico City | 56789 | (7) 555-2126 | $98.75 |
| Coho Winery | Christine Hughes | 3122 75th St. S. | Seattle | 34567 | (206) 555-2125 | $321.79 |
| Humongous Insurance | Steve Riley | 67 Big St. | Tampa | 01234 | (916) 555-2128 | $297.45 |
| Trey Research | Dana Birkby | 2 Nosey Pkwy | Portland | 43210 | (503) 555-2129 | $509.09 |
| Fourth Coffee | Reshma Patel | 2 Calle Smith | Mexico City | 56789 | (7) 555-2233 | $98.75 |
If you want to use the table in a database, see the steps in Prepare some sample data, earlier in this article.
Create a totals query
-
On the Create tab, in the Other group, click Query Design.

-
In the Show Table dialog box, double-click the table that you want to use in the query, or click Add, and then click Close to close the dialog box. If you are using the sample data, add the Amount Owed table to the query.
-
Add the fields that contain duplicate data.
If you use the Amount Owed table, you add the Company Name and City fields, because those fields determine duplication.
-
Add the field that provides selection criteria. If you use the Amount Owed table, you add the Amount Due field.
-
On the Design tab, in the Show/Hide group, click Totals
 The Total row appears in the design grid, and Group By appears in the row for each field.
 -
Do one of the following, depending on your requirements:
-
To count a number of records, select the field that contains the values that you want to count, and then change the value in the field in the Total row to Count. If you are using the sample data, set the value in the Amount Due field to Count.
-
To calculate a total amount, set the value in the field to Sum.
Note: A totals query can display only summary information. You cannot show the individual values.
-
-
Click Run
 to run the query and display the results in Datasheet view.
Use a delete query to delete duplicate records
After you confirm that a table contains duplicate records, you can delete the unwanted data by creating and running a delete query. The process of creating and running a delete query typically follows these broad steps:
-
Plan the deletion. As part of this process, you determine whether the data that you want to delete is related to the data in another table. If so, you need to determine if the data resides on the "one" side of a one-to-many relationship or on the "many" side of the relationship. If the data resides on the "one" side, you must enable a property in the relationship before you can delete data. If the data resides on the "many" side, you can create and run your query without taking that additional action. You can use the Relationships tool to investigate the relationships in a database. To start the Relationships tool, on the Database Tools tab, in the Show/Hide group, click Relationships.
For more information about planning and running delete queries, see the article Use a delete query to delete one or more records from a database.
-
Create a query, such as a select or unique-values query, and add or change any criteria until the query returns only the data that you want to delete.
-
Convert that query into a delete query, and then run the delete query to delete the unwanted data.
Important: You cannot undo the results of a delete query. For that reason, you should back up your database before you run your delete query. For information about backing up your database, see the section Back up a database, earlier in this article.
The following steps explain how to create a select query, convert it to a delete query, and run it to delete records.
Create a select query
-
On the Create tab, in the Other group, click Query Design.

The query designer opens, and the Show Table dialog box appears.
-
Select the table on the "one" side of the relationship, click Add, and then click Close.
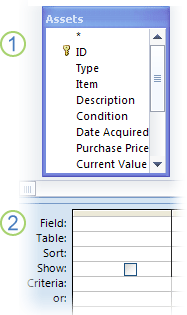
The table appears as a window in the upper section of the query design grid. The window lists all of the fields in the table. This figure shows a typical table in the query designer.
-
Double-click the asterisk (*) to add all of the fields in the table to the design grid.
Adding all the table fields enables the delete query to delete entire records (rows) from the table.
-
Optionally, add a column that allows you to enter criteria.
For example, suppose that a customer goes out of business and you need to delete all of the pending orders for that customer. To find just those records, you add the Customer ID and Order Date fields to the design grid.
-
If you followed the preceding step, enter your criteria in the Criteria row of the design grid.
You must use criteria to return only the records that you want to delete. Otherwise, the delete query deletes every record in the table. To continue the example from the preceding step, you enter the ID number of the customer that went out of business and the date on which that customer's orders became invalid.
For more information about using criteria, see the article Use a delete query to delete one or more records from a database.
-
If you followed the preceding step, clear the Show check box for each criteria field.
-
On the Design tab, in the Results group, click Run.
Verify that the query returns the records that you want to delete.
-
Keep the query open, and then go on to the next steps.
Convert the select query into a delete query and run the query to delete data
-
Click Design View to switch from the datasheet to the query designer.
-
On the Design tab, in the Query Type group, click Delete.
Access changes the select query to a delete query, hides the Show row in the lower section of the design grid, and adds the Delete row.
Ensure that the Delete row in the * (all fields) column displays From. The word Where should appear in any criteria columns.
-
Ensure that you want to delete the data, and then click Run
 to run the query and see the results in Datasheet view.
Access prompts you to confirm the deletion.
Click Yes to delete the data.
Hide the confirmation message
Follow these steps if you do not want to see a confirmation message each time you run a delete query or other action query.
-
Click the Microsoft Office Button
 , and then click Access Options.
The Access Options dialog box appears.
-
Click Advanced, and in the Editing section, under Confirm, clear the Action queries check box.
-
Click OK to close the Access Options dialog box.
Prevent users from entering duplicate values
You can prevent users from entering duplicate data by enforcing several rules:
-
Set a field to contain only unique values. To implement this rule, do one of the following:
-
Designate the field as a primary key. You can do this only if the table does not already have a primary key. To set the field as a primary key, open the table in Design view, right-click the field name, and then click Primary Key
 . A primary key field accepts only unique values and will prompt users if they enter a duplicate value.
 -
If the table already has a primary key, set the Indexed property of the field to Yes (No Duplicates) in table Design view. This property prevents the field from accepting the same value for more than one record. Remember that in some cases, such as fields that contain name and city information, you must accept duplicates.
-
-
Specify that a combination of values in two or more fields must be unique for each record. For example, suppose you have a table of contact data. You can designate a combination of fields, such as Contact Name, Address, and City, as the primary key for the table.
That approach works because it is highly unlikely that two contacts with the same name also share the same address and city.
To create a multi-field primary key, follow these steps:
-
Open the table in Design view.
-
Click the row selector to the left of the first field so that the entire row is selected.
-
Hold down CTRL while you click the row selector for any other fields that you want to include in the primary key.
-
Right-click, and then click Primary Key
 on the shortcut menu.
This step sets the Indexed property of each field in the primary key to Yes (Duplicates OK) so that, for example, you can enter the same name, or address, or city in multiple records, but you cannot enter an identical combination of name, address, and city in more than one record. For example, you can have two contacts named Jean Philippe Bagel who live at 2345 Main Street, but they cannot both live in London.
-
Find and edit, hide, or delete duplicate data in multiple tables
The information in the following sections explains some of the ways that you can find and edit, hide, or delete duplicate records that exist in multiple tables. Typically, the data in two or more tables overlap when you try to integrate one database with another.
-
Where duplicates exist in two tables, show them adjacent to each other
-
View only records in one table that don't have a matching record in another table
-
Delete duplicate records from one table and merge the remaining records into another table
-
See only the distinct records when viewing data from related tables
-
See a specific record or summarize duplicate data in related tables
Where duplicates exist in two tables, show them adjacent to each other
Often, you might end up with two tables that contain duplicate or overlapping data in the same database. For example, suppose you have a Clients table and a Customers table:
The Clients table
| Name | Address | City | Phone | Fax |
| Baldwin Museum of Science | 1 Main St. | New York | (505) 555-2122 | (505) 555-3123 |
| Blue Yonder Airlines | 52 1st St. | Boston | (104) 555-2123 | (104) 555-2124 |
| Coho Winery | 3122 75th Ave. S.W. | Seattle | (206) 555-2124 | (206) 555-2125 |
| Contoso Pharmaceuticals | 1 Contoso Blvd. | London | (171) 555-2125 | (171) 555-2126 |
| Fourth Coffee | Calle Smith 2 | Mexico City | (7) 555-2126 | (7) 555-2127 |
| Consolidated Messenger | 3122 75th St. S. | Seattle | (206) 555-2125 | (206) 555-2129 |
| Graphic Design Institute | 67 Big St. | Tampa | (916) 555-2128 | (916) 555-2128 |
| Litware, Inc. | 3 Microsoft Way | Portland | (503) 555-2129 | (503) 555-2110 |
| Tailspin Toys | 4 Microsoft Way | Portland | (503) 555-2233 | (503) 555-2239 |
The Customers table
| Company Name | Contact Name | Address | City | Postal Code | Telephone |
| Baldwin Museum of Science | Josh Barnhill | 1 Main St. | New York | 12345 | (505) 555-2122 |
| Blue Yonder Airlines | Waleed Heloo | 52 1st St. | Boston | 23456 | (104) 555-2123 |
| Coho Winery | Pica Guido | 3122 75th Ave. S.W. | Seattle | 34567 | (206) 555-2124 |
| Contoso Pharmaceuticals | Jean Philippe Bagel | 1 Contoso Blvd. | London | NS1 EW2 | (171) 555-2125 |
| Fourth Coffee | Julian Price | Calle Smith 2 | Mexico City | 56789 | (7) 555-2126 |
| Adventure Works | Christine Hughes | 3122 87th Way S.W. | Seattle | 34567 | (206) 555-2125 |
| Humongous Insurance | Steve Riley | 67 Big St. | Tampa | 01234 | (916) 555-2128 |
| Trey Research | Dana Birkby | 2 Nosey Pkwy | Portland | 43210 | (503) 555-2129 |
| Fabrikam, Inc. | Jesper Aaberg | 9 Empire Way | Seattle | 56789 | (206) 555-2233 |
Notice that in this case, the individual tables do not contain duplicate values, but fields in both tables contain some overlapping values, such as data in the Name field in the Clients table and data in the Company Name field in the Customers table.
You can't always integrate the data in each table by merging the two tables. For some customers, the Clients table might have the latest information, but the Customers table might have the latest data for other users. Typically, the best course of action is to review the contents of both the tables and then decide what to keep and what to delete.
To bring the records together from both tables, you create a union query. The query will place duplicate records close together to make it easier to review them.
Note: You cannot edit or delete the data that a union query returns. To edit or delete data, open the underlying tables in Datasheet view.
-
On the Create tab, in the Other group, click Query Design.

Access creates a new query. The Show Table dialog box appears.
-
Close the Show Table dialog box without adding any tables or queries to the design grid.
-
Right-click the document tab for the query, and then click SQL View.
-
If you used the preceding tables as an example, you paste the following SQL statement in the window. If you use your own data, use the following statement as a guide. Use the SELECT, UNION ALL SELECT, and ORDER BY clauses as shown, but substitute the field and table names from your own data.
SELECT [Company Name], [Address], [City], [Telephone], FROM [Customers]
UNION ALL SELECT [Name], [Address], [City], [Phone], FROM [Clients]
ORDER BY [Company Name];The first SELECT statement retrieves records from the Customers table, and the second SELECT statement retrieves records from the Clients table. The UNION ALL clause brings all records from both tables together. The ORDER BY statement sorts the records so that duplicate records are placed together for easy reviewing.
Note: Each SELECT statement must return the same number of fields, and in the same order. The corresponding fields are required to have compatible data types, but with one exception: you can use a Number field and a Text field as corresponding fields. Also, remember that field can names differ.
-
Click Run
 to run the query and see the results in Datasheet view.
 If you use the records in the tables above, the view shows 18 records — all 9 records from the Customers table and all 9 records from the Clients table.
Save the query, and then close the view. You will use this query in the next section.
Where duplicates exist in two tables, show only one record
At times, you might need to view just the distinct records in two similar tables. If a record exists in both tables, you can include the record from the first table and ignore the corresponding record in the second table.
Access treats records from different tables as duplicates only if the values in all the selected fields match. For example, if you include the Company Name, City, Address, Phone, and Fax fields in the query, the values in all five fields must match before Access treats the record as a duplicate.
The steps in this section explain how to alter the query from the previous section to show all the records in the Customers table and only the unique records from the Clients table.
Note: You cannot edit the data that a union query returns. To edit or delete data, open the underlying tables in Datasheet view.
Modify the query
-
Open the query that you created in the previous section.
-
On the document tab for the query, click SQL View to see the SQL statement.
-
Delete the [Telephone] and [Phone] fields from both of the SELECT statements.
-
Delete the word ALL that follows the word UNION. This causes the query to ignore the duplicate records from the Clients table. The SQL statement will look like the following.
SELECT [Company Name], [Address], [City], FROM [Customers]
UNION SELECT [Name], [ Address], [City], FROM [Clients]
ORDER BY [Company Name]; -
Click Run
 to run the query and see the results in Datasheet view.
If you use the example data from the previous section, the query returns 14 records instead of 18.
Show only the duplicate records found in both tables
You use an inner join when you need to query for only the matching values from two tables. If you are new to Access, an inner join is an operation that links the rows in two or more tables only if values in the joined fields match.
You create an inner join by building a select query that includes both tables, and then creating a relationship between the fields that contain the duplicate values. By default, Access creates an inner join when you create the relationship.
Note: You cannot edit the fields or rows that are returned by a select query that has an inner join. If you want to edit the data, open the underlying tables and change the values in each table.
Create a query that has an inner join
-
On the Create tab, in the Other group, click Query Design.

-
In the Show Table dialog box, double-click the Customers table and the Clients table, and then click Close to close the dialog box.
-
Identify the fields that contain matching values in duplicate records. If you use the sample tables, the Company Name field in the Customers table corresponds to the Name field in the Clients table.
-
Drag the Company Name field from the first table to the Name field in the second table. Access connects the fields with a line.
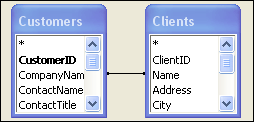
By default, the query creates an inner join between the two tables. An inner join selects only those records where the Company Name field matches the Name field.
-
Double-click the Company Name field to add it to the query design grid. This field will help you identify the records in the Datasheet view.
-
Double-click the other fields that you want from the Customers and Clients tables to add them to the query design grid. In this case, add the Phone field from the Customers table and the Telephone field from the Clients table.
-
Click Run
 to run the query and see the results in Datasheet view. The query returns five records, one for each customer with a record in both tables.
| Company Name | Telephone (Customers) | Phone (Clients) |
| Baldwin Museum of Science | (505) 555-2122 | (505) 555-3123 |
| Blue Yonder Airlines | (104) 555-2123 | (104) 555-2124 |
| Coho Winery | (206) 555-2124 | (206) 555-2124 |
| Contoso Pharmaceuticals | (171) 555-2125 | (171) 555-2125 |
| Fourth Coffee | (7) 555-2126 | (7) 555-2126 |
View only records in one table that don't have a matching record in another table
Continuing with the scenario where the Customers table and Clients table have duplicate data, you will now see what you need to do to view those records in the Customers table that don't have a duplicate record in the Clients table. This might help you make decisions for certain customers, based on the contents of the Customers table alone, before you take steps to consolidate the two tables.
You can view just the records in the Customers table that don't have a match in the Clients table by creating a find unmatched query. Using the sample data, this type of query retrieves all the records in the Customers table that don't have a match in the Clients table.
Note: You can edit the field values or delete records when you view this query in Datasheet view.
Create a find unmatched query
-
On the Create tab, in the Other group, click Query Wizard.

-
In the New Query dialog box, click Find Unmatched Query Wizard, and then click OK.
-
Click the Customers table — it contains the records in which you are interested. Click Next.
-
Click the Clients table — this is the table that you want to compare the Customers table against. Click Next.
-
Click the Company Name field in the Customers table, click the Name field in the Clients table, and then click the <=> button. This will join the tables, based on customer names. Click Next.
-
Select the fields that you want displayed in your view. In this case, add the Company Name, Address, City, and Phone fields. Click Next.
-
Type a name for the query, and click Finish to view the records in Datasheet view. If you use the sample tables, the query returns four records — in this case, the records in the Customers table that don't have an overlapping record in the Clients table.
| Company Name | Address | City | Telephone |
| Adventure Works | 3122 87th Way S.W. | Seattle | (206) 555-2125 |
| Humongous Insurance | 67 Big St. | Tampa | (916) 555-2128 |
| Trey Research | 2 Nosey Pkwy | Portland | (503) 555-2129 |
| Fabrikam, Inc. | 9 Empire Way | Seattle | (206) 555-2233 |
Delete duplicate records from one table and merge the remaining records into another table
After you review the duplicate data in similar tables, you can delete the duplicate records and merge the remaining data into a single table. The process follows these broad steps:
-
Optionally, in the table that you want to delete, update any data that you want to merge. Explaining how to update data is beyond the scope of this topic.
For information about ways to update data, see the article Update the data in a database.
-
Optionally, review any relationships that might exist between the table that you want to delete and other tables in the database. If a relationship exists, you typically delete the relationship and then establish a new relationship with the other table (the table that contains the merged data). However, you need to ensure that the primary key values in the new table match the primary key values in the other tables.
-
Create a delete query that uses the Unique Values property to find and delete any matching records. As part of this, you must ensure that you do not disrupt any relationships among the tables in your database. For example, suppose that you want to move any unique records from the Clients table to the Customers table, and then delete the Clients table. If the Clients table is related to any other tables in the database, you must take steps to ensure that the Customers table assumes those relationships. A full explanation of relationships is beyond the scope of this topic.
For more information, see the article Create, edit or delete a relationship.
-
Create an append query to add the remaining records from the table that you want to delete to the table that you want to keep. As part of that effort, you might need to add the primary key field and values for the appended data to the table that you want to keep.
-
Delete the unwanted table.
The steps in this section explain how to create and use a delete query and an append query, and how to delete a table. The steps use the Customers and Clients tables.
The Customers table
| Company Name | Contact Name | Address | City | Postal Code | Telephone |
| Baldwin Museum of Science | Josh Barnhill | 1 Main St. | New York | 12345 | (505) 555-2122 |
| Blue Yonder Airlines | Waleed Heloo | 52 1st St. | Boston | 23456 | (104) 555-2123 |
| Coho Winery | Pica Guido | 3122 75th Ave. S.W. | Seattle | 34567 | (206) 555-2124 |
| Contoso Pharmaceuticals | Jean Philippe Bagel | 1 Contoso Blvd. | London | NS1 EW2 | (171) 555-2125 |
| Fourth Coffee | Julian Price | Calle Smith 2 | Mexico City | 56789 | (7) 555-2126 |
| Adventure Works | Christine Hughes | 3122 87th Way S.W. | Seattle | 34567 | (206) 555-2125 |
| Humongous Insurance | Steve Riley | 67 Big St. | Tampa | 01234 | (916) 555-2128 |
| Trey Research | Dana Birkby | 2 Nosey Pkwy | Portland | 43210 | (503) 555-2129 |
| Fabrikam, Inc. | Jesper Aaberg | 9 Empire Way | Seattle | 56789 | (206) 555-2233 |
The Clients table
| Name | Address | City | Phone | Fax |
| Baldwin Museum of Science | 1 Main St. | New York | (505) 555-2122 | (505) 555-3123 |
| Blue Yonder Airlines | 52 1st St. | Boston | (104) 555-2123 | (104) 555-2124 |
| Coho Winery | 3122 75th Ave. S.W. | Seattle | (206) 555-2124 | (206) 555-2125 |
| Contoso Pharmaceuticals | 1 Contoso Blvd. | London | (171) 555-2125 | (171) 555-2126 |
| Fourth Coffee | Calle Smith 2 | Mexico City | (7) 555-2126 | (7) 555-2127 |
| Consolidated Messenger | 3122 75th St. S. | Seattle | (206) 555-0170 | (206) 555-0171 |
| Graphic Design Institute | 67 Big St. | Tampa | (916) 555-2128 | (916) 555-2128 |
| Litware, Inc. | 3 Microsoft Way | Portland | (503) 555-0192 | (503) 555-0193 |
| Tailspin Toys | 4 Microsoft Way | Portland | (503) 555-2233 | (503) 555-2239 |
If you want to use these tables in a database, see Prepare sample data, earlier in this article. For this exercise, assume that the Customers table has the latest information — thus, you want to delete the matching records from the Clients table and then merge the remaining records from the Clients table into the Customers table.
Delete unwanted data
-
On the Create tab, in the Other group, click Query Design.

-
In the Show Table dialog box, double-click the Customers table and the Clients table, and then close the dialog box.
-
Join the two tables by dragging the CompanyName field in the Customers table to the Name field in the Clients table.
-
Right-click the empty area in the top half of the window, and then click Properties. Set the value of the Unique Records property to Yes.
By joining the two tables and setting the query's Unique Records property to Yes, you avoid the Could not delete from the specified tables message that would otherwise appear when you run the query.
-
On the Design tab, in the Query Type group, click Delete.
-
Drag the asterisk (*) from the Clients table to the Field row of the first column in the query design grid.
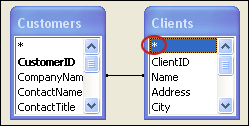
Clients appears in the Table row and From appears in the Delete row. This means that the query will delete rows from the Clients table.
-
You now need to specify which records the query deletes. If you use the sample tables, you can do this by deleting records where the values in the Name, Address, and City fields of the Clients table match the corresponding fields in the Customers table.
Drag the Name field from the Clients table to the first blank cell in the Field row in the query design grid. Do the same for the Address and City fields from the Clients table.
-
If you use the sample tables, in the Criteria row, for the Name field, type [Customers].[CompanyName]. In the Criteria row, for the Address field, type [Customers].[Address]. In the Criteria row, for the City field, type [Customers].[City]. Your query design grid should look like this:

When you run the query, it will delete all records that meet the criteria in the query — those that have matching values in the three fields of each table.
-
Click View
 to preview the records that will be deleted when you run the query. You will see the five duplicate records from the Clients table.
 -
Click Run
 to run the query. When asked to confirm the deletion, click Yes.
 -
Go to the next steps to create an append query.
Append the remaining data
-
On the Create tab, in the Other group, click Query Design.

-
In the Show Table dialog box, double-click the source table, double-click the table that contains the records that you want to append, and then click Close. If you use the sample data, double-click the Clients table.
-
On the Design tab, in the Query Type group, click Append.
-
In the Append dialog box, in the Table Name list, select the destination table (the table to which you want to append data). If you use the sample tables, select the Customers table, and then click Close.
-
Move the fields that you want to append from the source table to the Field row of the design grid.
Important: Move only those fields that have a corresponding field in the destination table.
If you use the sample data, move the Name, Address, and Phone fields.
-
Click the Append To row in each field and select the name of the corresponding field in the destination table. If you use the sample data, you select the Customer Name, Address, and Telephone, fields, respectively.
-
Because you want to add all the records in the Clients table to the Customers table, you need not specify any criteria. Click View
 to preview the records that will be added to the Customers table when you run the query.
 -
Save and close the view.
-
Find the append query, and double-click it. Click Yes to confirm the append operation.
I don't want to see confirmation messages each time I run this query
-
Click the Microsoft Office Button
 , and then click Access Options.
 -
In the Access Options dialog box, click Editing.
-
In the General Editing section, under Confirm, clear the Action queries check box.
-
Delete the table
-
Make sure that you have the necessary permissions to delete tables in the database, that the database is not read-only, and that another user does not have table open.
-
In the Navigation Pane, click the table that you want to delete.
-
Press DELETE, and then click Yes to confirm that you want to delete the table.
Note: Deleting database tables can break part or all of the functionality of a database. For that reason, you must plan a deletion to ensure that your database remains functional, and you should always back up your database before you delete data or other components.
For more information about deleting data, see the article Delete one or more records from a database.
See only the distinct records when viewing data from related tables
A query that brings together data from two related tables might show records where all fields seem to match. However, if you review the tables, you might find that the tables don't actually contain duplicate records. That problem arises when the query does not include certain fields, such as a primary key, that can uniquely identify each record. In such scenarios, you do not want to delete the records, but you can take action to hide what appear to be duplicates.
For example, suppose that you use a query to gather customer order data from two tables and ensure that your staff fills orders on time. Your customers can place an order for multiple products, so each product becomes a separate record (a row) in the underlying tables. Because the order is placed on a single day, and then shipped on a single day, the records for a given order can contain large numbers of duplicate dates, like so:
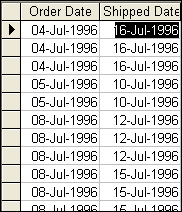
Because you know that orders arrive on a given day, and you ship the orders on a given day, you need to see only one record (one row) per order. To display unique records from the tables that contain your order data, you can set the Unique Records property for the query to Yes. When the property is set to Yes, the query looks at all the rows in the tables and, where it finds matching rows (not just fields), the query excludes all but one of those duplicate rows from your result set.
Set the Unique Records property to Yes
-
With your query open in Design view, press F4 to display the property sheet.
-
In the property sheet, set the Unique Records property to Yes, and then close the property sheet.

As you proceed, remember that when the Unique Records property is set to Yes, the query compares entire rows, and the rows in all of the tables involved must match before the query excludes any data. Also, you can use the Unique Records property setting only when a query includes two or more tables.
When you switch to Datasheet view, you see only one record for each order.
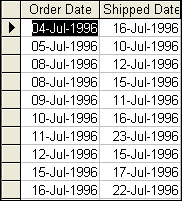
Remember too that when you set the Unique Records property to Yes and run the query, you might still see what appear to be duplicate records. To continue the previous example, you might still find records with matching order and shipped dates, like so:
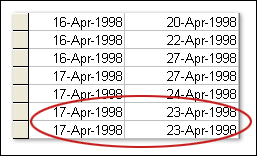
This happens when you receive two different orders on the same day, and you then ship them on the same day. Setting the Unique Records property to Yes does not hide such records from the query results because the records are not actually duplicates in the underlying tables.
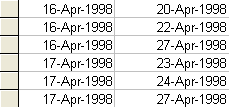
If you want to see only one instance of such records (that is, one order record per day), you need to set the query's Unique Values property to Yes. When the Unique Values property is set to Yes, the query does not look at the underlying tables for duplicates. Instead, it looks at the values of the fields that you include, and if all fields match for two records, the query hides one record from the view.
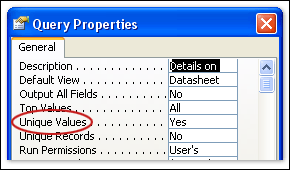
You set the Unique Values property in the same way that you set the Unique Records property — display the property sheet for the query and change the setting to Yes. In the property sheet, the Unique Values property box resides above the Unique Records property box.
To continue the previous example, you now see only the dates on which one or more orders were received or shipped. You do not see one record per order.
Note: Because setting the Unique Records property to Yes operates against the rows in the tables that provide data to your query, and setting the Unique Values property to Yes operates only against the fields in your query, you cannot use both properties together. If you set one to Yes, Access automatically sets the other property to No. However, both can be set to No to return all records.
The following table provides a summary to help you choose settings for the Unique Records and Unique Values properties in a query.
| If your query is based on... | And you want to see... | Set... | Result... |
| Two or more tables, but all query fields come from a single table | Distinct records from the table (all the fields in the table must match for two records to qualify as duplicates) | Unique Records to Yes. (Access sets Unique Values to No automatically). | If the table contains duplicate records, the query ignores the duplicates. However, the query results might still show records where all fields match, if the query does not include a field that uniquely identifies the records. |
| One or more tables | Distinct records in query Datasheet view (all the fields in Datasheet view must match for two records to qualify as duplicates) | Unique Values to Yes. (Access sets Unique Records to No automatically). | The query excludes duplicate records (where all fields match) in Datasheet view. However, remember that you might not see all the distinct records from the underlying table. |
| One or more tables | All records | Unique Values to No and Unique Records to No. | You see all unique and duplicate records from both tables. |
See a specific record or summarize duplicate data in related tables
When you view duplicate data in related tables, you might want to see a specific record among the set of duplicates, or you might want to summarize duplicate data by using Count, Sum, or one of the other aggregate functions.
Similar to the scenario described in the previous section, you might not actually have duplicate data in the tables, but when you view data from two tables that share a one-to-many relationship, such as the Orders and Order Details tables, you might find several records where multiple fields match. For example, an employee might have received multiple orders from the same customer, or that employee might have sold the same product as part of different orders on the same day, and so on. If you are interested in finding data to answer queries such as the following, you need to summarize data instead of deleting duplicate data.
-
Find the total quantity of each product sold by each employee.
-
Count the total number of orders that each employee handled for each customer.
-
Find the largest order of the day for each employee.
To summarize data, you use a totals query similar to the ones discussed in the section Show distinct records by specifying which duplicate appears in your results, earlier in this article. That section explained how to use a totals query with a single table. To create a totals query that contains multiple tables, do the following:
-
Remember to add the second table when you add the first table in the Show Table dialog box.
-
When you add the fields that determine duplication, drag the fields that you want from either table and, for all fields, set the value in the Total row of the column to Group By.
-
The field that identifies the record that you want to see or that has the values that you want to summarize can come from either table.
No comments:
Post a Comment