Create a self-running presentation
You can use a self-running presentation to run unattended in a booth or kiosk at a trade show or convention, or you can save it as a video and send it to a client.
Set up a self-running presentation
To set up a PowerPoint presentation to run automatically, do the following:
-
On the Slide Show tab, click Set Up Slide Show.
-
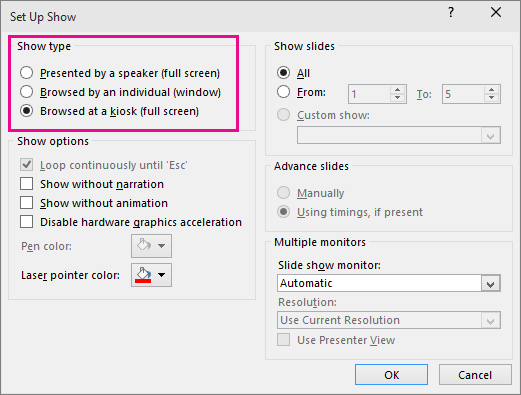
Under Show type, pick one of the following:
-
To allow the people watching your slide show to have control over when they advance the slides, select Presented by a speaker (full screen).
-
To present your slide show in a window, where control over advancing the slides is not available to the people watching, select Browsed by an individual (window).
-
To loop your slide show until the people watching press Esc, select Browsed at a kiosk (full screen).
-
Rehearse and record slide timings
When you choose the following show types: Presented by a speaker (full screen) and Browsed at a kiosk (full screen), you'll want to rehearse and record timings for effects and slides.
-
On the Slide Show tab, click Rehearse Timings.
Note: The presentation timer begins immediately when you click Rehearse Timings.
The Rehearsal toolbar appears and the Slide Time box begins timing the presentation.
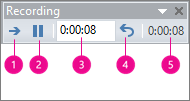 The Rehearsal toolbar
 Next (advance to next slide)
 Pause
Pause Slide Time
 Repeat
 Total presentation time
 -
While timing your presentation, you can do one or more of the following on the Rehearsal toolbar:
-
To move to the next slide, click Next.
-
To temporarily stop recording the time, click Pause.
-
To restart recording the time after pausing, click Pause.
-
To set an exact length of time for a slide to appear, type the length of time in the Slide Time box.
-
To restart recording the time for the current slide, click Repeat.
-
-
After you set the time for the last slide, a message box displays the total time for the presentation and prompts you to do one of the following:
-
To keep the recorded slide timings, click Yes.
-
To discard the recorded slide timings, click No.
Slide Sorter view appears and displays the time of each slide in your presentation.
-
Add narration or sound
To record a narration, your computer requires a sound card and a microphone, and a microphone connector if the microphone is not a part of your computer.
-
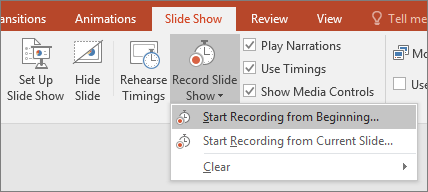
On the Slide Show tab, in the Set Up group, click the arrow on the Record Slide Show button.
-
Select one of the following:
-
Start Recording from Beginning
-
Start Recording from Current Slide
-
-
In the Record Slide Show dialog box, select the Narrations and laser pointer check box, and if appropriate, select or deselect the Slide and animation timings check box.
-
Click Start Recording.
Tips:
-
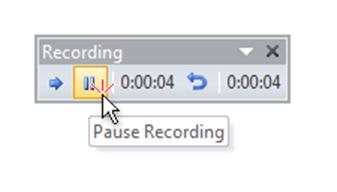
To pause the narration, in the Recording shortcut menu in Slide Show view, click Pause. And to resume your narration, click Resume Recording.
-
-
-
To end your slide show recording, right-click the slide, and then click End Show.
-
The recorded slide show timings are automatically saved and the slide show appears in Slide Sorter view with timings beneath each slide.
You can record a narration before you run a presentation, or you can record it during the presentation and include audience comments. If you do not want narration throughout your entire presentation, you can record separate sounds or comments on selected slides or objects. For more details, see Record a slide show with narration and slide timings.
By using a self-running presentation, you can communicate your information without a presenter. For example, you can set up a presentation to run unattended in a booth or kiosk at a trade show or convention, or you can send a CD with a self-running presentation to a client.
You can make most controls unavailable, so that your audience cannot make changes to your self-running presentation. Self-running presentations restart after they are finished and when they have been idle on a manually advanced slide for longer than five minutes.
To package a self-running presentation to run on a CD, network, or computer, see Copy a presentation to a CD, network, or local disk drive.

Considering the interactive options for a self-running presentation
When you design a self-running presentation, keep the environment in which the presentation will appear in mind — for example, whether the booth or kiosk will be in an unmonitored public place or whether supervision will be available. By keeping the environment in mind, you can better determine what elements to add to your presentation, how much control to give your audience, and what steps to take to prevent misuse.
Options that you might want to consider when designing a self-running presentation include the following:
-
Hyperlinks and Action buttons You can use hyperlinks to help your audience move through your presentation or move to other programs. You can also use action buttons, which are built-in navigation buttons that can give your presentation the look and familiarity of a Web page, with buttons for Home, Help, Back, Next, and so on.
-
Voice narration You can add recorded narration that plays with your presentation.
-
Automatic or manual timings You can set up your presentation to run by itself by using automatic timings, or you can set up your presentation so that your audience can navigate through it at their own pace by clicking action buttons. If you set up your presentation to run at a kiosk, only objects with hyperlinks or action buttons can be clicked.
Add navigation
If you want your audience to move through your self-running presentation freely, you can add hyperlinks or action buttons to provide navigation.
-
Hyperlinks
You can add hyperlinks that go to custom shows, specific slides within your presentation, different presentations, Microsoft Office Word documents, Microsoft Office Excel worksheets, locations on the Internet or an intranet, or e-mail addresses. You can create a hyperlink from any object, including text, shapes, tables, graphs, and pictures.
To learn how to add a hyperlink, see Create or edit a hyperlink.
-
Action buttons
PowerPoint includes ready-made action buttons that you can add to your presentation and that you can define hyperlinks for. Action buttons contain shapes, such as right and left arrows. Use them when you want to include commonly understood symbols for going to next, previous, first, and last slides. PowerPoint also has action buttons for playing movies or sounds.
Add narration
Adding narration can help deliver information more clearly in your self-running presentation.
To record a narration, desktop computers require a sound card, a microphone, and a microphone connector. Laptop computers require only a microphone and a microphone connector. You can record a narration before you run a presentation, or you can record it during the presentation and include audience comments. If you do not want narration throughout your entire presentation, you can record separate sounds or comments on selected slides or objects.
Rehearse and record slide timings
Note: Be prepared to begin timing your presentation immediately after you perform the first step in this procedure.
-
On the Slide Show tab, in the Set Up group, click Rehearse Timings.
The Rehearsal toolbar appears and the Slide Time box begins timing the presentation.
 The Rehearsal toolbar
 Next (advance to next slide)
 Pause
Pause Slide Time
 Repeat
 Total presentation time
 -
While timing your presentation, do one or more of the following on the Rehearsal toolbar:
-
To move to the next slide, click Next.
-
To temporarily stop recording the time, click Pause.
-
To restart recording the time after pausing, click Pause.
-
To set an exact length of time for a slide to appear, type the length of time in the Slide Time box.
-
To restart recording the time for the current slide, click Repeat.
-
-
After you set the time for the last slide, a message box displays the total time for the presentation and prompts you to do one of the following:
-
To keep the recorded slide timings, click Yes.
-
To discard the recorded slide timings, click No.
Slide Sorter view appears and displays the time of each slide in your presentation.
-
Set up a presentation to run at a kiosk
Setting up a presentation to run at a kiosk allows you to control whether a mouse click anywhere on the screen advances a slide. For example, if you want your presentation to be viewed at a specific pace, set automatic timings, and then set the presentation to run at a kiosk. To give users additional control, you can add navigation, such as hyperlinks or action buttons, to your slides.
-
On the Slide Show tab, in the Set Up group, click Set Up Slide Show.
-
Under Show type, click Browsed at a kiosk (full screen).
Important: If you set up a presentation to run at a kiosk, remember to also use automatic timings or navigation hyperlinks. Otherwise, your self-running presentation will not advance beyond the first slide.
For more information about self-running presentations, see:
No comments:
Post a Comment