Perhaps you've started your Microsoft 365 experience with a home plan, such as Microsoft 365 Family or Microsoft 365 Personal, and now you've started a business in your home. Or maybe you're a home user, but your needs have changed. Whatever the reason, this article will walk you through how to move from your Microsoft 365 Family subscription to a business subscription.
Before you roll up your sleeves and jump in, it's helpful to understand some of the key differences between a Microsoft 365 Family subscription and a Microsoft 365 Apps for business subscription.
| Home plans | Business plans |
| Licensed for home use | Licensed for business use |
| Microsoft 365 Personal can be used by 1 person Microsoft 365 Family can be used by up to 6 people | You can buy user licenses for 1 to 300 users and can add or remove users as your needs change. |
| Users sign in using a Microsoft account, such as sue@live.com or david@outlook.com. | Users sign in with a user ID, also known as a work or school account. |
| Email is accessed using a Microsoft account. | Email is stored in Microsoft 365 and is accessed using a Microsoft 365 work or school account. |
| Files are stored in the OneDrive that's associated with the user's Microsoft account. | Files are stored in OneDrive for business which is associated with the user's work or school account used to sign into Microsoft 365 for business. |
Because OneDrive files and email is stored in different places in Microsoft 365 for home and Microsoft 365 for business subscriptions, you'll probably want to migrate some of your email and files stored in OneDrive to the Microsoft 365 for business subscription that you choose.
You may receive a refund if you:
-
Bought a yearly subscription within the last 30 days,
—or—
-
Bought a monthly subscriptions, and cancel within 30 days of your last renewal date.
Note: If you purchased a Microsoft 365 subscription through a third-party retailer such as Apple or Best Buy, contact them directly for managing your subscription and billing.
The first step is to buy the Microsoft 365 for business plan that best fits your organization's needs. Here are a couple of decisions you'll need to make when choosing a business plan.
Do you want the full downloadable Office apps? If you want your users to have the desktop version of Office, which they can use even if they aren't connected to the Internet, make sure that you choose a plan that includes the desktop version of Office.
Tips:
-
Which plans do include the full downloadable Office apps? Microsoft 365 Apps for enterprise, Microsoft 365 Business Standard, and the Office 365 Enterprise E1 E1, E3, and E5 plans.
-
Which plans don't include the full downloadable Office apps? Microsoft 365 Business Basic and Office 365 Enterprise E1 plans. They include the Office Online apps only.
Do you want each user in your organization to have business class email? If you want your users to have business class email, calendar, and contacts with a 50 GB inbox per user, choose a business plan that includes email.
Tips:
-
Which plans do include business class email? Microsoft 365 Business Basic, Microsoft 365 Business Standard, Office 365 Enterprise E1, E3, and E5 plans.
-
Which plans don't include business class email? Microsoft 365 Apps for business and Microsoft 365 Apps for enterprise.
Ready to buy? Go to products.office.com to choose your business subscription. When you purchase your subscription, you'll be asked to enter the number of user licenses you want. Things will go much easier later in the migration process if you purchase a user license for yourself and each of your users when you purchase your new subscription.
After you've purchased your new Microsoft 365 for business subscription, the next step is to create a user account for each user, such as david@contoso.onmicrosoft.com or david@contoso.com. If you purchased a user license for yourself and each of your users when you bought the subscription, the user license will automatically be assigned to them when you create their user account.
To learn how to create user accounts in Microsoft 365 for business, see Add users individually to Microsoft 365 - Admin Help. To learn more about user licenses, see Manage licenses.
Your users can use the Microsoft Outlook app that comes with Microsoft 365 to save their email, calendar, tasks, and contacts to an Outlook Data File (PST).
Tip: You cannot use Outlook Web App to do the steps listed in this section. Each user who wants to migrate their Outlook information must use the full downloadable Microsoft Outlook app which can be installed from their Microsoft 365 for home subscription.
Users will have full access to the full downloadable Outlook app until the Microsoft 365 for home subscription is cancelled. After you cancel the Microsoft 365 for home subscription, the full Microsoft apps that they previously downloaded may go into reduced functionality mode unless the Microsoft 365 for business subscription you chose also has the full Microsoft apps.
Ask each user to complete the following steps in the order shown.
Export Outlook information to an Outlook data file
Before you can create your Outlook data file (.pst), the account that you want to export Outlook information from must already be added to the desktop version of Outlook. For information about how to add an account to Outlook 2013 or higher, see Set up email in Outlook (for Windows) or Set up email in Outlook for Mac 2011.
Ask each user to complete the steps in Export or backup email, contacts, and calendar to an Outlook .pst file.
Set up your email account in Outlook
Each user needs to set up their new email account that came with the Microsoft 365 for business subscription. To do this, they'll need the address of their new email account. Each user's email account is the same as the user name that they use to sign into Microsoft 365 for business. It will look something like sue@contoso.onmicrosoft.com or david@contoso.com.
Ask each user to add their email account to Outlook. To learn how, see Set up email in Outlook (for Windows) or Set up email in Outlook for Mac 2011.
Access the Outlook information
After the PST file is created, you can use Outlook to do either or both of the following:
-
Import information from the PST file into another email account. This merges the email, calendar, tasks, and contacts that are stored in the PST file into your Microsoft 365 for business email account.
To import the information stored in the PST file into your Microsoft 365 for business email account, have each user complete the steps in Import email, contacts, and calendar from an Outlook .pst file.
--and/or--
-
Open the PST file to access the email. This option provides access to the email in the PST file without merging the mail into your Microsoft 365 for business email account. You can use this option to copy only the emails you want from the PST file.
Tip: If you are using a Mac, then use the steps in Export items to an archive file in Outlook for Mac instead of the following procedure.
Complete the following procedure if you just want to have access to the email that's in the PST file. After you open the PST file, the emails that are saved to the PST file will appear in the left navigation in Outlook. From there, you can open the email or drag it into your existing Outlook folders.
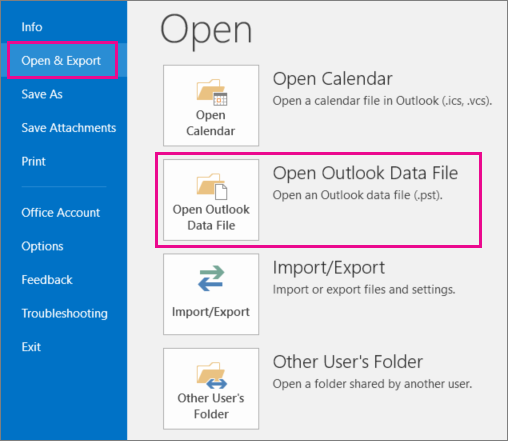
Note: The following procedure assumes that you have Outlook 2013 or higher. If you have an earlier version of Outlook, use the steps in Open, change, or close Outlook data files instead.
-
In Outlook 2013 or higher, choose File > Open and Export > Open Outlook Data File.
-
Browse to the PST file you created earlier and then choose OK.
Tip: If you are prompted for a password, enter the password that you assigned to the PST file.
The PST file appears in the left-nav in Outlook.
All Microsoft 365 for business plans include OneDrive for Business, which provides 1 terabyte of online file storage for each user. We'll walk you through how to migrate the files in the OneDrive file storage that's associated with a user's Microsoft account over to OneDrive for Business that's included with the Microsoft 365 for business subscription.
Ask each user to complete the following steps in the order shown.
Note: Users will need to have enough storage space on their computers' hard drives to temporarily store a copy of the online files they want to migrate.
Copy your OneDrive data
-
Create a temporary folder on your hard drive to temporarily store the files that you want to migrate to Microsoft 365 for business.
-
Go to https://onedrive.live.com/ and sign in using the Microsoft account that you use to access your Microsoft 365 for home subscription.
-
Copy the files that you want to use with Microsoft 365 for business to the local folder that you created in step 1.
Tip: If you download a folder, OneDrive saves the contents of the folder in a *.zip file. If you downloaded folders to a *.zip file, make sure that you unzip the files before uploading them to Microsoft 365 for business.
Import OneDrive files to Microsoft 365 for business
-
Go to admin.microsoft.com and sign in with your user name and password (such as sue@contoso.onmicrosoft.com).
-
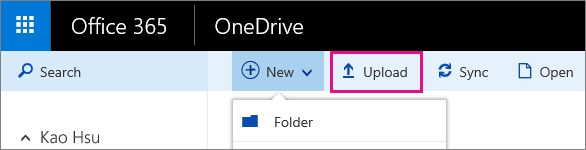
Select the app launcher icon in the upper-left and then choose OneDrive.
Tip: The first time you open OneDrive for Business, you'll need to set up your OneDrive. On the Welcome to OneDrive for Business page, choose Next. After OneDrive is set up, choose Your OneDrive is ready.
-
You'll be taken to an empty OneDrive folder. If you want to create sub folders, choose New > Folder.

-
Choose Upload to copy the files from your hard drive where you copied your OneDrive files.
Notes:
-
You can upload individual files and groups of files (such as all files in a particular folder) at one time but you cannot copy a folder to OneDrive for Business. Instead, you'll need to create the folder structure you want in OneDrive for business.
-
If you want to copy files to a folder that you created in step 4, open that folder before you upload the files. Otherwise, the files will be uploaded to the root folder. You can also move your files between folders in OneDrive for Business after you've uploaded them.
-
Now that your users are on your new Microsoft 365 for business subscription, you can cancel or turn off recurring billing for a Microsoft subscription.
Leave us a comment
Were these steps helpful? If so, please let us know at the bottom of this topic. If they weren't, and you're still having trouble, tell us what you were trying to do, and what problems you encountered.
No comments:
Post a Comment