Modify the columns in a Data View
After you create a Data View, to display different fields from your data source, you can add, remove, or arrange the columns in the existing Data View.
When you add, remove, or arrange the columns in a Data View, you are adding, removing, or arranging the fields as they appear in the Data View. If the Data View displays several fields, each in a different column, you can use the options in the Edit Columns dialog box to add, remove, or move the columns. If the Data View displays the fields in rows, you can use the options in the Edit Columns dialog box to add, remove, or move the rows.
Note: The Edit Columns command is available only when you are working with a Data View that displays data in an HTML table.
You can also use the table editing commands on the Table menu to modify the columns in a Data View.
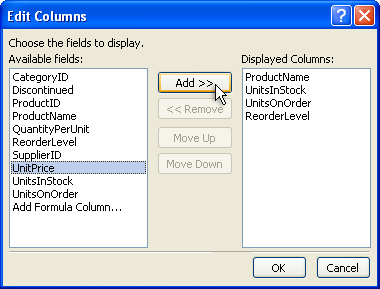
In the following example, Northwind Traders creates a Data View that includes the product name, the units in stock, the units on order, and the reorder level. To help keep track of the cost of their inventory, you suggest that the Data View also include the price per unit. You can easily add a column to display the UnitPrice field. You can also remove the columns or change the order in which the columns appear.
To learn more about Data Views, see Create a Data View.
What do you want to do?
Add columns
-
Open the page that contains the Data View to which you want to add a column.
-
Right-click the Data View, and then click Show Common Control Tasks on the shortcut menu.
You can also click the Data View and then click the arrow
 in the upper-right corner to show the Common Data View Tasks list. Click the arrow again to hide the list.
 -
In the Common Data View Tasks list, click Edit Columns.
Note: The Edit Columns command is not available if the Data View is in an HTML table that uses rowspan or colspan attributes with a value greater than 1.
-
In the Edit Columns dialog box, under Available fields, click the field that you want to include in the Data View, and then click Add. Repeat for each field that you want to add.
To select multiple fields at one time, press and hold CTRL while you click the fields.
For example, Northwind Traders wants to add the UnitPrice field to the Data View. In the Edit Columns dialog box, under Available fields, click UnitPrice, and then click Add.

Notes:
-
If you have changed the column headers in the Data View, the column headers, not the field names, are displayed in the Displayed Columns list.
-
To add a column that displays the result of an expression, see the topic Create a formula column in a Data View.
-
Remove columns
-
Open the page that contains the Data View from which you want to remove a column.
-
Right-click the Data View, and then click Show Common Control Tasks on the shortcut menu.
You can also click the Data View and then click the arrow
 in the upper-right corner to show the Common Data View Tasks list. Click the arrow again to hide the list.
 -
In the Common Data View Tasks list, click Edit Columns.
Note: The Edit Columns command is not available if the Data View is in an HTML table that uses rowspan or colspan attributes with a value greater than 1.
-
In the Edit Columns dialog box, under Displayed Columns, click the field that you want to remove from the Data View, and then click Remove. Repeat for each field that you want to remove.
To select multiple fields at one time, press and hold CTRL while you click the fields.
Arrange columns
-
Open the page that contains the Data View that you want to rearrange.
-
Right-click the Data View, and then click Show Common Control Tasks on the shortcut menu.
You can also click the Data View and then click the arrow
 in the upper-right corner to show the Common Data View Tasks list. Click the arrow again to hide the list.
 -
In the Common Data View Tasks list, click Edit Columns.
Note: The Edit Columns command is not available if the Data View is in an HTML table that uses rowspan or colspan attributes with a value greater than 1.
-
In the Edit Columns dialog box, under Displayed columns, click the field that you want to move in the Data View, and then click Move Up or Move Down. Repeat for each field that you want to move.
Moving a field up in the list moves the column to the left in the Data View. Moving a field down in the list moves the column to the right.
No comments:
Post a Comment