Manage project change with Microsoft Office Project 2007
By Bonnie Biafore
Change is about the only constant over the life of a project. Regardless of how well you plan, within a few nanoseconds of starting a project you're bound to be evaluating changes to your project plan and schedule. Sometimes a project derails, and you have to decide how to get it back on track. In other cases, you make modifications to incorporate change requests, take advantage of new opportunities, or replace people that have moved on. Microsoft Office Project 2007 offers several new features that help you manage the inevitable changes more easily than ever before.
Available in this article …
Identifying causes and effects
Identifying causes and effects
To master schedule revisions, you need to know two key things: what controls the scheduling of tasks and how your edits alter that schedule. In Office Project 2007, task drivers and change highlighting are your new best friends for reworking schedules.
-
Task drivers This features shows the factors that affect task start dates, so you can evaluate the most effective way to bring a schedule back on track.
-
Change highlighting Use this feature to show the values changed by your last task edit, which helps you see whether you achieved the results you want.
Finding the right fields to change
For project managers who live and breathe Office Project 2007 schedules, identifying the factors that control task start dates is second nature. But for the rest of us, or for project schedules containing hundreds of tasks, finding out what makes tasks start isn't so simple. Task dependencies, the availability of suitable resources, calendars (project, task, and resource), and other constraints can all drive the schedule when tasks start. Fortunately, the new Task Drivers feature can do most of the legwork for you.
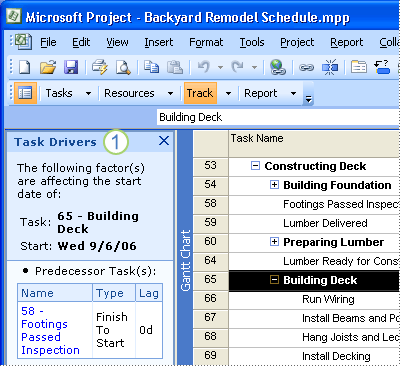
In Office Project 2007, from the Project menu, you can select Task Drivers. The Task Drivers pane appears to the left of your schedule. When you select a task, the Task Drivers pane shows the tasks and fields that control start dates. The Building Deck task has two predecessors, but as shown in Figure 1, the Task Drivers pane shows that the Footings Passed Inspection task determines when deck construction begins.

1. Task Drivers pane
Seeing results
One seemingly minor tweak can launch a torrent of schedule changes as durations stretch, costs increase, and dates slip. When you edit your schedule, the Change Highlighting feature shades all the fields that change as a result of that edit. By scanning the shaded cells, you can evaluate whether you like the results before committing to the change.
Note: If the highlighted cells show unwanted changes, you can use multi-level undo, described in the next section, to revert to your original schedule.
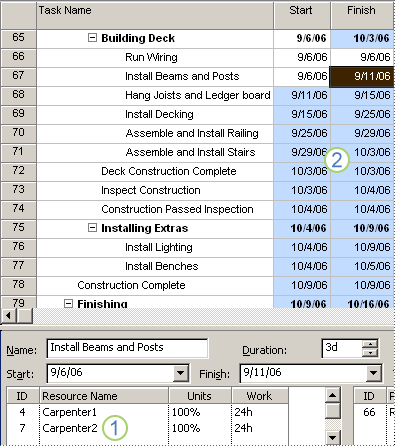
Suppose construction tasks take too long. To shorten the schedule, you decide to increase the master carpenter's units on one task and add a junior carpenter. As shown in Figure 2, adding units and an additional person shortens the duration (and its summary task) and changes the start and finish dates for subsequent tasks. In addition, the junior carpenter has a lower rate, so the cost decreases as well.

1. Another carpenter is added to shorten the duration of the Install Beams and Posts task.
2. The Change Highlighting feature highlights the start and finish dates that change as a result of adding more work units and resources to the Install Beams and Posts task.
Note: The Change Highlighting feature shows the effects of the last task edit you made, so you should make all your changes in the Task Form before you click OK to complete that edit.
The Change Highlighting feature remains visible no matter how you modify your view. You can switch tables, group tasks, or filter the schedule; change highlighting appears for values affected by your last edit. You can start with the Summary table to see the overall effect. Use the following steps to see cost changes: from the View menu, select Table: Entry, and then select Cost. When you make another edit, change highlighting shows the changed values. Click Save to remove all change highlighting.
Evaluating what-if options
Sometimes unwanted results are immediately apparent, such as the sudden change in start date when you inadvertently delete a task dependency. More often, you make several edits before you can see if your work has paid off. In previous versions of Project, you saved a copy of your schedule before testing what-if scenarios. When you found a workable solution, you saved that file and archived the rest, just in case. In Office Project 2007, multi-level undo will remove any number of edits, so you can test complex scenarios and evaluate their impact without jeopardizing your current schedule.
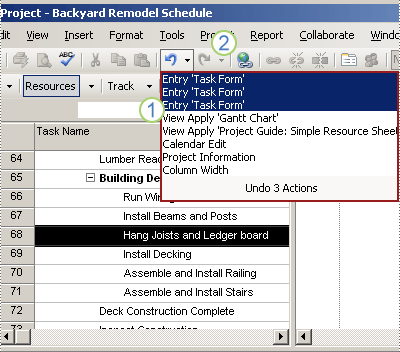
If you look at the Edit menu in Office Project 2007, you'll see the Undo and Redo commands. To access multi-level undo, in the Standard toolbar, to the right of the Undo button, click the down arrow. The Undo Actions drop-down combo box appears. As you drag the pointer up or down, recent actions are selected or deselected. The number of actions changes at the bottom of the combo box as you drag the pointer. Select the number of actions to delete and click. To redo the actions, follow the same steps by using the Redo button (see Figure 3). This enhanced undo capability works on individual Project commands, entire macros, and project changes made by other applications.

1. The Undo Last Command button displays a list of actions that you can undo.
2. The Redo Last Command button.
Tracking the financial effect of changes
Financial returns and budgets are always high on stakeholders' lists of success factors. Projects might promise fantastic new technology, but if the return on investment is abysmal, the project is unlikely to see completion. Top-down budgeting, new in Office Project 2007, helps you budget all project costs — even those that don't derive from work time or materials consumed, such as travel or capital expenses. Cost resource, a new resource type in Office Project 2007, supports budgeting in your schedules and helps you synchronize project costs with your organization's accounting system.
Using the cost resource
You can define a project budget by creating a budget cost-resource and assigning it to your project summary or high-level summary tasks. During planning, you can assign cost resources to tasks for non-labor and material costs and compare your total planned costs, from all resources, to your project budget. Finally, during project execution, you can compare actual costs against the budget and use codes assigned to resources to transfer project expenditures to the correct accounts in the organization's accounting system.
Creating a budget
Here are the basic steps for setting up a project budget in Office Project 2007:
-
Define a cost resource in the Resource Sheet. This is similar to creating a work or material resource. In addition, you can create or select titles for the Resource Name and Group column titles, for example, you can use Travel for a resource name and Overhead Costs for a group. To make the changes, double-click the current column title; the Column Definition dialog box appears. Select the wanted title, or create your own in the Title field. A column title you can choose is Code; with this, you can use accounting codes to link the cost to the corresponding account in your organization's financial system. In the Type drop-down list, select Cost and select the Budget check box.
-
Assign the budget cost resource. Add this item to your project summary or high-level summary tasks in the same way you assign a work resource to a project task.
-
To add budgeted values to summary tasks, from the View menu, select Resource Usage. Create a new column with a Budget Cost title. Beneath the Details column title, right-click and select Detail Styles from the dialog that appears. In the Detail Styles dialog box in the Available fields list, select Budget Cost and then click Show to add the field to the time-phased display. Click OK.
-
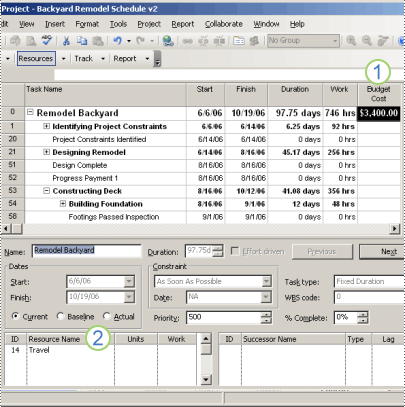
In the Resource Usage view, type the budgeted costs in each time period cell. As you can see in Figure 4, you can display budget cost in your Gantt chart by inserting the Budget Cost column.
 Figure 4: The Resource Usage view and budgeted costs in a Gantt chart.
1. The Budget Cost column added to the Gantt chart.
2. The Resource Usage view.
Note: To create the view shown in Figure 4, start with one of the multiple-pane views, such as Gantt chart. Click in the lower pane to activate it and then, in the View Bar, click Resource Usage. The chart will appear in the lower pane.
Assigning non-work-related costs to tasks
In addition to budgeted costs, you can also use the cost resource type to track project costs that are unrelated to the work or materials consumed or to more accurately reflect a project's financial performance. You can assign several cost resources to tasks; for example, to track travel, training, capital purchases, or fixed overhead.
Being ready for change
Office Project 2007 includes several new features that simplify planning for change, managing changes that you make, and tracking their cost implications. Task drivers help you decide how to modify your project schedule. Change highlighting shows you whether your schedule modifications were a success. Multi-level undo lets you try as many what-if scenarios as you need to find the right solution. And new financial features track your project costs more accurately and link them to the financial measures your stakeholders care about most.
| About the author Bonnie Biafore is a Project Management Institute (PMI)-certified Project Management Professional (PMP). She is a consultant, trainer, speaker, and award-winning author of several books about investing, personal finance, and project management, including On Time! On Track! On Target! Managing Your Projects Successfully with Microsoft® Project (Microsoft Press, 2006). |
No comments:
Post a Comment