Collect data by using e-mail messages
Microsoft Office Access 2007 makes it easy to gather data from people who are located anywhere on the globe, such as members of your sales team, survey participants, or contacts. Office Access 2007 works with Microsoft Office Outlook 2007 to help you to generate and send an e-mail message that includes a data entry form. When the recipients fill out the forms and send them back to you, the replies are processed according to your specifications. For example, if you choose to have the replies automatically processed, the contents of the form are added to the appropriate table in your database as soon as the reply reaches your inbox. This new feature, the Collect data through e-mail messages Wizard, can save you hours that you might have otherwise spent entering data on behalf of your users.
In this article

When to use data collection
The following list explores some scenarios that can utilize this new feature.
-
Surveys You want to do a survey and compile the results in Access. You first create an Access database that has tables necessary to store the results. You then use the wizard to generate a form that includes the questions (presented as fields) and mail them to the survey participants. When participants reply, their answers go directly to the table that you specify in the database.
-
Status reports Whether it is the latest inventory levels or up-to-date information on pending issues, your team can send you e-mail messages that contain the current information at regular intervals to keep you posted.
-
Event management When organizing an event, such as a conference or training, you can send one or more forms as an e-mail message for gathering contact information, travel and hotel preferences, and so on. If you choose to have the replies automatically processed, the participants are able to change their preferences at any time without having to notify you, and you always have access to the latest data for decision making purposes.
To make it easier for you to generate and send the data entry form as an e-mail message, you use the Collect data through e-mail messages Wizard to walk through all of the major steps in the process, including specifying how you want the replies processed when they reach your inbox.
Before you get started
If this is your first time collecting data by using e-mail messages, perform the following steps to ensure successful completion of the data collection process.
-
Ensure that you have installed the following applications on your computer:
-
Office Access 2007 The Collect data through e-mail messages Wizard is available only in Office Access 2007.
-
Office Outlook 2007 You must have Office Outlook 2007 installed and configured on the computer that you use to send the e-mail messages. If you have Outlook installed but not yet configured, start Outlook and follow the instructions in the Outlook Startup Wizard. For help with the wizard, see Outlook Help.
-
Microsoft Office InfoPath 2007 (optional) When you generate the data entry form, you can choose between a simple form that is in HTML format and an easier-to-use form that is generated by InfoPath. If Office InfoPath 2007 or later is not installed on your computer, or if you are not certain that all recipients of your message will have Office InfoPath 2007 or later installed, you should choose the HTML form.
Note: Keep in mind that the form that is used to collect data through e-mail messages is not an Access form. The wizard generates a special form for you, based on your choice of either HTML or InfoPath format.
-
-
Ensure that the users who will receive your e-mail message have the following applications installed on their computer. Without the prerequisite software, users will not be able to view or edit the form.
-
An e-mail client that supports HTML format If you send an HTML form, the recipient must have an e-mail program that supports HTML.
-
Office Outlook 2007 and Office InfoPath 2007 (both optional) If you send an InfoPath form, the recipient must have both Office Outlook 2007 and Office InfoPath 2007 installed to view and edit the InfoPath form.
-
-
Identify the destination database. The database can be in either .mdb or .accdb format. In addition, .mde and .accde files are supported.
If you don't want to use an existing database, you must create a new one.
-
Identify or create the tables that you want populated with the data from the user replies to your message. If you are collecting data for existing tables, ensure that the tables are not read-only and that you have the necessary permissions to add to or update their contents.
For more information about creating tables, see the article Create tables in a database.
Note:
-
Fields of the following data types cannot be collected by using e-mail messages:
-
Attachment
-
AutoNumber
-
Multi-valued fields
-
OLE
-
-
If your data collection operation populates two or more tables, you must create a select query and use that as the form's record source. Ensure that the query includes all of the required fields from the underlying tables. If you are using an existing query, ensure that the query is not read-only and that you have the necessary permissions to add to or update its contents. For more information about creating a query based on two or more tables, see the article Create a query based on multiple tables.
-
-
In most cases, you will be able to decide whether you want to store the collected data as new records, or to use the data to update existing records. In the following situations, you will only be able to store the data as new records:
-
You are collecting data to populate two or more tables.
-
The underlying table does not have a primary key field. The primary key values are necessary to map each reply to an existing record. If your destination table does not have a primary key field, either add it now or assign an existing field that has unique values as a primary key.
-
The underlying table does not have any records. If the table is empty, the wizard assumes that you want to add records.
-
The e-mail addresses of the recipients are not stored as a field in the database. When collecting data to update records, you will not be able to manually type the addresses in the wizard-generated message. The address field must be in the destination table, or in a table that has a relationship with the destination table. For example, if you are collecting data to update the Orders table, the addresses must be stored as a field either in the Orders table or in a related table (such as the Customers table).
-
Stepping through the wizard
You are now ready to run the wizard that assists you with setting up the data collection process.
In this section
Start the wizard
-
Open the destination database.
-
To populate a single table, select the table in the Navigation Pane. To populate two or more related tables, select the query that is bound to these tables.
-
Do one of the following to start the wizard:
-
On the External Data tab, in the Collect Data group, click Create E-mail.

-
Right-click the table or query, and then click Collect and Update Data via E-mail.
If the table does not contain any fields, or has fields only of types AutoNumber, OLE Object, Attachment, or multivalued Lookup, Access displays the message The selected table or query does not have any fields that support collecting data using e-mail.
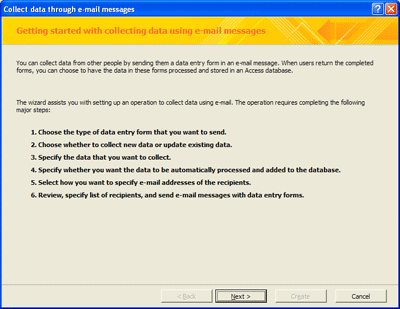
If the table contains fields that support data collection, the wizard starts. The first page of the wizard displays the major steps in the process. If the destination table supports both the adding and the updating of data, you perform six major steps in the wizard:
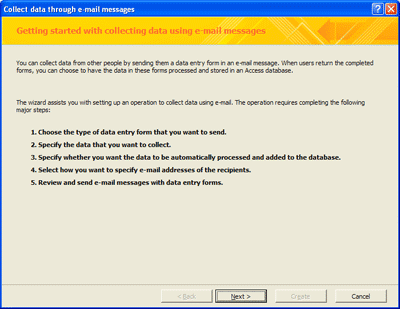
If the object supports only adding records, you perform five major steps:
-
-
Click Next.
The wizard prompts you to select the type of form you want to create.
Choose the type of data entry form
In this step, you must choose to create either an HTML form or an InfoPath form. As mentioned earlier in this article, an Access form cannot be used to collect data through e-mail messages — you must either use an HTML form or an InfoPath form that you create in the wizard.
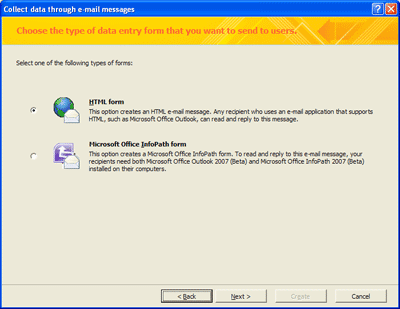
If InfoPath is not installed on your computer, the Microsoft Office InfoPath form option is unavailable.
The type of form that you create depends on two factors — ease of use, and whether all of your recipients have the necessary software installed on their computers. An InfoPath form is much easier to use, but an HTML form involves fewer software requirements.
An InfoPath form offers a better data entry and editing environment. In addition, an InfoPath form can perform preliminary validation of the data when the user clicks the Send button, giving the user a chance to correct incorrect data before they send the reply to you.
To summarize, an InfoPath form has several advantages over an HTML form, but an HTML form can be viewed and edited by any user whose e-mail client supports HTML.
-
In the wizard, select the Microsoft Office InfoPath form option only if all of your recipients have both Office InfoPath 2007 and Office Outlook 2007 installed. Otherwise, select the HTML form option.
-
Click Next.
The wizard page that is displayed next depends on whether the destination object supports the updating of data. If the object is a query based on two or more tables, or if it is a table that does not have a primary key field or does not contain any records, the wizard assumes that you want to add new records, and prompts you to select the form fields. In all other cases, the wizard prompts you to specify whether you want to add or update data before asking you to select the form fields.
If the wizard prompts you to select form fields, skip directly to the Select the form fields section of this article.
Specify what you want to do with the data
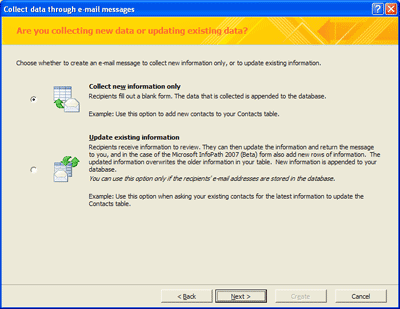
In this step, specify whether you want to add new records to the database or to update existing records.
The type of form that you are using affects the number of new records that a recipient can send to you in a single reply. When updating data, the number of records that must be updated by a recipient identifies the number of pre-completed forms that will be included in a message. The following table summarizes the various scenarios:
| Type of form | Add or update | Result |
| HTML | Add | Recipients will be able to send you no more than one new record in each reply. |
| InfoPath | Add | Recipients will be able to send you multiple new records in each reply. They can do this by clicking Insert a row at the bottom of the e-mail message. Note: After you specify the fields that you want to include in your message, a page in the wizard appears on which you can set several options. On this page, you can set the Outlook folder in which replies will be processed, and also set options for how you want those replies to be processed. |
| HTML | Update | Each e-mail message will include one or more pre-filled forms, depending on the number of records that correspond to a single e-mail address. The recipient will be able to review and update each of the forms in the message. |
| InfoPath | Update | Each e-mail message will include one or more pre-filled forms, depending on the number of records that correspond to a single e-mail address. The recipient will be able to review and update each of the forms in the message. In addition, the user can send additional records by clicking Insert a row at the bottom of the e-mail message. Later in this article, you will learn how to prevent the user from adding new records to an update request. |
-
In the wizard, select Collect new information only or Update existing information.
It is important to note that if your goal is add new records, you can type the e-mail addresses in the address box of the e-mail message when the message is created. However, if your goal is to update existing data, the e-mail addresses of the recipients must be stored as a field in the underlying table or query, or in a related table.
-
Click Next.
The wizard prompts you to select the fields that you want to include in the form.
Select the form fields
In this step, you pick the fields that you want to include in the form.
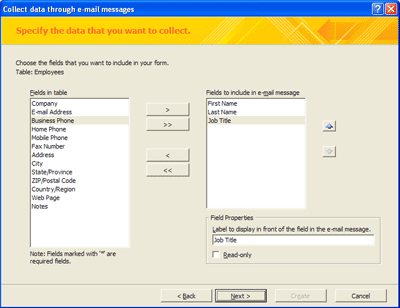
It is not generally necessary to include every field that exists in the underlying table or query in the form. However, there are two exceptions:
-
Required fields If you are collecting new records, the wizard will automatically include all fields whose Required property is set to Yes. If any record's required fields are blank, Access fails to add the record to the table.
-
Unsupported field types You will not be able to include certain fields in the form. The wizard does not support AutoNumber, Attachment, OLE Object, or multivalued lookup fields. Fields of these types will not be displayed in the wizard's Fields in table or Fields in query list. AutoNumber fields in the table will automatically be populated when new records are added. You will have to populate OLE Object, attachment, and multi-valued lookup fields either in Datasheet view or in Form view, because a data collection process cannot add these values.
-
Primary key field The following table summarizes when you will be able to include a primary key field in a form:
| Purpose of collecting data | Data type | Include in form? |
| Add | AutoNumber | No. The primary key value will be generated automatically when the record is added to the table. |
| Add | Not AutoNumber | Yes. The user will be able to type a value in the field when adding records. The reply will not be processed if the specified value is already in use. |
| Update | Either AutoNumber or Not AutoNumber | No. The primary key value can't be edited in the form. This field is used to map each reply to an existing record. |
-
In the Fields in table or Fields in query list, double-click the fields that you want. If you want to include all of the fields, click >>.
-
Use the up and down arrow buttons to rearrange the fields in the Field to include in e-mail message list.
-
For each included field, under Field Properties, specify a caption. Click Read-only if you are updating data and want to display the field for the benefit of the user, but you don't want the user to change the data. The field appears in the e-mail message with the caption This field is read-only. This feature is most useful if the user is updating existing data.
-
Click Next.
The wizard prompts you to specify how you want the replies processed.
Specify how you want to process the data
In this step, you make a very important decision regarding how you want the replies processed — automatically or manually. Note that manual processing in this context does not imply tedious data entry in Datasheet or Form view. It means only that you manually start the export operation to transfer the collected data to the destination table.
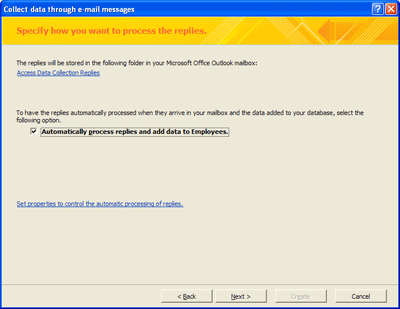
Automatic processing
If you choose to have the replies automatically processed, when the replies reach your mailbox, Outlook and Access work together to export the form contents of each of the replies to the destination tables in your database.
Automatic processing can save you considerable time and effort. Replies are successfully exported as long as the following conditions are met at the time the replies reach your mailbox:
-
Outlook must already be running on your computer. If Outlook is not running, processing starts the next time that you start Outlook.
-
Access must be installed on your computer.
-
The database must not be password-protected, and should not be open in Exclusive mode. The name or location of the database must not have changed since you sent the e-mail message.
-
The names of the tables and queries, and the properties of the fields included in the form, must not have changed since you sent the e-mail message.
-
You must still have the required permissions to add or update the contents of the underlying tables and query.
If one or more of these conditions are not met, automatic processing will fail. If processing fails, try fixing any issues, and then manually export the replies that failed. Any replies that reach your inbox after you resolve the issues continue to be processed automatically.
Allowing only updates to data
If you are updating data and you select the Automatically process replies and add data to check box, the Only allow updates to existing data check box becomes available. Select the check box if you don't want the user to be able to send new records. If you are only adding new data, the Only allow updates to existing data check box is not visible.
Manual processing
If you want to control when and which replies are processed, clear the Automatically process replies and add data to check box. In this case, the replies reach your inbox, but are not transferred to the database. You must manually select and right-click each reply in Outlook, and then click Export data to Microsoft Access in the shortcut menu to populate the database.
You might also have to manually process the replies that failed to be processed automatically. After you resolve the issue that caused the failure, you must manually export each of the existing replies.
Remember the following before you start an export operation:
-
Office Access 2007 must be installed on the computer.
-
If the database is password-protected, you are prompted to enter the password when you start the export operation. Also, the database should not be open in exclusive mode, and the name or location of the database must not have changed since you sent the e-mail message.
-
The names of the tables and queries, and the properties of the fields included in the form, must not have changed since you sent the e-mail message.
-
You must have the required permissions to add or update the contents of the underlying tables and query.
Specifying additional processing options
-
On the Specify how you want to process the replies page of the wizard, review the name of the Outlook folder where replies are stored. If you want to specify a different folder for the replies to this data collection request, click the folder name. In the Select Folder dialog box, either select a different folder, or click New to create a new folder. Click OK, and then switch back to Access.
-
Click Set properties to control the automatic processing of replies to display the Collecting Data Using E-mail Options dialog box.
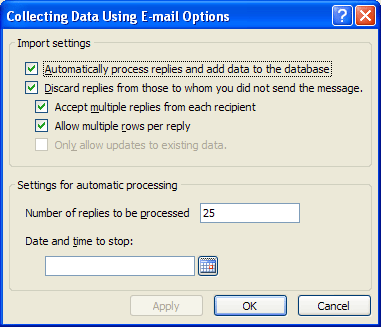
Use this dialog box to specify how you want the replies processed. If you want to manually process the replies, skip the next step.
-
In the Collecting Data Using E-mail Options dialog box, review and, if necessary, change the settings in any of the following ways, and then click OK:
-
Discard replies from those to whom you did not send the message Select this check box if you want only those replies that were sent by the original recipients of your message to be automatically processed. Replies from other people are stored in the destination folder, but are not automatically processed.
-
Accept multiple replies from each recipient A recipient can send you multiple replies. Select this check box if you want only the first reply from each recipient to be processed automatically. The second and subsequent replies are stored in the destination folder, but are not automatically processed.
Note: This setting only controls the number of replies, and not the number of records within a single reply, that are processed. In other words, if you send an InfoPath form, a user is able to send you multiple records in a single reply, and Access automatically processes all of the records in the reply, even if this check box is not selected.
-
Only allow updates to existing data When recipients use an InfoPath form to update data, they can send you new records in addition to updates to existing records. Select this check box if you want to process only the updates to existing records.
-
Number of replies to be processed Type the total number of replies (from all recipients) that you want automatically processed. If you want all replies to be automatically processed, enter a large value, such as 5000, in the text box. Replies that are received after the specified value is reached are stored in the destination folder, but are not automatically processed.
-
Date and time to stop Specify when automatic processing of replies should stop for this e-mail message. Replies received after this date and time are stored in the destination folder, but are not automatically processed.
Note: To change these options at a later date, on the External Data tab, in the Collect Data group, click Manage Replies. In the Manage Data Collection Messages dialog box, select the message for which you want to change the settings, and then click Message Options. The changes you make in the dialog box affect all subsequent replies that you receive for that message.
-
-
Click OK, and then click Close.
The next step depends on whether you are adding data or updating it. If you are adding new records, continue with the next section. If you are collecting data to update existing records, skip to the section Specify the e-mail address field.
Select how you want to specify the e-mail addresses of the recipients
If you are collecting new information only, you can specify the e-mail addresses in two ways:
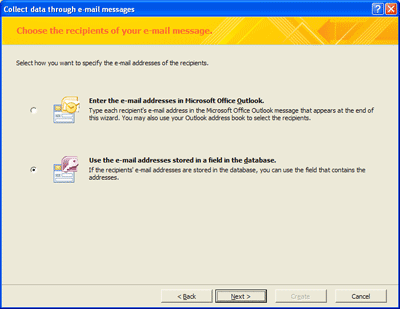
-
Type the addresses individually in the e-mail message that is generated by the wizard, or select the addresses from an address book.
-
Use a field in the current database that contains e-mail addresses. The field must be in the underlying table or query, or in a related table.
When you are collecting data to update existing records, you do not see this dialog box, because in that case the recipients' e-mail addresses must be available as a field in the database.
-
In the wizard, select the option that you want.
-
Click Next.
If you are choosing to enter the e-mail addresses yourself, skip to the section Customize the e-mail message. If you are choosing to use a field in the database, continue with the next section.
Specify the e-mail address field
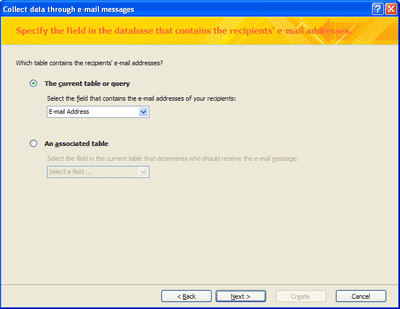
In this step, you specify the field that contains the recipients' e-mail addresses.
-
If the field is in the current table or query, select The current table or query, select the field from the drop-down list, and then click Next.
-
If the field that contains the recipients' e-mail addresses is not in the current table or query, use the following procedure:
-
Select An associated table.
-
In the drop-down list, select the field in the current table that joins it to the table that contains the addresses. This is usually an ID field.
-
Do one of the following:
-
If the field that you select is associated with just one table, one additional drop-down list appears. Select the field that contains the e-mail addresses.
-
If the field that you select is associated with more than one table, two additional drop-down lists appear. In the first list, select the table that contains the e-mail addresses. In the second list, select the field.
-
-
Click Next.
-
Associated tables are those that have relationships defined between them. To view or edit the relationships in your database:
-
On the Database Tools tab, in the Show/Hide group, click Relationships.

For more information about relationships, see the articles Guide to table relationships or Create, edit or delete a relationship.
When you choose to use an address field, you cannot preview or customize the e-mail message in Outlook. Instead, you do this in the wizard. In the next step, the wizard displays the default subject and body of the message, and you have the opportunity to customize it.
Customize the e-mail message
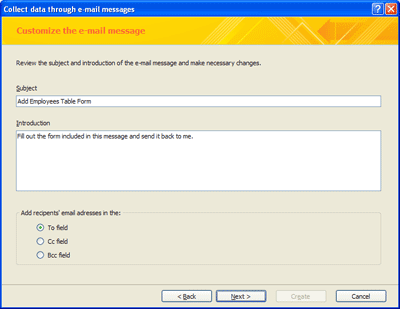
In this step, you review the components of the message and make necessary changes.
-
In the Subject and Introduction fields, make the changes that you want.
-
If you chose to use e-mail addresses that are stored in a field in the database, there is an additional choice you can make on this page. Under Add recipients' e-mail addresses in the:, select one of the options. Regardless of the option that you select, the users will receive the e-mail message. If you chose to enter the e-mail addresses in Microsoft Office Outlook, this choice is not available.
-
Click Next.
Create and send e-mail messages
The wizard displays a page informing you that you can now create the message, and also shows you how to view e-mail status by using the Manage Replies command.
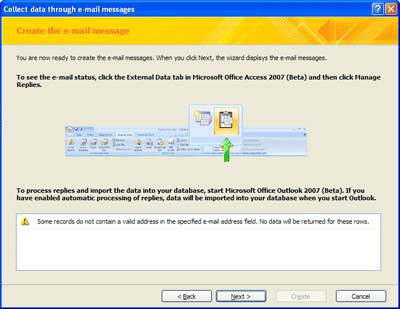
Some warning messages might appear on this page. The following table describes each warning and the action you can take to resolve it.
| Warning | Description | Resolution |
| Some records do not contain a valid address in the specified e-mail address field. No data will be returned for these rows. | The e-mail address field that you selected contains null values. | If you want to collect data for every record, exit the wizard and replace the null values with e-mail addresses. Then start the wizard again. |
| You currently have an exclusive lock on the database; automatic processing will fail until the lock is released. | You have the database currently open in exclusive mode. | If you chose to have the replies automatically processed, processing fails because Access cannot add to or update a database that has an exclusive lock on it. Close and reopen the database in non-exclusive mode immediately after sending the message. |
| These e-mail messages might contain data that is of a confidential or sensitive nature. | You are collecting data to update existing records, and the form that you are about to send will be pre-completed with existing data. | If some form fields include sensitive data, go back to the wizard step where you selected the fields and remove the fields that contain sensitive data from the form. |
The next steps you take depend on whether you are specifying the e-mail addresses yourself, or whether you are using addresses stored in a table in your database.
If you are choosing to specify the addresses in the Outlook e-mail message
In this scenario, you enter the e-mail addresses in Outlook, and can preview and customize the message before clicking the Send button.
-
Click Create to continue.
An Outlook message containing a data entry form is displayed. The message body includes a brief introduction and a form containing controls and hints. It is highly recommended that you do not make any changes to the message body. If the form structure is altered, the reply might fail to be processed.
-
Type the e-mail addresses of the recipients in the To, Cc, or Bcc boxes. You can also click the To, Cc, or Bcc buttons to select addresses from an address book.
-
Click Send.
If you are choosing to use an address field stored in the database
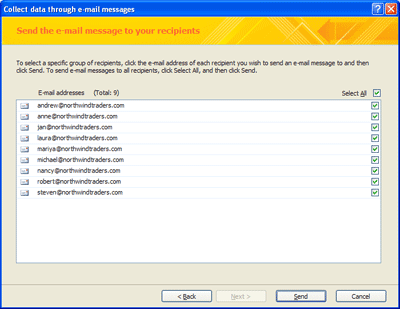
In this scenario, you have already previewed and customized the message. You now filter the e-mail address field so that you can select the addresses of users to whom the message is sent.
-
Click Next to display the Send the e-mail message to your recipients page.
-
Choose the e-mail addresses that you want to use by selecting the corresponding check boxes.
-
Click Send.
If some of the values in the address field are not valid e-mail addresses, a dialog box listing the invalid addresses is displayed. In this situation, make a note of the addresses in the list, click Exit, verify the addresses, and then try sending the message again. For more information about resending messages, see the section Resending a data collection e-mail message.
You have now completed most of the work that is involved in collecting data by using e-mail messages. If you have chosen to have the replies automatically processed, and if no errors occur, the data will be transferred to the destination database without any further action on your part.
On the other hand, if you have chosen to manually process the replies, or if errors occur, you still have actions to take. See the next section for more information about manual processing of replies, troubleshooting, and general management of data collection messages and replies.
After you send the e-mail message
To respond to the e-mail message, each recipient clicks Reply, fills in the requested information on the form, and then clicks Send. This section tells you how to view the replies and what to do if any of them are not processed correctly.
In this section
You can also find links to more information about managing replies and changing message options in the See Also section.
Viewing replies
Regardless of how you chose to have the replies processed, you might be interested in finding out who responded to your message, and you might also want to open the replies manually. To view the replies, do the following:
-
Switch to Outlook, and then browse to the folder that you designated for storing data collection replies.
Tip: If you don't remember the name of the folder, on the External Data tab, in the Collect Data group, click Manage Replies. In the Manage Data Collection Messages dialog box, you will find the folder name in the Outlook Folder column, in the row corresponding to the message whose replies you want to view.
-
To open a reply in Outlook, double-click it. You will see the form, as it was completed by the sender.
Access will not process replies to an original reply message. Therefore, if you see that one or more forms from recipients are empty, incomplete, or not completed properly, you must resend the original e-mail message to those users, instead of using the Reply command.
Similarly, if you want to send the request to additional people, you must resend the original message, instead of forwarding it. See the section Resending a data collection e-mail message for more information.
Verifying and troubleshooting automatic processing of replies
If you are choosing to have your replies automatically processed, do the following to ensure that replies are processed correctly:
-
For each reply, review the values in the Follow Up Flag, Data Collection Status, and Categories columns.
Tip: If you don't see the columns Follow Up Flag, Data Collection Status, and Categories in your view, add them by using the Field Chooser. Right-click the column header, and then click Field Chooser. In the Field Chooser dialog box, drag each field and drop it to the right or left of an existing column header.
In the Outlook folder, if the Follow Up Flag is set to Data Collection operation was successful, the Data Collection Status column is blank, and there is a green indicator in the Categories column, the reply was successfully processed.
-
Additionally, you might want to review the contents of the destination tables to make sure that you see the collected data stored either as new records or as updates to existing records.
If you suspect that a reply was not automatically processed, verify that all of the conditions necessary for processing have been met. See the section Automatic processing, earlier in this article. Then try the suggestions presented in the following table. Most suggestions require fixing the issue and then manually exporting the reply. For help with manual exporting, see the next section, Manually processing replies and troubleshooting errors.
| Issue | Cause | Resolution |
| A reply exists in the Outlook folder, but was not processed. The Data Collection Status column displays Message unprocessed. | Review the message options in the Collecting Data Using E-mail Options dialog box. Settings are selected either for manually processing the replies, or to prevent certain replies from being automatically processed. Tip: To display the options, on the External Data tab, in the Collect Data group, click Manage Replies. In the dialog box, select the message that you want, and then click Message options. | Manually export the reply. To make sure that replies not yet received are processed automatically, change the settings in the options dialog box. For help with reviewing and changing the options, see the article Data Collection E-mail Options . |
| I replied to one of my messages, but it is not getting processed. | Replying to your own message involves a slightly different procedure. | Instead of filling out the form in the message that you receive, fill out the form that is in the sent message found in the Sent Items folder. Browse to the Sent Items folder, and then open the message. Click Reply, fill out the form, and then click Send. |
| A reply is not going to the right folder. | Only original replies to a message go to the designated folder. Your replies to your own messages (unless you used the copy of the message in the Sent Items folder to generate the reply) and replies that are part of an e-mail message thread used for discussion might not move to the designated folder. Other possible reasons include: that Office Access 2007 is not installed, or that the add-in that is required to process the replies is either missing or corrupt. | If one of your replies isn't getting processed, fill out the form that is in the sent message found in the Sent Items folder. If a user filled out a form in a reply to a reply, ask the user to reply to the original message. If you suspect that the add-in is either missing or corrupt, switch to Outlook, and then on the Tools menu, click Trust Center, and then click Add-ins. Ensure that you see the item Microsoft Access Outlook Add-in for Data Collection and Publishing. If you don't see the entry, try installing Access again. |
| The Data Collection Status column displays the following string: Cannot find the database. Locate the database and manually import the data. | The database has either been moved to another location, been renamed or deleted, or become corrupt. | Restore the database to the original location, and manually export the reply. |
| The Data Collection Status column displays the following string: Cannot open database for importing data because the database is already in use. Manually process the replies after the database becomes available. | The database is open in exclusive mode, and changes cannot be made to the database until the exclusive lock is released. | Ask the user who has the database open in exclusive mode to close and open the database in normal mode. Then try manually exporting the reply. |
| The Data Collection Status column displays the following string: This Access database is protected with a password. Please manually export this data to Microsoft Access. | The destination database is password-protected. Automatic processing fails if the database requires a password. | Manually export the reply. If you want future replies to be processed automatically, remove the password protection from the database. |
| The Data Collection Status column displays a message that indicates that either a table, a query, or a field is missing. | Either the destination table or query has been deleted or renamed, or the structure has been modified in such a way that the contents of the form cannot be added to the tables. | Recreate the destination tables and queries, or create and send a new data collection message. |
| The Data Collection Status column displays the following string: Cannot process this e-mail message. The form in this e-mail message is either corrupt or has been modified. | Either the form in the reply is corrupt, or someone (the recipient or the sender) modified the form. | If the recipient modified the form, ask the recipient to resend the form to you, and then manually export the reply. If the form in the original message is corrupt or not valid, you must create and send a new message. |
| The Data Collection Status column displays the following string: Cannot find the information necessary to complete processing in the specified database. | The information necessary for mapping the reply to the existing record that must be updated is missing. | The message settings need to be synchronized with Outlook. In Access, on the External Data tab, in the Collect Data group, click Manage Replies. In the Manage Replies dialog box, select the message. Under Message Details, Access displays a warning box. Click the warning to synchronize the settings, and then close the dialog box. Switch back to Outlook, and then try manually exporting the reply. |
| The Data Collection Status column displays the following string: Cannot add or update data because the data would result in a duplicate value in a field that only accepts unique values. | A field whose Indexed property is set to Yes (No Duplicates) cannot contain duplicate values. If the value assigned to the form field already exists in the corresponding field in the table, the operation will fail. | Ask the recipient to send another reply, with a different value in the form field. |
| The Data Collection Status column displays the following string: The value you entered isn't an item in the list of choices... | Either the form includes a required field that looks up values, but the user did not specify a value for the field, or the field's LimitToList property is set to Yes, but the user specified a value that is not in the list. | Either ask the recipient to resend the reply after filling out all of the fields, or fill out and save the form yourself, and then try exporting again. |
| The Data Collection Status column displays a message that indicates that the value specified in a form field is not valid. | The recipient entered invalid data in one or more fields. | Either ask the recipient to resend the reply after filling out all of the fields, or fill out and save the form yourself, and then trying exporting again. |
| The Data Collection Status column displays the following string: This message contains a form you need to fill out. When you are done, send it to the sender of this e-mail message. | The recipient did not fill out the form. | Ask the recipient to send another reply after filling out the form. |
Manually processing replies and troubleshooting errors
Manual processing of a reply involves starting the export operation from Outlook.
You can only export one reply at a time. Avoid replies for which the Data Collection Status column is set to Collecting data using e-mail was successful. This status indicates that the reply has already been successfully processed. Replies for which the Data Collection Status column is set to Message unprocessed must be processed manually. A reply that has an error message in this column has failed to be automatically processed, and will require some troubleshooting before you can manually export it. See the previous section, Verifying and troubleshooting automatic processing of replies, for help with troubleshooting.
-
In Outlook, right-click the reply that you want to process manually.
-
Click Export data to Microsoft Office Access.
-
In the Export data to Microsoft Access dialog box, review the details of the reply, and then click OK to export.
If the export operation succeeds, you see the message Data successfully exported to the database. If the operation fails, you see the message Cannot import data due to errors, followed by a description of the issues that caused the failure. The following table lists the issues that might cause an export operation to fail:
| Issue | Cause | Resolution |
| When I right-click a reply, I don't see the Export data to Microsoft Access command. | The selected message is not a valid data collection reply. | Delete messages that are not data collection replies from the designated folder. |
| A reply is not going to the right folder. | Only original replies to a message will go to the designated folder. Your replies to your own messages (unless you used the copy of the message in the Sent Items folder to generate the reply) and replies that are part of an e-mail message thread used for discussion might not move to the designated folder. Other possible reasons include: that Access is not installed, or that the add-in that is required to process the replies is either missing or corrupt. | If one of your replies isn't getting processed, fill out the form that is in the sent message found in the Sent Items folder. If a user filled out a form in a reply to a reply, ask the user to reply to the original message. If you suspect that the add-in is either missing or corrupt, switch to Outlook. In Outlook, on the Tools menu, click Trust Center, and then click Add-ins. Ensure that you see the item Microsoft Access Outlook Add-in for Data Collection and Publishing. If you don't see the entry, try installing Access again. |
| Message: Cannot find the database. Locate the database and manually import the data. | The database has either been moved to another location, been renamed or deleted, or become corrupt. | Restore the database to the original location, and then try again. |
| Message: The database is already in use. | The database is open in exclusive mode, and changes cannot be made to the database until the exclusive lock is released. | Ask the user who has the database open in exclusive mode to close and open the database in normal mode. Then try manually exporting the reply. |
| Message: Table, query, or a field is missing. | A destination table or query has either been deleted or renamed, or its structure has been modified in such a way that the contents of the form cannot be added to the tables. | Create the missing destination tables and queries, or create and send a new data collection message. |
| Message: Form is either corrupt or has been modified. | Either the form in the reply is corrupt, or someone (the recipient or the sender) modified the form. | If the recipient modified the form, ask them to resend the form to you, and then manually export the reply. If the form in the original message is corrupt or not valid, you must create and send a new message. |
| Message: Information necessary to complete processing is missing. | The information necessary for mapping the reply to the existing record that must be updated is missing. | The message settings must be synchronized with Outlook. In Access, on the External Data tab, in the Collect Data group, click Manage Replies. In the Manage Replies dialog box, select the message. Under Message Details, Access displays a warning box. Click the warning to synchronize the settings, and then close the dialog box. Switch back to Outlook, and then try manually exporting the reply. |
| Message: Cannot add or update data because the data would result in a duplicate value in a field that only accepts unique values. | A field whose Indexed property is set to Yes (No Duplicates) cannot contain duplicate values. If the value assigned to the form field already exists in the corresponding field in the table, the operation will fail. | Ask the recipient to send another reply, with a different value in the form field. |
| Message: The value you entered isn't an item in the list of choices. | Either the form includes a required field that looks up values, but the user did not specify a value for the field, or the field's LimitToList property is set to Yes and the user specified a value that is not in the list. | Either ask the recipient to resend the reply after filling out all of the fields, or fill out and save the form yourself, and then trying exporting again. |
| Message: Invalid value in a form field. | The recipient entered invalid data in one or more fields. | Either ask the recipient to resend the reply after filling out all of the fields, or fill out and save the form yourself, and then try exporting again. |
| Message: Reply contains a form you need to fill out. When you are done, send it to the sender of this e-mail message. | The recipient did not fill out the form. | Ask the recipient to send another reply after filling out the form. |
Try exporting the reply until the Categories column displays a green square.
Resending a data collection e-mail message
If you want to send the message to additional users, or if the original message did not reach some users due to errors, try resending the message rather than forwarding it.
-
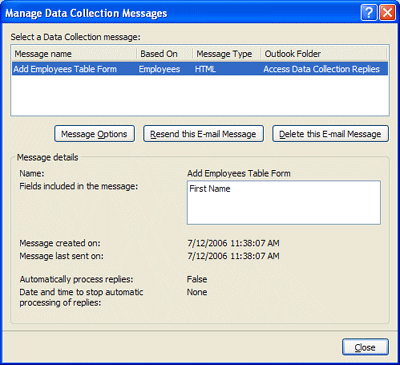
On the External Data tab, in the Collect Data group, click Manage Replies.

The Manage Data Collection Messages dialog box is displayed.
-
In the Manage Data Collection Messages dialog box, click the message that you want to send again.
-
Click Resend this E-mail Message.
If the Resend this E-mail Message button is disabled
This button appears dimmed (unavailable) if message settings must be synchronized with Outlook.
Click the warning box under Message details to synchronize the settings. If the process was successful, you will see the message Synchronization was successful. If you see an error message, try closing and then reopening the dialog box.
-
Access performs certain checks — such as verifying that the destination tables and query still exist, that they still include all of the form fields, and that their data types have not changed. If the checks succeed, the wizard page prompts you to specify how you want the replies processed. Otherwise, you see a message that instructs you to recreate the e-mail message.
-
Continue with the wizard as you did when you first sent the message. The settings can be different from the last time.
To send the e-mail message to different users, do one of the following:
-
Manually specify the e-mail addresses. (Note that this option is available only when you are collecting data to add new records.)
-
Choose a different e-mail address field.
-
Use the same e-mail address field but, in the last step, select only the addresses that you want.
For help with the wizard steps, see the section Specify how you want to process the data, earlier in this article.
-
No comments:
Post a Comment