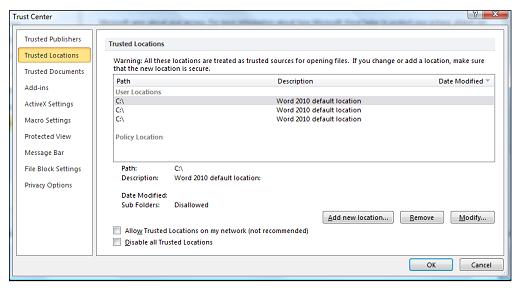
Add, remove, or change a trusted location
You should use a trusted location to store a file when you don't want that file to be checked by the Trust Center, or if you don't want it to open in Protected View. This applies particularly to files with macros, data connections, ActiveX controls (what we call active content). If you think the active content in a file is from a reliable source, it's better to move the file to a trusted location, instead of changing the default Trust Center settings to a less-safe macro security setting.

Add a trusted location
-
Click File > Options.
-
Click Trust Center > Trust Center Settings > Trusted Locations.
-
Click Add new location.
-
Click Browse to find the folder, select a folder, and then click OK.
Remove a trusted location
-
Click File > Options.
-
Click Trust Center > Trust Center Settings > Trusted Locations.
-
Select the location to be removed, and then click Remove, and then click OK.
Change a trusted location
-
Click File > Options.
-
Click Trust Center > Trust Center Settings > Trusted Locations.
-
In the Trusted Locations list, select a location, and then click Modify.
-
Make the modifications you want, and then click OK.
Add a trusted location
-
Click the Microsoft Office Button
 , and then click Access Options.
 -
Click Trust Center, click Trust Center Settings, and then click Trusted Locations.
-
If you want to create a trusted location that is not local to your computer, select the Allow trusted locations on my network (not recommended) check box.
-
Click Add new location.
Important: We recommended that you don't make your entire Documents or My Documents folder a trusted location. Doing so creates a larger target for a hacker to potentially exploit and increases your security risk. Create a subfolder within Documents or My Documents, and make only that folder a trusted location.
-
In the Path box, type the name of the folder that you want to use as a trusted location, or click Browse to locate the folder.
-
If you want to include subfolders as trusted locations, select the Subfolders of this location are also trusted check box.
-
In the Description box, type what you want to describe the purpose of the trusted location.
-
Click OK.
Remove a trusted location
-
Click the Microsoft Office Button
 , and then click Access Options.
 -
Click Trust Center, click Trust Center Settings, and then click Trusted Locations.
-
Under Path, click the trusted location that you want to remove.
-
Click Remove, and then click OK.
Change a trusted location
-
Click the Microsoft Office Button
 , and then click <Your Office Program> Options.
 -
Click Trust Center, click Trust Center Settings, and then click Trusted Locations.
-
Under Path, click the trusted location that you want to change.
-
Click Modify, and then click OK.
-
In the Path box, type the name of the folder that you want to use as a trusted location, or click Browse to locate the folder.
-
If you want to include subfolders as trusted locations, select the Subfolders of this location are also trusted check box.
-
In the Description box, type what you want to describe the purpose of the trusted location.
-
Click OK.
No comments:
Post a Comment