Add imported data to shapes
You can import data into a drawing by clicking the Link Data to Shapes command on the Data menu. After importing the data into your drawing, you are ready to link the data to shapes. There are several ways to link imported data to shapes in your drawing. For more information about importing data, see Import data from Excel, SQL Server, SharePoint sites, and other external sources.
What do you want to do?
Link rows of data to existing shapes automatically
This approach is best for existing drawings that contain many shapes.
Important: Your shapes must have text or existing shape data that can be matched with the data in your data source.
-
On the Data menu, click Automatically Link.
-
Follow the steps in the Automatic Link Wizard.
Your data appears in your shapes. To change the appearance of the shapes, see Enhance your data with data graphics.
Drag a row of data onto a shape
This approach is best for existing drawings that contain relatively few shapes.
-
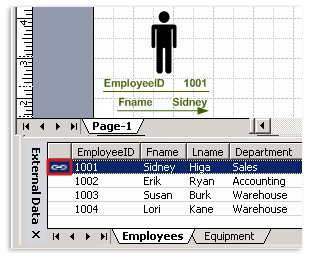
Drag a row from the External Data window onto a shape in your drawing.
Your data appears in the shape, and a link icon appears to the left of the row in the External Data window.

Specific help is available for most wizard pages. To access Help, press F1 or click the Help icon.
Drag a row of data onto a page to create a linked shape
This approach is best if you can use the same shape for many of the rows of data.
-
Click a shape in the Shapes window.
-
Do one of the following:
-
Drag a row or set of rows from the External Data window onto a blank space in your drawing.
-
Select a row or rows in the External Data window, and then press CTRL+ENTER.
One instance of the shape that you click in the Shapes window appears on the drawing for each row that you drag onto the page.
Notes:
-
If you do not select a master on a stencil, the Data Link feature uses the first master in that stencil.
-
If you don't have a stencil open in the Shapes window, the Data Link feature uses a default rectangle.
-
If you selected multiple masters in a stencil, the Data Link feature places one shape for each master, each one with the same data.
-
-
Link one row of data to multiple shapes or to parts of a complex shape
This approach is best if you want to use the same data in many shapes or if you want to link a row to a subshape (one part of a shape made of multiple shapes).
-
Select the shapes or subshape in your drawing that you want to link data to.
-
Right-click the row that you want to link to the shapes or subshape, and then click Link to Selected Shapes on the shortcut menu.
Choose whether to replace existing data
-
In the External Data window, right-click the tab of the data source that you want to change, and then click Properties on the shortcut menu.
-
In the Properties window, select one of the following:
-
Prompt me when linking to a shape with existing links
-
Always replace existing links when linking
-
Never replace existing links when linking
-
No comments:
Post a Comment