Send automatic Out of Office replies from Outlook for Mac
You can send automatic (Out of Office) replies from Outlook whenever you want to let people who send you email know that you won't be responding to their messages right away.
There are two different ways to set up automatic replies. The method you choose depends on the type of email account you have in Outlook.
Click here if you have an Exchange account
You can set up automatic replies for when you're out of the office and specify an end date so that the replies will stop automatically when you return, or you can manually turn off automatic replies.
Set up automatic replies when you're out of the office-
At the bottom left corner of the of the navigation pane, click Mail.

-
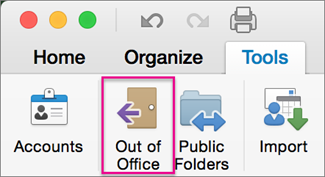
On the Tools tab, click Out of Office.
-
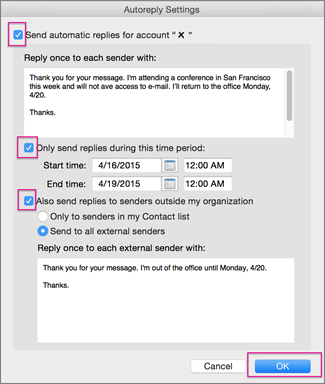
In the Autoreply Settings box, check the Send automatic replies for account "X" box (where "X" is the account you'd like to send out of office replies from).
-
Under Reply once to each sender with, enter your automatic reply.
-
To set the start and end dates, select the Only send replies during this time period check box, and enter the start and end dates and times.
Note: When you check this box and set start and end dates and times, your out of office replies will turn off automatically when the end date and time occurs.
-
To set options for replying to people outside your organization (if it is enabled by your Exchange administrator), check the Also send replies to senders outside my organization box, select Send to all external senders, and under Reply once to each external sender with, enter your automatic reply.
-
Click OK.
-
At the bottom left corner of the of the navigation pane, click Mail.

-
On the Tools tab, click Out of Office.

-
Clear the Send automatic replies for account "X" box (where "X" is the account you'd like to turn off Out of Office replies for).
Click here if you have an Outlook.com, Hotmail, Gmail, Yahoo! or other POP or IMAP account
You can set up an mail rule in Outlook to automatically reply to new email messages. You can set up mail rules for all account types in Outlook, including Exchange, POP, and IMAP accounts.
Important: Because email rules are run by Outlook and not the mail server, your computer must be turned on and Outlook must be open for automatic reply messages to be sent.
-
At the bottom left corner of the of the navigation pane, click Mail.

-
On the Organize tab, click Rules, and select Edit Rules.
-
In the left pane of the Rules box, click the account type that you want to create the rule for, such as Exchange, IMAP, or POP.
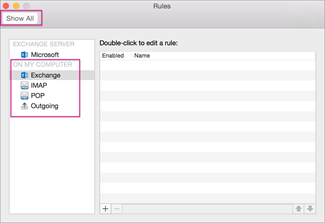
Tip: If you don't know what type of account you have, see I'm not sure what type of account I have, and then return to step 4 in this section.
-
In the Rules box, click Add a rule
 .
. -
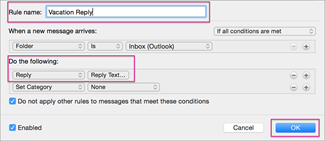
In the Rule name box, type a name for the rule, such as Vacation Reply.
-
Under Do the following, click the Change status button, and choose Reply.
-
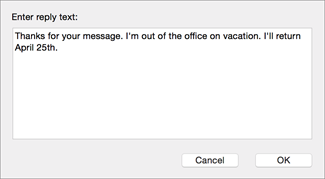
Click Reply Text, and type the automated reply that you want Outlook to send, and click OK.
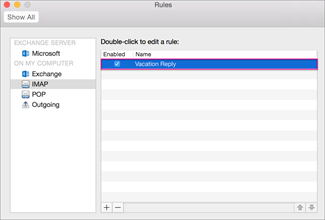
In the Rules box, you'll see the Vacation Reply rule you created.
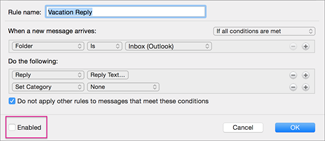
Note: Outlook will send automatic replies based on the rule you created until you manually turn off the email rule.
-
At the bottom of the navigation pane, click Mail.

-
On the Organize tab, click Rules, and then click Edit Rules.
-
In the Rules box, double-click the rule you want to turn off.

-
Clear the Enabled check box, and click OK.
Click here if you're not sure what type of account you have
-
At the bottom left corner of the of the navigation pane, click Mail.

-
On the Organize tab, click Rules, and select Edit Rules.
-
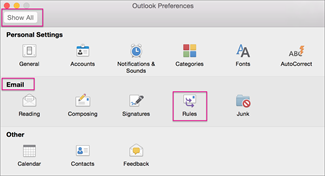
In the Rules box, click Show All.

-
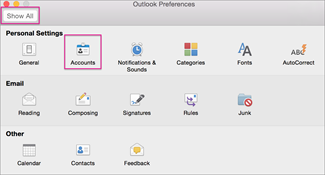
In the Outlook Preferences box, under Personal Settings, click Accounts.
-
In the Accounts box, in the left pane, click the account.
-
To return to the Rules box, click Show All, and then under Email, click Rules.
-
To configure an automatic reply rule, go to step 4 in I have an Outlook.com, Hotmail, Gmail, Yahoo! or other POP or IMAP account. To set up an Out of Office reply for an Exchange server account, go to I have an Exchange server account.
See also
There are two different ways to set up automatic replies. The method you choose depends on the type of email account you have in Outlook.
Click here if you have an Exchange account
-
At the bottom of the navigation pane, click Mail
 .
.Note: If you have multiple Exchange accounts, you must turn the Out of Office Assistant on or off for each account separately. To choose an account for which you want to turn on the Out of Office Assistant, select a folder in the account in the folder list before you continue to the next step.
-
On the Tools tab, click Out of Office.

-
Click Send Out of Office messages.
-
In the Reply to message with box, type the text that you want to include in your automatic reply.
-
Do either of the following.
To
Do this
Set start and end dates for an Out of Office message
Select the I am out of the office between check box, and then set your Start date and End date.
Set options for replying outside your organization (if enabled by your Microsoft Exchange administrator)
Select the Send replies outside my company to check box, and then complete the information.
The Out of Office Assistant works with the server that is running Microsoft Exchange Server to automatically reply to email messages while you are out of the office. Because the Exchange server sends the messages (not Outlook), Outlook does not need to be open for the reply messages to be sent.
Note: Your delegate cannot turn on or turn off the Out of Office Assistant for you.
-
At the bottom of the navigation pane, click Mail
 .
.Note: If you have multiple Exchange accounts, you must turn the Out of Office Assistant on or off for each account separately. To choose an account for which you want to turn off the Out of Office Assistant, select a folder in the account in the folder list before you continue to the next step.
-
On the Tools tab, click Out of Office.

-
Click Do not send Out of Office messages.
Tip: If you set a start and end date for your Out of Office message, it will turn off automatically when it reaches the end date. If you want to turn off the Out of Office message before the end date, click Do not send Out of Office messages.
Click here if you have a POP or IMAP email account
You can set up an email rule in Outlook to automatically reply to new email messages. Rules can be set up for all account types in Outlook, including POP and IMAP accounts.
Important: Because email rules are run by Outlook and not the mail server, your computer must be on and Outlook must be open for automatic reply messages to be sent.
-
At the bottom of the navigation pane, click Mail
 .
. -
On the Organize tab, click Rules, and then click Edit Rules.

-
In the left pane of the Rules dialog box, click the account type for which you want to create the rule. If you don't know which type of account you have, go to I'm not sure what kind of account I have.
-
Click Add
 .
. -
In the Rule name box, type a name for the rule, such as Vacation response.
-
Under the Add Action button, on the Change status pop-up menu, click Reply.
-
Click Reply Text, type the automated reply that you want Outlook to send, and then click OK.
-
Make sure that the Enabled check box is selected, and then click OK.
-
To turn off the automatic reply messages, double-click the rule to open it, and then clear the Enabled check box.
Tip: You can also turn off a rule by clearing the check box next to the name of the rule in the Rules dialog box.
-
At the bottom of the navigation pane, click Mail
 .
. -
On the Organize tab, click Rules, and then click Edit Rules.

-
In the left pane of the Rules dialog box, click the account type for which you want to create the rule. If you don't know which type of account you have, go to I'm not sure what kind of account I have.
-
Double-click the rule to open it, and then clear the Enabled check box.
Tip: You can also turn off a rule by clearing the check box next to the name of the rule in the Rules dialog box.
Click here if you're not sure what kind of account you have
-
In the Rules dialog box, click Show All, and then under Personal Settings, click Accounts.
-
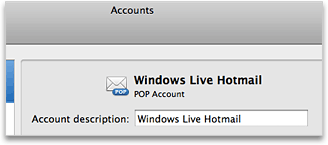
In the left pane of the Accounts dialog box, click the account.The account type appears under the account description. In this example, the account is a POP account.
-
To return to the Rules dialog box, click Show All, and then under Email, click Rules.
See also
Create or edit a rule in Outlook for Mac 2011
microsoft office 2010 professional (Retail License this specialised and efficient tool to enhance business productivity in a quick and easy way. Get your favourite applications to be downloaded absolutely free, which includes Word, Excel, Power-point, One-note, Outlook, Publisher and Access, Office 2010 Professional, streamlines all business needs from sales tracking, data analysis and budget-building to ad creation, business reports and customer newsletters with a single, high-performance Office suite.
ReplyDelete